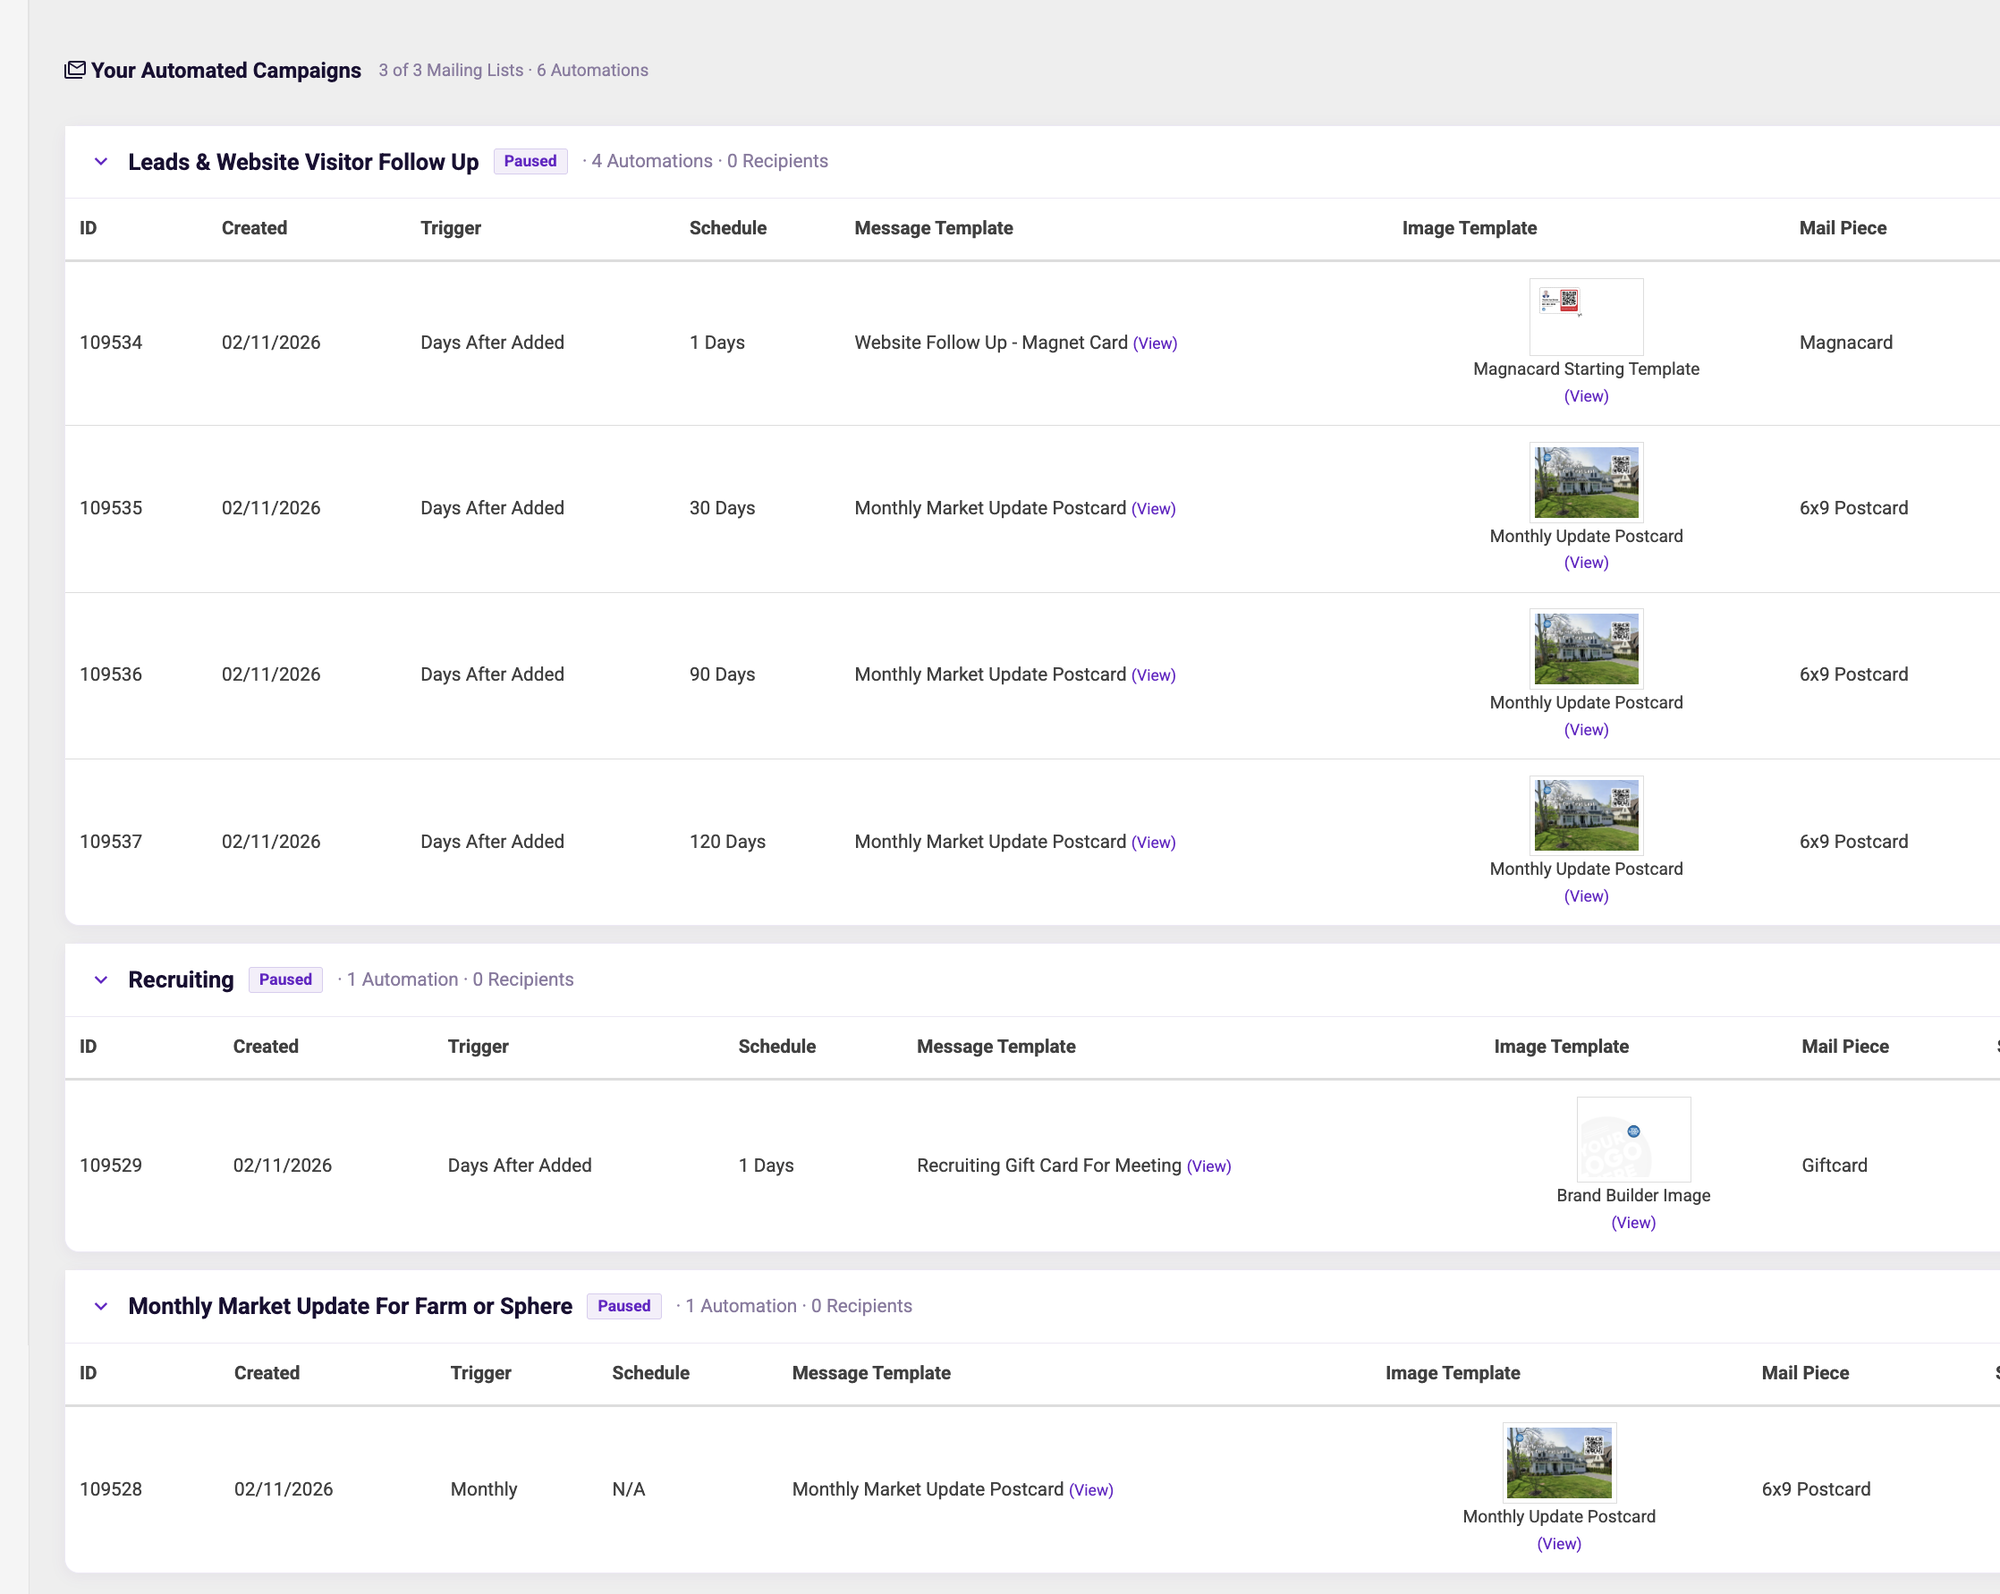
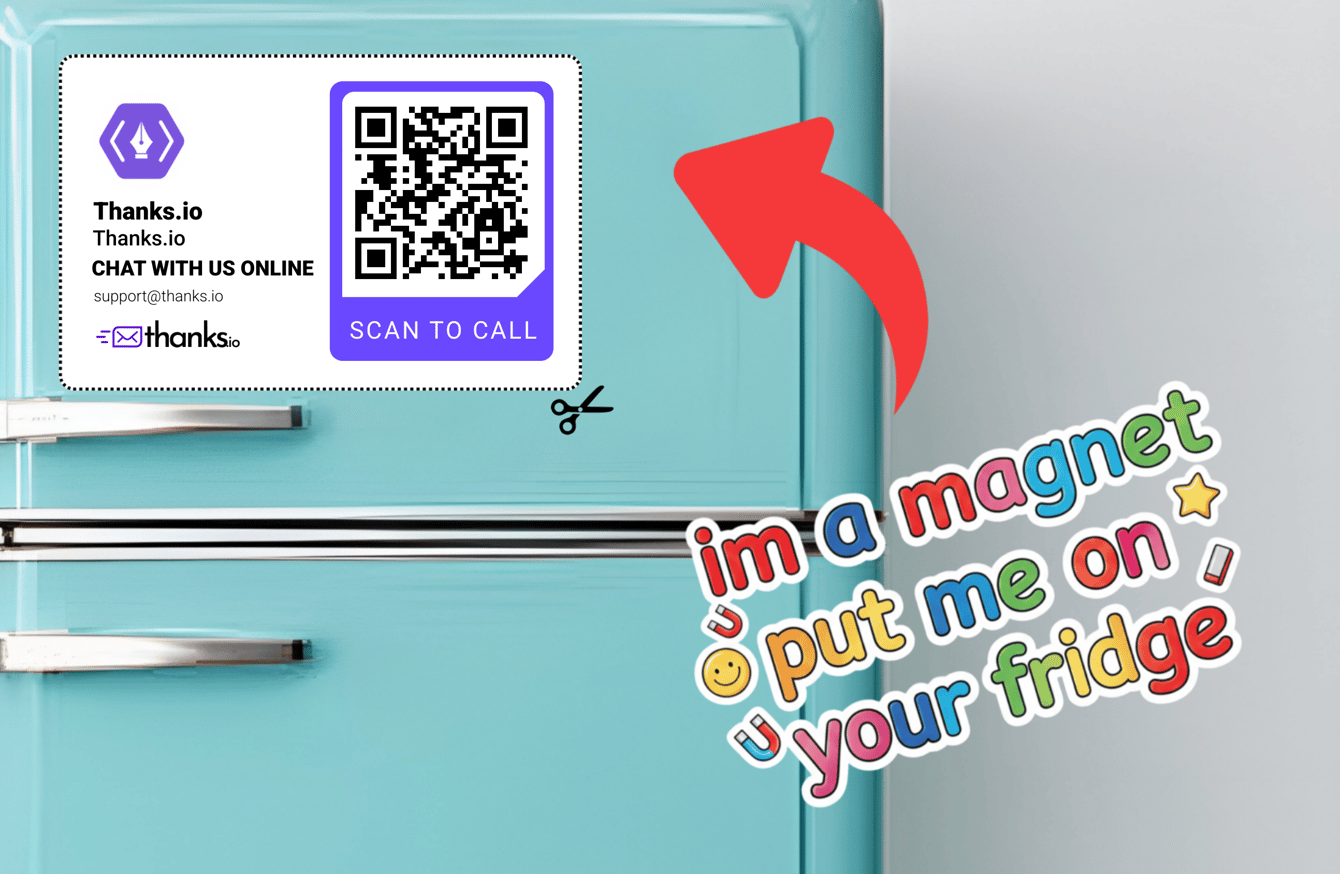
# thanks.io Help Center > Guides, FAQs, and how-tos for AI-automated direct mail. thanks.io is a direct-mail automation platform — send postcards, letters, Notecards, gift cards, and MagnaCards via dashboard, REST API, or integrations like Zapier and Make. This file contains all documentation content in a single document following the llmstxt.org standard. ## Welcome Video & "The Basics" If you'd like help getting going, email [support@thanks.io](mailto:support@thanks.io) or [schedule a concierge session](http://calendly.com/thanks-io) anytime. ### **THE BASICS** **Creating Message Templates** **Creating Image Templates** **Creating Mailing Lists** **Bringing It All Together -- Quickly Sending Once Your Templates Are Built** --- ## Choosing a Mailer Type # Choosing a Mailer Type ## What it is thanks.io offers five mailer types. Each one has a different physical format, price point, and ideal use case. Picking the right type before you design saves time and ensures your mail lands the way you intend. ## Mailer comparison | Type | Size / Format | Best for | Stamp type | First Class option | |---|---|---|---|---| | Postcard 4×6 | 4 × 6 in | High-volume outreach, promotions | Metered | Yes | | Postcard 6×9 | 6 × 9 in | Neighborhood farming, real estate | Metered | Yes | | Postcard 6×11 | 6 × 11 in | Bold visuals, maximum print area | Metered | Yes | | Letter (windowed) | 8.5 × 11 in | Formal communications, B2B | Metered | Yes | | Letter (windowless) | 8.5 × 11 in | Full-bleed design, newsletters, PDFs | Metered | Yes | | Notecard | 5 × 4 in folded | Premium touches, VIP clients | Real stamp | Yes | | Gift Card | Branded card | Appreciation, win-back, gifting | Real stamp | Yes | | MagnaCard | 6 × 9 in magnetic | Staying power - sticks to fridges | Metered | Yes | :::note For current per-piece pricing on each type, see [thanks.io/pricing](https://www.thanks.io/pricing). ::: ## When to pick each type **4×6 Postcard** - Your go-to for cost-efficient, high-volume sends. Great for e-commerce post-purchase thank-yous, drip campaigns, and lead follow-up. **6×9 Postcard** - More visual space than 4×6 with a stronger presence in the mailbox. Popular for real estate neighborhood farming, local service businesses, and promotions. **6×11 Postcard** - Maximum postcard real estate. Use it when your design needs room - event announcements, luxury brands, or campaigns where standing out is the priority. **Windowed Letter** - The recipient's address shows through a window in the envelope. Best for formal, professional communications. Commonly used by nonprofits, financial services, and B2B outreach. **Windowless Letter** - A full-bleed printed letter with complete design control. Supports multi-page PDFs. Use it for newsletters, long-form content, or any letter where you want full design freedom. **Notecard** - A 5.5x8.5 folded card with a real postage stamp. The most personal-feeling format. Use it for VIP client touches, post-meeting thank-yous, and high-value relationship moments. **Gift Card** - A branded gift card delivered by mail with a real postage stamp and QR code for redemption. Use it for customer appreciation, win-back offers, and gifting. Note: Gift Cards are exempt from Duplicate Prevention. **MagnaCard** - A 6×9 postcard on magnetic stock. It adheres to refrigerators and metal surfaces, giving it significantly longer staying power than paper mail. Best for local businesses that want their contact details on display for months. ## Tips & best practices - If cost per piece is your primary constraint, start with the 4×6 postcard. - If you want the recipient to keep your mail long-term, use a MagnaCard or Notecard. - For trust-building with cold contacts, a windowed letter feels more formal than a postcard. - Gift Cards generate unusually high response rates because recipients must act to redeem them. - All types support handwritten-style messages - choose AI Fonts and optional Realism Mode to maximize the personal feel. ## Related - [Postcard details](../03-sending-mail/mailer-types/postcards.md) - [Letters & PDF sends](../03-sending-mail/mailer-types/letters.md) - [Plan Comparison](../13-plans-and-billing/plan-comparison.md) --- ## Dashboard Tour # Dashboard Tour ## What it is The thanks.io dashboard at [dashboard.thanks.io](https://dashboard.thanks.io) is your central workspace. Every task - designing mail, managing contacts, running campaigns, reviewing analytics - happens here. ## Send Mail The Send Mail Wizard is where you design and send mail. Click **New Send** from the dashboard home to open it. You choose your mailer type, Image Template, message, and recipients, then review a proof before placing the order. See [Send Mail Wizard Walkthrough](../03-sending-mail/card-builder-walkthrough.md) for a step-by-step guide. ## Mailing Lists Mailing Lists store your recipients. You can create multiple lists, upload recipients via CSV, verify addresses, apply suppression, and segment contacts for targeted sends or campaigns. Each list can also power an Address Collection Landing Page - a thanks.io-hosted URL you share with contacts to collect their physical addresses. ## Automated Campaigns Automated Campaigns automate your sending based on triggers. The index groups automations by their bound mailing list - each group shows all automations for that list with their trigger, schedule, templates, and status. - **Days After Added** - sends mail N days after a recipient is added to a list. - **Birthday** - sends mail 10 days before a recipient's birthday. - **Anniversary** - sends mail 10 days before a recipient's anniversary (like a house anniversary) - **Holiday** - sends mail on or around a specified holiday. - **Neighbor Blast** - sends to addresses within a radius of a specified property. - **evenFLOW** - paces sending to a daily limit, optionally looping through the list. ## Templates **Image Templates** - the primary visual design of your mail. Created in the thanks.io editor, uploaded as files, or synced directly from Canva. **Message & QR Templates** - the message body, QR code configuration, and replacement variables. Supports AI Fonts, Realism Mode, and Rate My Content scoring. ## Analytics This section shows scan data from your QR codes. You can view scan rates by Image Template and mailing list, and configure scan notifications (email, text, webhook). ## Integrations Connect thanks.io to your existing tools. Native integrations include HubSpot, Canva, HighLevel, and more. You can also configure API access, webhooks, and Zapier/Make connections here. ## Account & Settings Manage your account name, billing, password, two-factor authentication, email notification preferences, and the Branding Builder (your company logo, contact details, and "Scan Me" background used across templates). ## Sub-accounts Sub-accounts let you create separate scoped tenants under your main account - each with its own lists, templates, campaigns, orders, and webhooks. Useful for agencies managing multiple clients. ## Tips & best practices - Use the Branding Builder early - it applies your logo and contact info across templates automatically. - Check the audit log under Account settings to troubleshoot API or Zapier activity. - Run Rate My Content on new Message Templates before launching a campaign. ## Related - [Sign Up and Send Your First Mailer](./sign-up-and-first-send.md) - [Send Mail Wizard Walkthrough](../03-sending-mail/card-builder-walkthrough.md) - [Plan Comparison](../13-plans-and-billing/plan-comparison.md) --- ## Send Your First Mailer # Send Your First Mailer ## What it is This guide walks you through creating a thanks.io account and placing your first physical mail order - all from the web dashboard. ## When to use it - You're new to thanks.io and want to send something for the first time. - You want to verify the process works end-to-end before committing to a campaign. ## How to do it ### Step 1 - Create your account 1. Go to [https://dashboard.thanks.io/register](https://dashboard.thanks.io/register) and fill in your name and email address. 2. Click Next to continue. --- ## Setup Wizard After entering your email, thanks.io walks you through a three-step setup wizard before you reach the dashboard. ### Step 2 - Enter your address for free samples 1. Enter your mailing address on the first wizard screen. 2. This is used to ship you free physical samples so you can see the print quality before you send to anyone else. ### Step 3 - Choose a plan 1. Review the three plan options: **Free**, **Business**, and **Professional**. 2. Select the plan that fits your needs. You can start on **Free** at no cost and upgrade at any time. 3. If you select **Business** or **Professional**, enter your credit card details on this screen. ### Step 4 - Set up branding 1. Enter your company name and upload a logo. 2. These defaults are used across your mail pieces and populate the Branding Builder automatically. 3. You can update branding at any time from your account settings. --- ## Send Mail Wizard After completing the setup wizard you land on the dashboard. Click **Send Now** to open the Send Mail Wizard and place your first order. ### Step 5 - Click "Send Now" 1. From the dashboard, click the **Send Now** button. 2. This opens the Send Mail Wizard. ### Step 6 - Choose a mailer type 1. Select the physical format you want to send: postcard (4×6, 6×9, or 6×11), letter, Notecard, gift card, or MagnaCard. 2. For your first send, a **4×6 postcard** is the simplest and most affordable option. ### Step 7 - Upload your design 1. Click **Upload** to use your own image file, or browse the pre-built template gallery to pick an existing design. 2. The image you select becomes the front artwork for your mailer. 3. For a first send, choose a gallery template to skip design work entirely. ### Step 8 - Create your message 1. Type your message in the editor. This is the handwritten-style text that appears on the mailer. 2. Use replacement variables like `%FIRST_NAME%` to personalize each piece automatically. ### Step 9 - Enter recipient address 1. Click **Add Recipients**. 2. Enter the recipient's name, street address, city, state/province, and postal code. ### Step 10 - Review and send 1. Check the print-ready proof - confirm the design, message text, and recipient address all look correct. 2. Review the order total, then click **Place Order** to submit. Your order enters the processing queue immediately. You will receive an email confirmation once it is accepted. ## Tips & best practices - Use your own address as the recipient for your first send - that way you can inspect the printed result in person. - Keep your first message short. One clear sentence plus a call-to-action is enough to test the full flow. - Check the proof carefully before confirming. Orders move to print quickly and cancellation is only possible within one hour of placing the order. ## Related - [What is thanks.io?](./what-is-thanks-io.md) - [Send Mail Wizard Walkthrough](../03-sending-mail/card-builder-walkthrough.md) - [Plan Comparison](../13-plans-and-billing/plan-comparison.md) --- ## What is thanks.io? # What is thanks.io? ## What it is thanks.io is a direct-mail automation platform. You use it to design, send, and track physical mail - postcards, letters, Notecards, gift cards, and MagnaCards - through a web dashboard, a REST API, or an integration with your existing tools. Mail is personalized with handwritten-style text rendered by a proprietary digital handwriting engine. Every piece is printed, addressed, and mailed on your behalf. You never touch an envelope. Trusted by 5,000+ businesses since 2017, thanks.io is built around a simple idea: physical mail cuts through digital noise in a way that email and ads cannot. ## When to use it - You want to stand out in a prospect's inbox - but their *physical* mailbox. - You need to send thank-you notes, win-back offers, or neighborhood outreach at scale. - You want automated drip campaigns triggered by CRM events, birthdays, or website visits. - You're building a product workflow (e.g., post-purchase touches) and need a programmable mail API. thanks.io works for solo operators sending a handful of cards and enterprises sending millions of pieces per year. ## The five mailer types at a glance | Type | Size / Format | Best known for | |---|---|---| | Postcard | 4×6, 6×9, or 6×11 | High-volume outreach, promotions, neighborhood farming | | Letter | Windowed or Windowless | Formal communications, long-form content, nonprofits | | Notecard | 5.5x8.5 folded | Premium personal touches, VIP clients, thank-yous | | Gift Card | Branded, real stamp | Customer appreciation, win-back offers, gifting | | MagnaCard | 6×9 magnetic | Maximum staying power - sticks to fridges and metal surfaces | All five types support First Class or Standard postage and international delivery. ## Key capabilities **AI-powered personalization.** AI Fonts with optional Realism Mode produce handwritten-style text that looks personally written. Rate My Content scores your message before you send. Per-recipient AI messaging customizes copy at the individual level. **QR tracking.** Embed a dynamic QR code with a per-recipient URL. Get notified by email, text, or webhook when someone scans. View scan analytics by template and mailing list. **Campaigns.** Automate sends based on triggers: Days After Added (drip), Birthday, Holiday, Neighbor Blast (radius around an address), and evenFLOW (paced daily sending). Set it once; it runs on its own. **API and integrations.** A full REST API lets developers trigger sends programmatically. Native integrations include HubSpot, Canva, HighLevel, and more. Generic automation via Zapier, Make, and 8,000+ connected apps. **Analytics and audit.** Track QR scans in the Global Scan List. Review every API call, dashboard action, and webhook event in the audit log. ## Why physical mail works Inboxes are saturated. Open rates for email continue to fall. A physical postcard lands in someone's hands - it cannot be filtered by an algorithm, and it does not disappear on a swipe. The handwritten-style format amplifies that effect. A piece that looks personally addressed is far more likely to be read than a printed advertisement. :::tip Even a single well-timed Notecard to a high-value client can outperform an entire email sequence. The medium signals effort. ::: ## Related - [Sign Up and Send Your First Mailer](./sign-up-and-first-send.md) - [Choose a Mailer Type](./choosing-a-mailer-type.md) - [Plan Comparison](../13-plans-and-billing/plan-comparison.md) --- ## Absentee Owner Outreach # Absentee Owner Outreach ## Who it's for Real estate agents and investors who want to reach owners of investment properties - rentals, vacant lots, second homes - who live at a different address from their property. ## The play Obtain a list of absentee owner records (mailing address ≠ property address). Mail each owner at their actual home address with a postcard or Notecard that references the investment property they own. The mailer shows a Google Street View photo of *their property* (the investment address), not their home - making the mail feel highly specific and relevant. ## Step-by-step **Send method: Automated Campaigns → Days After Added** - this runs automatically. Set it up once and it fires for everyone you add to the list. ### 1. Get your absentee owner list Sources: - County assessor records (public data, available from most counties) - Data services - thanks.io offers address append and data services; see [Data Services](/account-and-billing/data-services) - Third-party list providers (ListSource, PropStream, ATTOM) Required fields: `First Name`, `Last Name`, **Mailing Address** (where they live), **Property Address** (the investment property). Upload both; the mailing address is where the mail goes. ### 2. Upload to thanks.io Upload your list as a CSV. Map: - `Address`, `City`, `State`, `Zip` → the **mailing address** (where you send the mail) - `Absentee Address`, `Absentee City`, `Absentee State`, `Absentee Postal Code` → the **investment property address** Using the dedicated absentee fields lets you reference the property address with `%ABSENTEE_STREET%` in your message and image templates. You don't need to use custom fields for this. ### 3. Set up Street View on your Image Template 1. In the nav bar, go to **Image Templates**. 2. Click **Dynamic Builder**. 3. Set the Background Image to `~STREET_VIEW~`. 4. Add a header and subheader - for example: - Header: *"Your property at %ABSENTEE_STREET%"* - Subheader: *"Let's talk about what it's worth today."* 5. Save the template. The postcard will show a Google Street View photo of the investment property - not the owner's home. ### 4. Create your Message Templates In the left navigation, go to **Message & QR Templates** and create one template per touch. Use these as starting points: **Day 1:** > Hi %FIRST_NAME%, > > I specialize in working with property owners in this area and noticed you own the property at %ABSENTEE_STREET%. > > If you've been thinking about selling or want to know what it's worth in today's market, I'd love to connect - no pressure. > > Scan the QR code for a free estimate, or call me directly. > > %YOUR_FULL_NAME%, %YOUR_COMPANY% > %YOUR_PHONE% Save each template - you'll select them in the campaign setup below. ### 5. Set up the Days After Added campaign A 2-3 touch sequence over 60 days significantly improves response: | Touch | Day | Format | Message angle | |---|---|---|---| | 1 | Day 1 | Postcard with Subject Property Street View | Initial outreach referencing their investment property | | 2 | Day 30 | Notecard | Warmer follow-up, more personal | | 3 | Day 60 | Postcard or Notecard | Final touch with a market update for their area | To set this up: 1. Go to **Automated Campaigns** in the left navigation. 2. Click **Add Automation**. 3. In the **Add Automation** modal: - **Select What To Send:** choose your postcard or Notecard format. - **Select An Image Template:** choose your Street View image template. - **Select A Message Template:** choose your Day 1 message template. - **Select A Mailing List:** choose your absentee owner list. - In the **Sending trigger** dropdown, select **A Number of Days After a Recipient Is Added**. - Set **Enter Day After Added to List** to **1** (sends the day after they're added). 4. Click **Save and Add Another** to create the Day 30 touch: same list, different message template, enter **30** for the day. 5. Repeat for Day 60. When you add a contact to the list, all three touches fire automatically on schedule. ## Run this play 1. [Upload your list as a CSV](/mailing-lists/csv-upload-and-format) 2. [Create a Street View Image Template](/ai-and-personalization/dynamic-images) 3. [Create Message Templates for each touch](../05-templates-and-design/message-templates.md) 4. [Set up a Days After Added campaign](/campaigns/days-after-added) ## Video Guide ## Related - [Neighbor Blast - Just Listed / Just Sold](./neighbor-blast-just-listed.md) - [Golden Letters](./golden-letters.md) - [Dynamic Images - Street View](/ai-and-personalization/dynamic-images) --- ## AI Handwritten Insurance Newsletters ## Who it's for Insurance agents who want to send monthly newsletters to their book of business without designing a PDF each time. The AI writes a unique, personalized message for each client - printed in a handwritten-style font and mailed as a physical letter. ## The play Instead of a designed PDF newsletter, thanks.io's AI generates a personal, conversational message for each recipient based on a prompt you define. Every client gets a letter that feels like it was written just for them. Pair this with an automated campaign (evenFLOW) and it runs every month without you touching it. ## Why it works A handwritten-style letter stands out from the printed marketing mailers most clients receive. A short, personal note about a topic relevant to their coverage or life stage - like an open enrollment reminder, a seasonal safety tip, or a "just checking in" message - keeps you top of mind between renewals. ## Step-by-step ### 1. Set up your client list Upload your book of business as a CSV with at minimum: `First Name`, `Last Name`, `Address`, `City`, `State`, `Zip`. Add any extra fields you want the AI to reference, such as policy type or renewal month. Save it as a mailing list in thanks.io. ### 2. Create your Message Template In the **Message & QR Templates** section, create a new template. Write a prompt that tells the AI what to say - for example: > *"Write a short, friendly note from an insurance agent checking in with a client. Mention that you are available to review their coverage and answer any questions. Keep it warm and under 150 words."* Use `%FIRST_NAME%` and other [replacement variables](/ai-and-personalization/replacement-variables) to personalize the greeting. Use **Rate My Content** to score and improve your message before saving. ### 3. Choose a handwritten-style font When placing your order or setting up your campaign, select one of thanks.io's [AI Fonts](/ai-and-personalization/ai-fonts-and-realism-mode) to give the letter the look and feel of a handwritten note. ### 4. Set up your campaign Use **evenFLOW** to automate the send. Set it to repeat on a monthly schedule so every client on your list receives a newsletter each month without any manual work. ## Tips - Keep the message short - physical letters are read quickly. Aim for 100-150 words. - Rotate your AI prompt each month to vary the content so clients don't receive the same message twice. - Add a clear call to action at the end - a phone number, QR code link, or a simple "reply to this letter" prompt. ## Related - [Monthly Newsletter Campaign (PDF)](./monthly-newsletter-campaign.md) - [T65 Birthday Campaign](./t65-birthday-campaign.md) - [Replacement Variables](/ai-and-personalization/replacement-variables) - [Rate My Content](/ai-and-personalization/rate-my-content) --- ## Automated Real Estate Campaigns This recorded webinar covers how to build automated direct mail campaigns for real estate from start to finish. It walks through setting up campaigns that fire on their own - Neighbor Blasts for new listings, drip sequences for absentee owners and golden letter prospects, and list-based outreach that runs without manual effort each time. If you're new to thanks.io's automation features or want a comprehensive overview of how real estate agents are using the platform, this is a good place to start. ## Related - [Neighbor Blast - Just Listed / Just Sold](./neighbor-blast-just-listed.md) - [Absentee Owner Outreach](./absentee-owner-outreach.md) - [Golden Letters](./golden-letters.md) - [Campaigns](/campaigns) --- ## AI Generated Real Estate CMA Letters A Comparative Market Analysis (CMA) letter is one of the most effective tools in a real estate agent's prospecting toolkit. It gives a homeowner a data-driven look at what their property might be worth in today's market - and creates a natural reason to start a conversation. With thanks.io's AI message generation, you can send personalized CMA letters at scale. Use the **Real Estate CMA** mode in Message Templates to generate and refine CMA-focused messaging. The AI drafts a unique letter for each recipient based on their name, city, and the replacement variables in your template - no copy-paste required. ## Related - [Golden Letters](./golden-letters.md) - [AI Fonts and Realism Mode](/ai-and-personalization/ai-fonts-and-realism-mode) - [Replacement Variables](/ai-and-personalization/replacement-variables) --- ## Getting Started with Default Campaigns # Default Campaigns for Real Estate Agents Thanks.io includes pre-built automated campaigns designed for real estate agents. All automations run automatically — just add recipients to the corresponding mailing list and the sequences start immediately. ![Automated Campaigns Dashboard](/img/default-campaigns-dashboard.png) ## Leads & Website Visitor Follow Up Nurture new leads with a 4-step sequence over 120 days. | Automation | Trigger | Mail Piece | |---|---|---| | Website Follow Up | 1 day after added | Magnet Card | | Market Update 1 | 30 days after added | Postcard | | Market Update 2 | 90 days after added | Postcard | | Market Update 3 | 120 days after added | Postcard | **When to use:** Add website leads, contact form submissions, and new prospects to this list to automatically send a magnet card hook followed by market updates. ## Recruiting Convert potential agents with a targeted gift sequence. | Automation | Trigger | Mail Piece | |---|---|---| | Gift Card Offer | 1 day after added | Gift Card | **When to use:** Add agent prospects to this list to send a recruiting gift card within 24 hours. ## Monthly Market Update For Farm or Sphere Keep past clients and sphere of influence engaged with regular market data. | Automation | Trigger | Mail Piece | |---|---|---| | Market Update | Monthly | Postcard | **When to use:** Add your past clients, friends, family, and sphere contacts to this list for recurring monthly market updates. ## How to use default campaigns 1. Go to **Automated Campaigns** in the left navigation. 2. Select a default mailing list (e.g., "Leads & Website Visitor Follow Up"). 3. Click **+ Add Recipient** or bulk-import contacts into that list. 4. The automations activate automatically and send on schedule. 5. To pause automations, toggle the status OFF next to each automation; toggle ON to resume. All automations are pre-configured with templates and mail pieces. You can preview any automation before it sends by clicking **Preview** on the automation row. ## Customizing default campaigns Default campaigns are templates. You can: - **Pause automations** by toggling status OFF on individual automations or mailing lists - **Preview** mail pieces before they send - **Edit templates** by clicking the template name to customize message and design - **Move recipients** to other lists after sending (optional setting on each automation) - **Create new automations** in these lists to add more touches For more details, see [Automated Campaigns Overview](./overview.md). --- ## Automated Follow-Ups on Delivery One of the most powerful - but often overlooked - features of thanks.io is the ability to trigger actions in third-party systems the moment a mail piece is delivered. Instead of guessing when to follow up, you can send an automated text or email to your recipient at exactly the right time: when they have your mail in hand. This can be set up directly through the [thanks.io API](https://docs.thanks.io/webhooks/available/order-item-delivered) or using connector apps like Zapier - no coding required with the Zapier route. ## Why it works Most follow-up calls and texts happen on a fixed schedule - 3 days after sending, a week later, etc. Delivery-triggered follow-ups are different: they fire based on when the mail actually arrives, not when it was sent. Your message lands while the recipient is holding your postcard. ## How to set it up **Option 1 - Zapier (no code):** 1. Create a Zap with the thanks.io trigger **Order Item Delivered**. 2. Add an action to send an SMS via your preferred platform (e.g., Twilio, HighLevel, HubSpot). 3. Personalize the message using the recipient data passed by the webhook. **Option 2 - thanks.io API:** Set up the [`order-item-delivered` webhook](https://docs.thanks.io/webhooks/available/order-item-delivered) in your own system to fire your follow-up logic when thanks.io posts the delivery event. ## Tips - Keep your follow-up message short and reference the mail piece directly - "Did you get the card I sent?" or "I wanted to follow up on the letter that just arrived." - This feature requires the **Business Plan**. If you need help getting it set up, [schedule a 1-on-1 implementation session](https://calendly.com/thanks-io/strategysession?back=1). - Pair delivery follow-ups with a QR code on your mailer so you can also track recipients who scan before you even reach out. --- ## Drip to Past Customers # Drip to Past Customers ## Who it's for Any business with a list of past customers who haven't bought again recently. This is typically the highest-ROI mail play - you already have the relationship; you just need to stay visible. ## The play Upload your past customer list. Set up a **Days After Added** campaign with 2-4 touches spread over 60-90 days. Each touch is a warm, personal-feeling message (Notecard or postcard) with a relevant offer or reason to reconnect. The sequence runs automatically for everyone on the list. ## Expected signals - Past customer re-engagement mail typically sees 2-4× higher response rates than cold outreach - QR scan rates on warm customer lists commonly run 4-10% - A 3-touch sequence over 90 days outperforms a single mailer by a significant margin ## Step-by-step **Send method: Automated Campaigns → Days After Added** - set it up once and it fires automatically for everyone on the list. ### 1. Build your past-customer list Export from your CRM, POS, or billing system. Required: `First Name`, `Last Name`, `Address`, `City`, `State`, `Zip`. Optional: `Last Purchase Date` or `%CUSTOM1%` for personalized context. Upload as a mailing list named "Past Customers - Re-engagement." ### 2. Design a 3-touch sequence Each touch is a separate automation: | Day | Format | Message angle | |---|---|---| | Day 1 | Notecard or 4×6 postcard | "We miss you" - warm, personal, no hard sell | | Day 30 | 4×6 or 6×9 postcard | New offer, updated service, or relevant reason to return | | Day 60 | Notecard | Final personal touch, direct CTA, or exclusive offer | ### 3. Create your Message Templates In the left navigation, go to **Message & QR Templates** and create one template per touch. Use these as starting points: **Day 1 (Notecard):** > Hi %FIRST_NAME%, > > It's been a while and I wanted to reach out personally. We've been thinking of you and would love to reconnect. > > [Relevant offer or update - e.g., "We've added new services this year" or "As a past customer, you get 10% off your next visit."] > > %YOUR_FULL_NAME%, %YOUR_COMPANY% > %YOUR_PHONE% **Day 30 (Postcard):** Lead with the offer. QR code to a landing page with a specific redemption. **Day 60 (Notecard):** "Last chance" framing - limited offer, expiring date, or personal check-in. Run **Rate My Content** on each template - target 8+ on personalization and CTA. Save each template before moving on. ### 4. Set up a Days After Added campaign 1. Go to **Automated Campaigns** in the left navigation. 2. Click **Add Automation**. 3. In the **Add Automation** modal: - **Select What To Send:** choose your mailer format (Notecard for Day 1/60, postcard for Day 30). - **Select An Image Template** and **Select A Message Template** for the Day 1 touch. - **Select A Mailing List:** choose your past-customer list. - In the **Sending trigger** dropdown, select **A Number of Days After a Recipient Is Added**. - Set **Enter Day After Added to List** to **1** (sends the day after they're added). 4. Click **Save and Add Another** to add the Day 30 touch: same list, Day 30 message template, enter **30** for the day. 5. Repeat for Day 60. Contacts added to the list in the future will automatically enter the sequence at Day 1. ### 5. Track with QR codes Add a QR code to every piece. Scanners go into a "Re-engaged" list via Move Recipient on Scan. Call or follow up within 24 hours. ## Pitfalls - **Generic "we miss you" with no offer.** Sentiment without a reason to act doesn't convert. Give them something. - **Only one touch.** A single mailer to a lapsed customer often isn't enough. The sequence builds momentum. - **Not updating the list.** As you continue working, add new lapsed customers regularly so the campaign stays full. ## Run this play 1. [Upload your past-customer list](/mailing-lists/csv-upload-and-format) 2. [Set up a Days After Added drip](/campaigns/days-after-added) ## Related - [Your First 100 Mailers](./first-100-mailers.md) - [QR Scan → Call Follow-up](./qr-scan-followup.md) - [Monthly Newsletter Campaign](./monthly-newsletter-campaign.md) --- ## Farming with evenFLOW # Farming with evenFLOW ## Who it's for Real estate agents who want to own a geographic farm - a specific neighborhood, zip code, or subdivision - by showing up in mailboxes consistently over months and years. ## The play Build a list of every address in your farm area. Use **evenFLOW** to drip through the list at a controlled daily pace - say, 20 pieces per day - so you spread your spend evenly throughout the month. Run the campaign on a loop so the same list rotates through every few months, each time with fresh creative. Over time, you become the agent that neighborhood thinks of first. ## Expected signals - A well-maintained farm of 500 homes at 20 pieces/day cycles through every 25 days - After 3-6 months of consistent mailing, inbound inquiry rates measurably increase - QR scan rates on farm mail typically run 1-4%; scans indicate active home-value interest - Cost: depends on list size and frequency - evenFLOW lets you set the daily budget ceiling ## Step-by-step **Send method: Automated Campaigns → Daily Send Limit (evenFLOW)** - paces your farm list at a controlled daily rate and loops indefinitely. ### 1. Build your farm list Sources for addresses: - **Radius search** - from a seed address, let thanks.io find all addresses within a radius. See [Radius Search](/mailing-lists/segmenting-and-filtering). - **CSV upload** - purchase a list from a data provider or pull from your MLS. Upload to a dedicated list named by neighborhood, e.g., "Oak Park Farm." ### 2. Choose your format **6×9 postcards** are the recommended format for farming - strong visual presence, lower cost, and ideal for rotating creative. ### 3. Create your Image Template and Message Template Create these before setting up the campaign - you'll select them in the automation form. - **Image Template:** go to **Image Templates** in the left navigation. Design a clean, professional card with your headshot, logo, and one clear message. Rotate creative every 1-2 months (recent sale, market stats, seasonal greeting). - **Message Template:** go to **Message & QR Templates** in the left navigation. Add a QR code pointing to a home-value landing page or your contact page. Run **Rate My Content** - target 8+ before activating. ### 4. Set up the evenFLOW campaign 1. Go to **Automated Campaigns** in the left navigation. 2. Click **Add Automation**. 3. In the **Add Automation** modal: - **Select What To Send:** choose 6×9 Postcard (or your preferred format). - **Select An Image Template** and **Select A Message Template** for your current creative. - **Select A Mailing List:** choose your farm list. - In the **Sending trigger** dropdown, select **Daily Send Limit (evenFLOW)**. - Set **Number of Recipients to Send to Daily** (e.g., 20 pieces/day). - Enable **Rotate at end of list** - this restarts the campaign from the top when the list is exhausted, creating the loop that keeps your farm active indefinitely. 4. Click **Preview** to confirm the mailer looks right. 5. Click **Save**. ### 5. Rotate creative on a schedule Every 4-6 weeks, create a new Image Template or Message Template for the campaign. Consistent delivery with fresh creative keeps the farm alive. Stale, repetitive mail gets ignored. ## Tracking what worked - **Global Scan List:** who in your farm is actively checking home values? - **QR scan spikes** after a market-update card often indicate high homeowner engagement - Track inbound inquiry source - when a new listing or call comes in, ask "Did you receive a card from us recently?" ## Pitfalls - **Stopping after 2-3 months.** Farming requires patience. Most farms take 6-12 months to produce consistent referrals. - **No QR code.** Without it, you can't identify who's interested. - **Same creative every send.** Rotate messaging to stay relevant. - **List too large to sustain.** A 2,000-home farm at $1/piece is $2,000 per cycle. Match your farm size to your monthly budget. ## Run this play 1. [Build your list with radius search or CSV upload](/mailing-lists) 2. [Set up a Daily Send Limit (evenFLOW) campaign](/campaigns/evenflow-daily-limit) 3. [Add a QR code to your Message Template](/qr-and-tracking/enabling-qr-codes) ## Related - [Neighbor Blast - Just Listed / Just Sold](./neighbor-blast-just-listed.md) - [Monthly Newsletter Campaign](./monthly-newsletter-campaign.md) - [QR Scan → Call Follow-up](./qr-scan-followup.md) --- ## Your First 100 Mailers # Your First 100 Mailers ## Who it's for Anyone sending their first thanks.io campaign who wants a structured approach that actually gets a response - not just a test send. ## The play Send a single, clear postcard to 100 people you already have some relationship with - past customers, prospects who went cold, neighbors of a recent sale, or leads from a list. One strong headline, one sentence of context, one CTA, and a QR code to track who responds. 100 pieces is enough to get real signal without a large upfront cost. ## Expected signals at 30 days - **QR scan rate:** 2-6% (2-6 responses from 100 pieces) is typical for a warm-ish list with a relevant offer - **Cost:** roughly $100-$160 depending on postage class and plan; check current pricing at [thanks.io/pricing](https://www.thanks.io/pricing) - **If scan rate is below 1%:** the list, offer, or design needs work - not the channel ## Step-by-step **Send method: Send Mail Wizard** - this is a one-time send. Open it via **Send Mail** in the left navigation. ### 1. Pick your 100 people - **Past customers** → the most responsive; they already trust you - **Cold leads who requested info** → second best - **Neighborhood farm** → use [Neighbor Blast](./neighbor-blast-just-listed.md) if you have a trigger address - **Purchased list** → usable, but expect lower response than a warm list Have your list ready as a CSV with these columns: `First Name`, `Last Name`, `Address`, `City`, `State`, `Zip`. You'll upload it inside the wizard in step 5. ### 2. Open the Send Mail Wizard Click **Send Mail** in the left navigation (or **New Send** on the dashboard). This opens the wizard and walks you through the rest of the steps. ### 3. Choose your mailer type Select **4×6 Postcard** - it's the lowest cost and fastest way to proof a first campaign. Upgrade to 6×9 if you want more visual impact. ### 4. Select an Image Template and set your Message Template - **Image Template:** upload your own photo (property, product, team, office) or choose from the gallery. - **Message Template:** select a saved template from **Message & QR Templates**, or type a new message directly in the wizard. Add `%FIRST_NAME%` to personalize it and enable the QR code. Set the QR destination to a simple landing page or your phone number. ### 5. Add recipients In the **Recipients** step, click **Upload CSV** and map your columns. Your list goes in here - not before you open the wizard. ### 6. Review the proof and place your order Check the print-ready proof: confirm your name, address, and message all look correct. Click **Place Order**. ### 7. Watch the Global Scan List In the first 7-14 days after expected delivery, check your [Global Scan List](/qr-and-tracking/global-scan-list). Anyone who scanned is a warm lead. Follow up within 24 hours. ## Copy starter > Hi %FIRST_NAME%, > > I wanted to reach out personally - [one sentence about your business and why it's relevant to them]. > > [Your offer or CTA - e.g., "Call me at %YOUR_PHONE% to get a free estimate" or "Scan the QR code to see current listings in your area."] > > %YOUR_FULL_NAME% > %YOUR_COMPANY% > %YOUR_PHONE% Replace all `%VARIABLE%` placeholders with your details or use [Replacement Variables](/ai-and-personalization/replacement-variables) to pull them from your list automatically. ## Pitfalls - **Sending to a cold, unrelated list.** Low relevance = low response. Warm beats cold every time. - **No QR code.** You'll have no idea if it worked. Add one. - **Sending once and giving up.** Direct mail builds over repetition. If 100 pieces don't yield a response, a sequence of 3 touches over 6 weeks often does. ## Run this play 1. [Start a Send Mail Wizard send](/sending-mail/card-builder-walkthrough) 2. [Enable QR tracking on your Message Template](/qr-and-tracking/enabling-qr-codes) 3. [Watch scan results in the Global Scan List](/qr-and-tracking/global-scan-list) ## Related - [Neighbor Blast - Just Listed / Just Sold](./neighbor-blast-just-listed.md) - [Drip to Past Customers](./drip-past-customers.md) - [Mail + Text Sequence](./mail-then-text.md) --- ## Golden Letters # Golden Letters ## Who it's for Real estate agents who want to generate listing appointments from a short, targeted list of high-value prospects - homeowners in a specific area, FSBO owners, expired listings, or absentee owners you want to represent. ## The play Send a short, personally-addressed handwritten-style Windowless Letter to 25-75 precisely targeted homeowners. The letter uses a real postage stamp and looks genuinely personal. The message is brief, warm, and specific - not a flyer, not a postcard, not a form letter. Then follow up with 2-3 more touches over 6-8 weeks via a Days After Added drip. ## Expected signals - Response rates on Golden Letter sequences commonly run 5-15% for warm lists - A 50-homeowner sequence at 3 touches costs roughly $150-$300 - a small fraction of a listing commission - Most responses come in within 7-14 days of delivery ## Step-by-step **Send method: Automated Campaigns → Days After Added** - add contacts to your list and the sequence fires automatically. ### 1. Build your target list Keep it tight - 25-100 names is ideal. Sources: - Expired or withdrawn listings from your MLS - FSBO owners in your target area - Absentee owners (purchased list or skip-traced from county records) - Recent life-event contacts (estate sales, divorces, new job changes) Upload to a mailing list named "Golden Letters." ### 2. Create your Message Templates In the left navigation, go to **Message & QR Templates** and create one template per touch. The key: each message must sound personal, not promotional - three sentences max. **Day 1:** > Hi %FIRST_NAME%, > > I've been working in this neighborhood for [X] years and noticed you haven't listed yet. If you've thought about selling, I'd love to share what similar homes have been going for - no obligation, just a quick conversation. > > %YOUR_FULL_NAME% > %YOUR_PHONE% Add a QR code pointing to a calendar-booking link or home-value estimate page. Run **Rate My Content** - aim for 8+, especially on Personalization score. Save each template before moving on. :::tip Handwritten-style with Realism Mode enabled makes the letter look genuinely personal. This matters - a piece that looks personally written gets read. One that looks printed gets tossed. ::: ### 3. Set up a Days After Added campaign Golden Letters work best as a sequence: 1. Go to **Automated Campaigns** in the left navigation. 2. Click **Add Automation**. 3. In the **Add Automation** modal: - **Select What To Send:** choose Windowless Letter. - **Select An Image Template** and **Select A Message Template** for your Day 1 Golden Letter. - **Select A Mailing List:** choose your Golden Letters list. - In the **Sending trigger** dropdown, select **A Number of Days After a Recipient Is Added**. - Set **Enter Day After Added to List** to **1** (sends the day after they're added). 4. Click **Save and Add Another** to create the Day 21 follow-up: Windowless Letter, Day 21 message template, enter **21** for the day. 5. Repeat for Day 45 (6×9 postcard with a new angle). ### 4. Add contacts and watch the QR Scan List When you add a contact to your Golden Letters list, the drip fires automatically. Monitor your **Global Scan List** - anyone who scans is actively interested. Call them within 24 hours. ## Copy starter (Day 1) > Hi %FIRST_NAME%, > > I work with homeowners in your area and noticed your home hasn't been listed. I wanted to reach out personally - the market is active right now and I'd love to share what I'm seeing. > > I'd love to share a quick estimate - no pressure. Scan the code or give me a call. > > %YOUR_FULL_NAME%, %YOUR_COMPANY% > %YOUR_PHONE% ## Pitfalls - **Generic message.** The Golden Letter only works if it sounds personal. If it reads like a postcard, it performs like one. - **Oversized list.** 300+ contacts with a 3-touch sequence is a budget commitment. Start with 50 and scale what works. - **No follow-up.** The first touch rarely closes. The sequence does. ## Run this play 1. [Upload your target list as a CSV](/mailing-lists/csv-upload-and-format) 2. [Create a Windowless Letter Message Template with AI Fonts and Realism Mode](../05-templates-and-design/message-templates.md) 3. [Set up a Days After Added drip campaign](/campaigns/days-after-added) 4. [Enable QR tracking](/qr-and-tracking/enabling-qr-codes) ## Video Guide ## Related - [Absentee Owner Outreach](./absentee-owner-outreach.md) - [QR Scan → Call Follow-up](./qr-scan-followup.md) - [Letters](/sending-mail/mailer-types/letters) --- ## Highest Converting Real Estate Postcard Not all postcards perform equally. This guide breaks down what makes a real estate postcard actually convert - the image layout, the message length, the offer, and what to put on the QR code - based on what works across thousands of campaigns. The short version: a postcard with a Street View photo of a local property, a short personal message (not a corporate-looking flyer), and a QR code that goes to a home value estimate page consistently outperforms generic designs. ## Related - [Neighbor Blast - Just Listed / Just Sold](./neighbor-blast-just-listed.md) - [Dynamic Images - Street View](/ai-and-personalization/dynamic-images) - [QR Codes and Tracking](/qr-and-tracking/enabling-qr-codes) --- ## Strategies & Playbooks # Strategies & Playbooks Physical mail works best when it's targeted and timed. Each playbook below is a proven campaign recipe - who it's for, what to send, and what success looks like. :::tip[Start here if you're not sure what to send] Pick your industry and goal from the table below. Each row links to a complete playbook with step-by-step instructions and copy starters. ::: ## Find your play | Industry | Goal | Recommended playbook | |---|---|---| | Real estate | Announce a listing to the neighborhood | [Neighbor Blast - Just Listed / Just Sold](./neighbor-blast-just-listed.md) | | Real estate | Build long-term farm presence | [Farming with evenFLOW](./farming-with-evenflow.md) | | Real estate | Target absentee owners | [Absentee Owner Outreach](./absentee-owner-outreach.md) | | Real estate | High-touch prospect outreach | [Golden Letters](./golden-letters.md) | | Real estate | Provide automated home value reports | [AI CMA Letters](./ai-cma-letters.md) | | Insurance | Stay top of mind with your book | [Monthly Newsletter Campaign](./monthly-newsletter-campaign.md) | | Insurance | Reach Medicare-eligible prospects | [T65 Birthday Campaign](./t65-birthday-campaign.md) | | Home services | Turn completed jobs into new leads | [Neighbor Blast for Home Services](./neighbor-blast-home-services.md) | | Home services | Market your roofing company with mail | [Postcard & Gift Card Templates for Roofers](./roofer-templates.md) | | Any | Re-engage past customers | [Drip to Past Customers](./drip-past-customers.md) | | Any | Follow up after a QR scan | [QR Scan → Call Follow-up](./qr-scan-followup.md) | | Any | Layer mail over a text campaign | [Mail + Text Sequence](./mail-then-text.md) | | Any | First 100 mailers | [Your First 100 Mailers](./first-100-mailers.md) | ## What makes a play work Every successful direct mail play shares four traits: 1. **A specific audience.** The more precisely you can describe who gets this mail, the better the response rate. 2. **One clear ask.** Each piece should have a single CTA - call, scan, go to a URL, reply. 3. **Consistent follow-through.** A single piece rarely wins. The plays that work repeat the message 3-6 times over weeks or months. 4. **A way to track response.** Use a QR code so you know exactly who scanned and when. ## Measuring success Response rates for direct mail typically range from 1-5% for cold audiences and 5-15% for warm/existing customer lists. QR scan rates on well-targeted campaigns commonly run 2-8%. These are ranges, not guarantees. Your results depend on list quality, message quality, offer strength, and repetition. Use the QR scan data in your [Global Scan List](/qr-and-tracking/global-scan-list) to build a real picture of what's working. ## Related - [Sign Up and Send Your First Mailer](/getting-started/sign-up-and-first-send) - [Campaigns & Automation](/campaigns) - [QR Codes & Tracking](/qr-and-tracking) --- ## Just Rented Postcard A "Just Rented" postcard lets property managers and real estate agents announce a successful rental placement. It's a simple way to show landlords in your area that you can fill properties quickly - and to generate inquiries from neighbors who own investment properties nearby. The setup is the same as a Just Listed or Just Sold postcard: upload your recipients, choose a postcard template, and send. You can include a photo of the property using the Street View image feature and a QR code pointing to a home-value or contact page. ## Related - [Neighbor Blast - Just Listed / Just Sold](./neighbor-blast-just-listed.md) - [Absentee Owner Outreach](./absentee-owner-outreach.md) - [Dynamic Images - Street View](/ai-and-personalization/dynamic-images) --- ## Mail + Text Sequence # Mail + Text Sequence ## Who it's for Anyone using a CRM or automation platform (Zapier, HubSpot, HighLevel, GoHighLevel) who wants to layer a text message on top of a direct mail send to amplify response rates. ## The play Send a physical mailer today. Three days before estimated delivery, send an SMS to the same recipient with a brief message referencing the card they're about to receive: "Hey %FIRST_NAME%, keep an eye out for something in your mailbox from us." When the card arrives, they already know to look for it. When they open it, there's a QR code. When they scan, you get notified and call them. ## Expected signals - Mail + text sequences commonly outperform mail-only sends by 20-40% on response rate - The text dramatically increases the likelihood the physical piece gets opened - QR scan rates on mail-then-text campaigns typically run 4-10% ## Step-by-step **Send method: Send Mail Wizard** (for the mailer) + **Integration** (Zapier, HubSpot, or HighLevel for the SMS delay). ### 1. Create your Message Template In the left navigation, go to **Message & QR Templates** and create a new template. The mailer should feel like the follow-through on your SMS: > Hi %FIRST_NAME%, > > As promised - here's what I mentioned. > > Scan the QR code to learn more. > > %YOUR_FULL_NAME%, %YOUR_COMPANY% > %YOUR_PHONE% Save the template - you'll select it in the wizard in the next step. ### 2. Send your mailer with First Class postage 1. Click **Send Mail** in the left navigation to open the Send Mail Wizard. 2. Choose your mailer type (4×6 Postcard or Notecard). 3. Select your Image Template and the Message Template you just created. 4. In the **Recipients** step, add your contacts (manual entry, existing list, or CSV upload). 5. At the postage step, choose **First Class** - this gives you a predictable 3-5 business day delivery window, which you need to time the SMS correctly. Standard postage varies too much. 6. Review the proof and place your order. Note the send date; add 3-5 days for expected delivery. ### 3. Set up the SMS trigger In your CRM or automation tool, create a workflow that fires an SMS approximately 3 days after the mail order is placed: **Using Zapier:** 1. Trigger: New row added to your mailing list (or new thanks.io order placed via webhook). 2. Action: Delay 3 days. 3. Action: Send SMS via Twilio, SimpleTexting, or your CRM's SMS tool. **Using HubSpot or HighLevel:** - Add the mail send as a workflow step. - Add a "Wait 3 days" delay. - Add an SMS send action. ### 4. Write the SMS Keep it brief. Reference the card: > Hi there - keep an eye out for something in your mailbox from us this week. There's a little something inside for you. Do not make it promotional. The goal is just to prime them to open the mail. ### 5. Track QR scans Configure scan notifications so you're alerted the moment someone scans. Call within the hour. ## Pitfalls - **Sending with Standard postage.** Delivery timing is unpredictable with Standard. The SMS may arrive days before or after the mail. Use First Class. - **SMS that sounds like spam.** A "keep an eye on your mailbox" text that's obviously promotional lowers the effect. Keep it warm and personal. - **No QR code on the mailer.** If there's no trackable next step, you lose the data. ## Run this play 1. [Send via Send Mail Wizard with First Class postage](/sending-mail/card-builder-walkthrough) 2. [Enable QR tracking on your Message Template](/qr-and-tracking/enabling-qr-codes) 3. [Set up a Zapier workflow to trigger the SMS delay](/integrations/zapier) 4. [Configure QR scan notifications](../14-qr-and-tracking/notifications.md) ## Related - [QR Scan → Call Follow-up](./qr-scan-followup.md) - [Your First 100 Mailers](./first-100-mailers.md) - [Zapier Integration](/integrations/zapier) --- ## Monthly Newsletter Campaign # Monthly Newsletter Campaign ## Who it's for Insurance agents, financial advisors, and real estate agents who want to consistently stay in front of their book of business with a genuine, personalized touch - not a generic email blast. ## The play Every month, send a 1-page branded letter to your entire client list. Design your newsletter in Canva or any PDF tool, upload it to the Send Mail Wizard, and thanks.io prints, addresses, envelopes, and mails it. No AI message or cover letter is added - your PDF is the complete letter. ## Expected signals - 1-2% call-back rate per send on a warm client book is typical and meaningful - After 3-6 months, clients start mentioning the letters - the consistency builds genuine presence - Works well as a renewal-timing anchor (send a newsletter 6 weeks before typical renewal dates) ## Step-by-step ### 1. Set up your client list Upload your current book of business as a CSV. Required: `First Name`, `Last Name`, `Address`, `City`, `State`, `Zip`. Optional but valuable: `%CITY%` as a custom field for hyper-local copy. Save as a mailing list (e.g., "Monthly Newsletter"). ### 2. Design and send your PDF newsletter - Design your newsletter in Canva or your preferred tool at 8.5×11 - Export as PDF - Open the **Send Mail Wizard** and choose **Letter → Windowless** (or Windowed). - On the next screen ("How Would You Like To Send Your Letter?"), choose **Upload Full PDF** - not "Handwritten Cover Letter". Your uploaded PDF becomes the entire letter with no cover page. - Upload your PDF, add your client list, and place the order. - Your PDF is the complete letter - no Image Template or Message Template is added on top of it. - See [Send a PDF Letter](/sending-mail/mailer-types/send-pdf-letter) for the full walkthrough. ### 3. Update your PDF each month Each month, design a new newsletter with current content, export it as a PDF, and upload it when placing your next Send Mail Wizard order. ## Pitfalls - **Generic content.** Insert real local context - a real town event, actual market data, something specific. Generic newsletters become wallpaper. - **Not updating the PDF monthly.** Sending identical content every month will start getting ignored. Rotate the content. - **No call to action.** Always end with how to reach you. Phone number, scan, or website. ## Run this play 1. [Upload your client list](/mailing-lists/csv-upload-and-format) 2. [Send as a PDF letter via the Send Mail Wizard](/sending-mail/mailer-types/send-pdf-letter) ## Related - [T65 Birthday Campaign](./t65-birthday-campaign.md) - [Drip to Past Customers](./drip-past-customers.md) - [Send a PDF Letter](/sending-mail/mailer-types/send-pdf-letter) ## Real estate: AI-generated newsletter (no PDF required) If you're a real estate agent and want to skip designing a PDF every month, you can use thanks.io's AI message generation to write a fresh newsletter each time. Set a campaign to resend monthly, and the AI writes a new letter each time it fires - no PDF needed. ### The prompt Paste this into the message editor in thanks.io when creating your Message Template. The campaign logic re-runs it monthly so each letter is unique: ``` chatgpt: write me a monthly newsletter less than 300 words that starts with hi %FIRST_NAME% and include 1 fun fact that differs each month and include 1 home owning tip, 1 local event of the month, and 1 market update based on %CITY% using %CURRENT_DAY% + 10 days as reference so it's referencing the month that the letter gets delivered in. Remove subject line. Make sure the current month is used based on %CURRENT_DAY% + 10 days. Sign it %YOUR_FULL_NAME% %YOUR_PHONE% ``` The `%CITY%` and `%CURRENT_DAY%` replacement variables pull in each recipient's city and the current send date automatically, so the content stays locally relevant and timed to when the letter actually arrives. --- ## Neighbor Blast for Home Services When you finish a job at a house, the neighbors have already seen your truck in the driveway. That's the best moment to introduce yourself - before that visibility fades. Neighbor Blast for home services lets you automatically mail the addresses surrounding a completed job, turning every project into a built-in lead generation opportunity. This is a custom feature set up by the thanks.io team for your business. To get started, email [support@thanks.io](mailto:support@thanks.io) or reach out via live chat. --- ## Neighbor Blast - Just Listed / Just Sold # Neighbor Blast - Just Listed / Just Sold ## Who it's for Real estate agents who want to mail the neighborhood every time they list or sell a property. The goal: generate listing inquiries from neighbors who want to know what their home is worth. ## The play Every time you add a listing address to a dedicated mailing list, thanks.io automatically finds the neighbors within a set radius and mails them a postcard. The postcard shows a photo of the subject property (via Google Street View), your contact info, and a QR code. The whole thing runs automatically. You add one address; the campaign does the rest. ## Expected signals - Typical Neighbor Blast: 50-100 neighbors per address - QR scan rate: 3-8% on a well-designed card with a relevant offer - Result: 2-8 warm leads per listing, passively generated - Cost: roughly $50-$100 per blast depending on neighbor count and plan tier ## Step-by-step **Send method: Automated Campaigns → Neighbor Blast** - add a listing address to your list and postcards fire automatically to surrounding neighbors. ### 1. Create a dedicated "Blast" mailing list In **Mailing Lists**, create a list named something like "Just Listed Blasts." This is the list your Neighbor Blast campaign will watch. Every address you add here fires a new blast. :::tip[Real estate accounts come with preloaded templates] Real estate accounts are preloaded with **Just Listed** and **Just Sold** dynamic image templates that are already set up with Street View and the right layout. We recommend using those instead of building from scratch - just select them when choosing your Image Template in the campaign setup. ::: ### 2. Create Street View Image Template 1. In the nav bar, go to **Image Templates**. 2. Click **Dynamic Builder**. 3. Set the Background Image to `~STREET_VIEW~`. 4. Add a header and subheader - for example: - Header: *"Just Listed in Your Neighborhood"* - Subheader: *"Curious what your home is worth? Scan to find out."* 5. Save the template. Every postcard now auto-generates with a Street View photo of the listing address. See [Dynamic Images](/ai-and-personalization/dynamic-images) for full setup details. ### 3. Create your Message Template In the left navigation, go to **Message & QR Templates** and create a new template. Keep it simple: > Hi %FIRST_NAME%, > > Your neighbor at %ABSENTEE_STREET% just listed / just sold. The market is active in your area right now. > > Curious what your home is worth? Scan the QR code for a free instant estimate, or call me directly. > > %YOUR_FULL_NAME%, %YOUR_COMPANY% > %YOUR_PHONE% Enable the QR code and set the destination to your home-valuation landing page or your phone number. Save the template - you'll select it in the campaign setup below. ### 4. Set up the Neighbor Blast campaign 1. Go to **Automated Campaigns** in the left navigation. 2. Click **Add Automation**. 3. In the **Add Automation** modal: - **Select What To Send:** choose your postcard format. - **Select An Image Template:** choose your Street View listing template. - **Select A Message Template:** choose your "Just Listed" message. - **Select A Mailing List:** choose your "Just Listed Blasts" list. - In the **Sending trigger** dropdown, select **Neighbor Blast (radius around an address)**. - Set **Number of Neighbors to Send To** (10-100 is a good starting range). - Set **Enter Day After Added to List** to **1**. - Under **Select the Property to Display in Google Street View**, choose **Target property (radius search center)** - this shows the listing address on the postcard, not each neighbor's own house. 4. Click **Save**. ### 5. Add a listing address to fire the campaign Add your listing address to the "Just Listed Blasts" list. The campaign picks it up within minutes and queues postcards to all neighbors in the radius. That's it. Every future listing you add to this list fires a new blast automatically. ## Tracking what worked - Check **All Campaign Neighbor Blasts** - it's your complete record of every neighbor reached across all blasts. - Check your **Global Scan List** to see which neighbors scanned and when. ## Pitfalls - **Not choosing Target property (radius search center).** Without it, the postcard shows a photo of each neighbor's own house - which is odd and not what you want for a listing announcement. - **Radius too large.** 100+ neighbors per blast can get expensive fast. Start tight and expand if the economics work. - **No QR code.** You lose all tracking data. Always include one. ## Run this play 1. [Enable Street View / Subject Property on your Image Template](/ai-and-personalization/dynamic-images) 2. [Set up Neighbor Blast campaign](/campaigns/neighbor-blast) 3. [Set up QR tracking](/qr-and-tracking/enabling-qr-codes) ## Video Guides **How to manually send Just Listed / Just Sold cards:** **How to set up automated Just Listed / Just Sold sending:** ## Related - [Absentee Owner Outreach](./absentee-owner-outreach.md) - [Farming with evenFLOW](./farming-with-evenflow.md) - [QR Scan → Call Follow-up](./qr-scan-followup.md) --- ## QR Scan → Call Follow-up # QR Scan → Call Follow-up ## Who it's for Anyone running a QR-enabled campaign who wants to act on scan data while the prospect is still warm - within the first 24 hours after they scan. ## The play When a recipient scans your QR code, thanks.io can automatically move them to a "Hot Leads" mailing list. You get an instant scan notification (text, email, or webhook). You or your team calls them within the day. The next day, they also receive a follow-up Notecard or postcard from a Days After Added campaign tied to the Hot Leads list. Two-channel follow-up (phone + physical mail) within 24-48 hours of a QR scan is one of the highest-converting sequences in direct mail. ## Expected signals - QR scan to call conversion depends on list quality and offer relevance, but warm-list scans that receive a same-day callback close at materially higher rates than cold outreach - The follow-up mailer arriving 3-5 days after the scan reinforces the call attempt ## Step-by-step **Send method: Automated Campaigns → Days After Added** - set it up once and it fires automatically when contacts land in your Hot Leads list. ### 1. Set up a "Hot Leads" mailing list In **Mailing Lists**, create a list called "Hot Leads." This is where scanners will be automatically moved. ### 2. Enable QR tracking on your Message Template 1. Open your Message Template. 2. Enable the QR code and set the destination URL (landing page, calendar link, or phone-number click-to-call). 3. Save. See [Enabling QR Codes](/qr-and-tracking/enabling-qr-codes) for setup details. ### 3. Configure "Move Recipient on Scan" 1. Go to **Mailing Lists** and open the source mailing list (the list your campaign is sending to). 2. Find the **Whenever a recipient on this list scans a QR Code, add them to the following lists** field. 3. Set the destination list to your "Hot Leads" list. 4. Save. Now, every time someone scans, they are automatically added to Hot Leads. ### 4. Set up scan notifications In **Account Settings** (click the gear icon in the top-right, or go to `profile/account`), scroll to the **Notifications** section under Contact Information and toggle on: - **Email on QR Scan** - instant email to you when a scan occurs - **Text on QR Scan** - instant SMS to your phone number on file Click **Save Changes**. See [QR Scan Notifications](../14-qr-and-tracking/notifications.md). ### 5. Set up a Days After Added follow-up on the Hot Leads list 1. Go to **Automated Campaigns** in the left navigation. 2. Click **Add Automation**. 3. In the **Add Automation** modal: - **Select What To Send:** choose Notecard or 4×6 Postcard. - **Select An Image Template** and **Select A Message Template** for your "Following up on our conversation" piece. - **Select A Mailing List:** choose your "Hot Leads" list. - In the **Sending trigger** dropdown, select **A Number of Days After a Recipient Is Added**. - Set **Enter Day After Added to List** to **1** (fires the day after they're added). 4. Click **Save**. When a scanner lands in Hot Leads, they automatically receive a follow-up piece the next day. ## Sample follow-up message (Day 1 after scan) > Hi %FIRST_NAME%, > > I saw you scanned our QR code - I'd love to connect if you have any questions. > > Give me a call or just reply to this card. > > %YOUR_FULL_NAME%, %YOUR_COMPANY% > %YOUR_PHONE% ## Pitfalls - **Not calling the same day.** The scan is a buying signal. Every hour of delay reduces conversion. Set up SMS notifications so you know the moment someone scans. - **No follow-up mail.** The phone call alone is great. The phone call + a physical follow-up piece that arrives 3 days later is better. - **Scan destination is a dead end.** If the QR code goes to a generic homepage with no clear next step, scans don't convert. Use a landing page with one clear ask. ## Run this play 1. [Enable QR codes on your Message Template](/qr-and-tracking/enabling-qr-codes) 2. [Create a Days After Added follow-up campaign](/campaigns/days-after-added) 3. [Monitor the Global Scan List](/qr-and-tracking/global-scan-list) ## Related - [Your First 100 Mailers](./first-100-mailers.md) - [Neighbor Blast - Just Listed / Just Sold](./neighbor-blast-just-listed.md) - [Mail + Text Sequence](./mail-then-text.md) --- ## Postcard & Gift Card Templates for Roofers Thanks.io includes ready-made postcard and gift card templates built specifically for roofing companies. Whether you're reaching out to new prospects after a storm event or rewarding a customer for sending you a referral, these templates give you a polished starting point that you can customize with your logo, contact details, and message. The video below walks through the available template options for roofers. --- ## Tip - Start By Mailing People You Already Know It's easier and more efficient to generate more business from the leads, customers and clients you already have. It's highly recommended that you **start with a campaign that re-engages the leads or contacts you already have, instead of trying to use direct mail to generate New "FRESH" leads.** There are a few reasons for this, which we'll quickly bullet point here below. 👉 **Generating fresh leads with mail requires a fair amount of money to test new ideas on large sample sizes. It also requires considerable patience...** it could take months and a number of tests and iterations to figure out what really works on a cold audience who doesn't know you yet. If you don't have $1000's to invest in a cold lead generation campaign, focusing on re-engagement is better. 👉 **The people you've already worked with are MUCH more likely to respond to a mail campaign and re-engage, leave a review, or refer someone to you**.... because, yep, they already know you and trust you on some level. (or if you're using automation for lead follow up, they would have seen your website or lead magnet in recent memory.) 👉 **It's pretty easy, and affordable to "set and forget" campaigns that automatically re-engage your current contacts.** [Thanks.io](http://thanks.io/) can be connected up to your CRM or Shopping cart. Or you can upload a contact list and automate using our campaign features like date based, birthday, holiday, and "staggered send" options. After the initial setup (which we'll help you with), your re-engagement mail will go out on autopilot. Our goal is to make it so you hardly ever even need to login to the platform after the first few days! 👉 **We're called "Thanks" for a reason :)** The initial idea for this company was based around automatically sending a postcard as a follow up "conversion booster" to leads we we're generating online. We've consistently grown our own business by using digital ads to generate fresh opportunities, and our own platform (combined with other retargeting channels) to re-engage and convert the leads we generate into paying customers. We suggest you do the same :) Examples of some ideas we can help you execute: - Sending Automated Birthday or Holiday cards to your past client database. - Sending automated retargeting postcards to your anonymous website visitors. - Sending automated thank you notes and gift cards to people who send you a referral. - Dropping something in the mail to help generate more engagement from sales leads and purchases that occur on your website. ### **👉👉 If you would like help implementing any of the above for your business, you can chat with us from the dashboard or [click here to schedule a 1 on 1 concierge session.](http://calendly.com/thanks-io)** ### **👉👉 If you're more of a DIY Type, [Click Here to learn the basics](/getting-started/basics) of sending and automating mail with Thanks.io.** --- ## T65 Medicare Birthday Campaign # T65 Medicare Birthday Campaign ## Who it's for Insurance agents who sell Medicare plans and want to reach prospects automatically in the enrollment window - roughly 3-6 months before their 65th birthday. ## The play Upload your prospect list with birth dates. Set up a **Birthday campaign** - the system fires automatically ahead of each recipient's 65th birthday. Everyone on the list gets a personalized mailer at the right moment without you manually tracking who is turning 65. ## Expected signals - Well-timed T65 mail during the enrollment window sees higher engagement than general insurance mail - QR scan rates on targeted T65 lists commonly run 3-8% - Most conversions happen within 2-4 weeks of the first touch; a 2-3 touch sequence amplifies results ## Step-by-step ### 1. Prepare your prospect list Required CSV columns: - `First Name`, `Last Name`, `Address`, `City`, `State`, `Zip` - `Birthday` - in `MM/DD/YYYY` format (thanks.io uses this to trigger the campaign) Upload to a mailing list named "T65 Medicare Prospects." ### 2. Create your Message Template In the left navigation, go to **Message & QR Templates** and create a new template. Keep it empathetic and informative: > Hi %FIRST_NAME%, > > Your Medicare enrollment window is coming up. If you're turning 65 this year, now is the right time to review your options - before the Open Enrollment deadline. > > I specialize in Medicare plans in %CITY% and would love to help you find the right coverage at no extra cost to you. > > Scan the QR code for a free consultation, or call me directly. > > %YOUR_FULL_NAME%, Licensed Insurance Agent > %YOUR_PHONE% Run **Rate My Content** - aim for 8+ on personalization and CTA. Save the template before moving on. **Send method: Automated Campaigns → On Recipient's Birthday** - fires automatically for each prospect ahead of their birthday. ### 3. Set up the Birthday campaign 1. Go to **Automated Campaigns** in the left navigation. 2. Click **Add Automation**. 3. In the **Add Automation** modal: - **Select What To Send:** choose your mailer format (Notecard or 4×6 Postcard). - **Select An Image Template** and **Select A Message Template** for your Medicare outreach piece. - **Select A Mailing List:** choose your "T65 Medicare Prospects" list. - In the **Sending trigger** dropdown, select **On Recipient's Birthday**. 4. Click **Save**. :::note[Timing] The birthday trigger automatically mails each prospect so the piece arrives about 10 days before their birthday. That's within the Medicare Initial Enrollment Period, so the timing is intentional. **Want to reach prospects earlier** - say, 3-6 months out? The birthday trigger can't do that. Instead, add prospects to a [Days After Added](/campaigns/days-after-added) campaign and set it to fire shortly after you add them to your list. Either way, remove contacts from the list once they've enrolled - the birthday trigger runs every year. ::: ### 4. Add a follow-up touch Consider a second touch 30 days later using a **Days After Added** campaign on a follow-up list: - Touch 1: Birthday campaign mailer (arrives ~10 days before the birthday) - Touch 2: If they scan the QR code, move them to a Hot Leads list that triggers a Day 1 follow-up Notecard ### 5. Track QR scans Anyone who scans is actively researching Medicare. Follow up within 24 hours - this is a warm lead. ## Pitfalls - **Missing birthday data.** The campaign requires a `Birthday` field in your list. Without it, nothing fires. Ensure the field is in `MM/DD/YYYY` format before uploading. - **Sending to prospects who've already enrolled.** The birthday trigger recurs every year. Remove contacts from the list once they've signed up for a plan. - **No follow-up.** A single touch in this window often gets missed. A second touch - or a phone call triggered by a QR scan - significantly improves response. ## Run this play 1. [Upload your list with birthday field](/mailing-lists/csv-upload-and-format) 2. [Set up an On Recipient's Birthday campaign](/campaigns/birthday-and-holiday) 3. [Enable QR tracking on your Message Template](/qr-and-tracking/enabling-qr-codes) 4. [Set up a follow-up with Days After Added](/campaigns/days-after-added) ## Related - [Monthly Newsletter Campaign](./monthly-newsletter-campaign.md) - [Drip to Past Customers](./drip-past-customers.md) - [QR Scan → Call Follow-up](./qr-scan-followup.md) --- ## Send Mail Wizard Walkthrough # Send Mail Wizard Walkthrough ## What it is The Send Mail Wizard is the primary design and send interface in the thanks.io dashboard. It walks you through choosing your format, selecting designs, composing your message, adding recipients, picking postage, and reviewing the proof before placing the order. ## Step 1 - Open the Send Mail Wizard Click **New Send** from the dashboard home, or select **Send Mail** from the main navigation. ## Step 2 - Choose your mailer type Select the physical format you want to send: - **Postcard** - 4×6, 6×9, or 6×11 - **Letter** - windowed or windowless - **Notecard** - **Gift Card** - **MagnaCard** ## Step 3 - Select an Image Template At this step you can only select from templates that already exist or upload a static image. Your options are: - **Gallery** - browse pre-built templates and your saved designs. - **Upload** - upload your own static artwork as a one-off image. Dynamic templates built with the thanks.io Studio editor or Canva must be **created as Image Templates beforehand** - they are not created during this step. Once saved as a template they will appear in the Gallery above. ## Step 4 - Select a Message Template The Message Template controls the handwritten-style text on your mail. Select an existing Message Template from your saved templates, or set your message and QR code on the fly without selecting a template. If you select an existing template, you can still edit the copy before sending - the changes apply to this send only and do not modify the saved template. - Switch between **Manual Edit**, **AI Builder**, and **Real Estate CMA** modes while composing. - Choose a handwriting style and optionally enable **AI Fonts** with **Realism Mode**. - Configure a QR code URL if needed. - Use replacement variables like `%FIRST_NAME%` and `%YOUR_COMPANY%` to personalize each piece. - Use **Rate My Content** to review quality and apply recommendations in one click. ## Step 5 - Add recipients Choose how to specify who receives this send: - **Add manually** - enter a single recipient's name and address directly. - **Upload CSV** - upload a spreadsheet of recipients. - **Choose from mailing list** - select one or more saved Mailing Lists. All addresses go through Duplicate Prevention (36-hour window) automatically. ## Step 6 - Review the proof Before placing the order, check the print-ready proof: - Front design looks correct - Message text renders as expected - Replacement variables resolve correctly (no raw `%FIRST_NAME%` in the preview) If anything looks wrong, go back and edit before confirming. ## Step 7 - Confirm and place the order 1. Review the order summary: recipient count, mailer type, and total cost. 2. Click **Place Order** to submit. Your order enters the processing queue. Orders move to print quickly - cancellation is only possible within one hour of placing the order. ## Limits & gotchas - Cancellation is only available within one hour of placing the order. ## Related - [Single Send Overview](./single-send-overview.md) - [Postage Options](./postage-options.md) - [Plan Comparison](../13-plans-and-billing/plan-comparison.md) --- ## International Delivery # International Delivery thanks.io supports international delivery for all five mailer types - postcards (4×6, 6×9, 6×11), letters (windowed and windowless), Notecards, Gift Cards, and MagnaCards. You can send internationally directly from the Send Mail Wizard, without any special setup. ## Adding an international recipient 1. In the Send Mail Wizard, go to the recipients step. 2. Enter the recipient's address. Include street address, city, region/province, postal code, and the **2-letter ISO country code** (e.g., `CA` for Canada, `GB` for the United Kingdom, `AU` for Australia). 3. If uploading a CSV, include a `country` column with the 2-letter ISO code for each international row. 4. Confirm the address looks correct in the recipient preview before placing the order. ## Postage International sends automatically use the equivalent of First Class postage. Standard postage is not available for international recipients. Per-piece pricing for international delivery is higher than domestic. ## Delivery times International delivery is longer than domestic and varies by destination country, local postal infrastructure, and customs processing. Do not plan time-sensitive campaigns around specific international delivery dates. ## Tips & best practices - Always include the 2-letter ISO country code. Omitting it may cause delivery failures. - Include the full postal code in the destination country's format (e.g., Canadian postal codes use `M5V 2T6` format). - For countries where the address format differs significantly from the US format, double-check your CSV column mapping. ## Limits & gotchas - Supported regions vary. If a country cannot be accepted, you will see an error during address validation. - Address Verification behavior may vary for non-US addresses. ## Related - [Postage Options](./postage-options.md) - [Send Mail Wizard Walkthrough](./card-builder-walkthrough.md) - [Plan Comparison](../13-plans-and-billing/plan-comparison.md) --- ## Gift Cards # Gift Cards ## What it is Gift Cards are branded physical gift cards from leading brands, mailed in an envelope with a real postage stamp. The recipient's address is printed on the envelope in a handwriting font. The envelope color cannot be modified. Each card includes a QR code the recipient scans to redeem their gift. Unlike every other thanks.io mailer type, **Duplicate Prevention cannot be disabled for Gift Cards.** Even if you turn off Duplicate Prevention in your account settings, Gift Cards always observe the 36-hour window. ## When to use it - Customer appreciation sends to high-value accounts or loyal buyers - Win-back campaigns for lapsed customers who haven't purchased recently - E-commerce post-purchase gifting to encourage repeat purchases or referrals - Sales prospecting - a physical gift card in the mail gets opened and remembered in a way that a discount code in an email does not ## Tips & best practices - Pair with a short, personal Message Template. A gift card that arrives with a note referencing the recipient by name has significantly higher perceived value. - Use for win-back campaigns with a clear CTA: "Here's $X toward your next order." - Use a dedicated mailing list for each Gift Card campaign to keep reporting clean. ## Gift Card Settings & Gating Gift Card settings are found just below the message compose area in the Message Template editor. You can set: - **Gift Card Brand** - choose from available brands - **Gift Card Amount** - set the denomination ### What is gating? Gating redirects the recipient to complete an action before they can redeem their gift card. When the recipient scans the QR code, they are sent somewhere else first - and only after completing that action are they forwarded to their gift. You can gate with: - **YouTube video** - paste a direct link to a video (not a playlist). The recipient is automatically redirected to redeem their gift after watching it to the end. - **Website** - paste a URL (such as a booking page, form, or landing page). This works correctly only if the third-party site can redirect the user after they complete the desired action. You must configure that redirect using the **Return Link to Redeem Giftcard** URL shown in the gray box in your settings. ### Examples Common uses for website gating: - **Calendly appointment** - paste your Calendly booking page link. Note: Calendly requires a Professional plan to enable post-booking redirects. - **Typeform** - paste your Typeform link so recipients fill out a form before redeeming. - **SurveyMonkey** - gather feedback before the recipient claims their reward. - **Custom landing page** - direct recipients to a product demo, case study, or special promotion. - **Zoom webinar registration** - place your Zoom registration link so recipients sign up before claiming the gift. - **Google Form** - collect feedback, opt-ins, or lead information before unlocking the reward. ### Important notes - When a gift card QR code is scanned (or shown after gating), the gift is instantly redeemed - not at the register, but at the moment of scanning or when the gift is shown on the gating redirect page. - Once a QR code is printed it cannot be changed. You can still control the gating destination, as long as the URL itself does not change. - You are notified when a gift card is redeemed. - Starbucks gifts cannot be merged into existing Starbucks accounts. The recipient can still redeem easily at the register. - Fraud protections are in place: there is a 30-day limit on gifts to a given address, and gift QR codes are not visible in your dashboard (only placeholders are shown). ## Limits & gotchas - Gift Cards are the **only** mailer type where Duplicate Prevention cannot be disabled, regardless of your account setting. - Available brands and denominations vary - check the Send Mail Wizard for current options. - Per-piece pricing is in addition to the gift card denomination value. See [thanks.io/pricing](https://www.thanks.io/pricing). - Gift Cards use a real stamp (First Class equivalent) for delivery. - Including additional inserts (such as business cards or other physical items) inside the envelope is not supported at this time. ## Related - [Notecards](./notecards.md) - [Send Mail Wizard Walkthrough](../card-builder-walkthrough.md) - [Choosing a Mailer Type](../../01-getting-started/choosing-a-mailer-type.md) --- ## Letters # Letters ## What it is Letters are 8.5×11-inch mailers sent in envelopes. Two formats are available: - **Windowed letter** - the recipient's address shows through a transparent window cut into the envelope. - **Windowless letter** - no address window; the address is printed on the envelope directly. Both formats support two send modes: - **Cover page mode** - a designed cover page using an Image Template and a Message Template (handwritten-style font). You can optionally attach additional pages as a PDF appended after the cover. Additional pages can be printed front/back. - **PDF-only mode** - the entire mailer is a PDF you upload. No Image Template or Message Template is used; your PDF is the complete letter. All pages can be printed front/back. Both formats support Standard and First Class postage and replacement variable personalization. ## When to use it - Formal communications where a traditional letter format builds credibility (B2B, legal notices, nonprofit appeals) - Long-form content that needs more space than a postcard - proposals, newsletters, multi-page donor letters - Situations where the envelope presentation matters: windowed letters look like official mail and get opened - Nonprofit fundraising appeals and donor acknowledgments ## Windowed letters For windowed letters, the address block on your printed letter must fall within the window zone. The editor shows the window zone as an overlay on the design canvas. - Keep all address content inside the window zone boundary. - Do not place any other design elements inside the window zone - they will be visible through the envelope. - Use a white or light background behind the address area. In cover page mode, the window zone constraint applies to the cover page. In PDF-only mode, your PDF is the entire letter - ensure the address block on page 1 of your PDF falls within the window zone. ## Windowless letters Windowless letters have no window constraint - full design freedom across the entire letter. The address is handled separately by the printing process. Windowless letters are mailed with a real postage stamp, and the recipient's address is printed on the envelope in a handwriting font. The envelope color cannot be modified. Use the windowless format when: - Your design spans the full page without an address zone. - You're sending a newsletter or multi-page document as a PDF. ## Send modes Both windowed and windowless letters support the same two send modes. ### Cover page mode Your first page is a designed cover using an Image Template and a Message Template (handwritten-style font). You can optionally attach additional pages as a PDF appended after the cover. Additional pages can be printed front/back. ### PDF-only mode Your entire mailer is a PDF you upload. There is no cover Image Template or Message Template - your PDF is the complete letter. All pages can be printed front/back. This is the right mode for newsletters, CMA reports, multi-page proposals, and any document that already exists as a formatted PDF file. See [Send a PDF Letter](./send-pdf-letter.md) for a step-by-step walkthrough of the PDF-only workflow. ### Multi-page pricing The first physical page is included in the base per-piece price. Each additional physical page adds **$0.20 per piece**. A physical page is one sheet of paper - a page printed front/back counts as one physical page, not two. Example: a 4-page PDF where each page is a separate side (2 sheets, printed front/back) = base price + $0.20 × 1 additional physical page. ## Tips & best practices - Use a clean, professional letterhead for windowed letters - the window creates an impression of official correspondence. - For nonprofit appeals, a personalized opening line with `%FIRST_NAME%` and a handwritten-style signature can meaningfully increase response rates. - For PDF newsletters, design at 8.5×11 with 0.5-inch margins to avoid content being trimmed. ## Limits & gotchas - Both send modes (cover page and PDF-only) are available for windowed and windowless letters. - Additional pages cost $0.20 per additional physical page. A sheet printed front/back is one physical page. - Including additional inserts (such as business cards or other physical items) inside the envelope is not supported at this time. ## Related - [Send a PDF Letter](./send-pdf-letter.md) - [Postage Options](../postage-options.md) - [Choosing a Mailer Type](../../01-getting-started/choosing-a-mailer-type.md) --- ## MagnaCards # MagnaCards ## What it is A MagnaCard is a 6×9-inch postcard with an integrated detachable magnet section. It mails like a standard postcard but - when it arrives - the recipient can remove the magnet along a perforated cut line and place it on any magnetic surface (refrigerator, filing cabinet, locker, etc.). Instead of being recycled after a glance, your message stays visible for months. ## How it works 1. **Production** - The postcard prints as a standard 6×9 card with a magnet layer integrated into a designated cut-out section. 2. **Delivery** - Mailed via USPS just like any other postcard. The magnet section is marked and ready to be removed. 3. **Recipient interaction** - The recipient flips the card over, sees the marked section, and peels the magnet away along the cut line. It then sticks to any metal surface. ## When to use it - Real estate agents farming a neighborhood: your contact info stays visible for the entire listing season - Local service businesses (plumbers, HVAC, pest control): stay top-of-mind between service calls - Restaurants and food delivery: a menu or QR code on the fridge is a powerful reorder prompt - Any campaign where you want the recipient to *keep* your mail rather than discard it ## Design tips - **Include clear instructions on the back.** Add a short line like "Detach this magnet and stick it on your fridge or workspace!" so recipients know the card has a removable piece. - **Put your most important content on the magnet area.** Contact details, a QR code, or a key call to action work well because the recipient will see them every day after detaching the magnet. - Include your phone number, website, and key service description in the front design - this is a reference card that will be viewed repeatedly. - Use high-contrast colors and clean typography. The piece will be viewed at refrigerator distance, often quickly. - Avoid design that looks purely promotional. A MagnaCard that looks like a useful reference (e.g., a contractor's emergency contact card) stays up longer than one that looks like an ad. ## Design examples Example of a Magna Card front (the side that includes the magnet section): ![Example of a Magna Card front design with magnet section](/img/magna-card-front-example.png) ## Designing your Magna Card in Canva We provide a Canva template with clearly marked safe zones and cut lines for both the front and the back of the card. - [Open the Canva Template](https://dashboard.thanks.io/canva-templates/magnacard) - [PNG File Template](https://docs.thanks.io/creatives/templates/magnacards#image-templates) ### Steps 1. Open the Canva template using the link above. 2. Design within the safe zones - keep all important content inside the indicated boundaries. 3. Use the cut line guides to position the magnet section correctly on the front. 4. Customize with your branding, messaging, QR codes, and imagery. ### Remove the guides before downloading The safe zone and cut line guides are for reference only. They must not appear in the final file. Before downloading: - Delete or hide all guide layers (safe zones, cut lines, and instructional text). - Confirm that only your finished artwork is visible. - Download using the export settings shown in the template. :::tip If guide elements are locked in the template, unlock them before deleting or hiding them. ::: Leaving guide lines in your final file may cause them to print on the card. Removing them ensures a clean result. ## Uploading your Magna Card to thanks.io 1. Log in to your thanks.io account. 2. Go to **Image Templates** in the main menu. 3. Scroll to the **Magna Cards** section. 4. Click **Upload Magna Card**. 5. Enter a name for your design. 6. Select the file you downloaded from Canva and upload it. After the upload, a preview of your Magna Card will appear. Review it to confirm: - All important content is inside the safety zone. - The magnet section is positioned correctly. - No guide lines or instructional text are visible. If adjustments are needed, return to Canva, make edits, and re-upload the updated file. ## Video walkthrough ## Tips & best practices - For real estate farming, combine MagnaCards with the **Neighbor Blast** campaign to send to addresses within a radius of a Just Listed / Just Sold property. - Use **evenFLOW** to pace large MagnaCard campaigns to a daily limit. - Pair MagnaCards with a follow-up postcard campaign. The MagnaCard establishes your presence; the postcard prompts action. - Use the magnet to reinforce follow-up - pair it with a special offer or reorder incentive to drive repeat action. ## Frequently asked questions **Can the magnet damage mail processing?** No. The magnet is designed to be compatible with USPS sorting and delivery processes. **What surfaces will the magnet stick to?** Any metal surface with magnetic attraction - refrigerators, lockers, filing cabinets, and similar surfaces. ## Related - [Postcards](./postcards.md) - [Neighbor Blast Campaign](../../09-campaigns/neighbor-blast.md) - [Postage Options](../postage-options.md) --- ## Notecards # Notecards ## What it is A Notecard is a 5.5x8.5-inch folded greeting card mailed with a real postage stamp. It is thanks.io's most personal-looking format. The front displays your design; the inside carries your handwritten-style message rendered by thanks.io's proprietary digital handwriting engine. Unlike postcards and letters, Notecards use a real postage stamp rather than a metered imprint, and the recipient's address is printed on the envelope in a handwriting font - both details that make the piece feel like personal mail, not a mass marketing piece. The envelope color cannot be modified. ## Format and orientation Notecards are landscape-oriented when folded: the front panel and inside message panel each measure approximately 5.5 × 4.25 inches. There is no portrait orientation option. The front carries your Image Template design. The inside carries your Message Template text. ## Centering your message By default, the handwritten-style text starts at the top left of the message panel. To visually center shorter messages, add a few blank lines before your text in the Message Template editor to shift it down on the card. ## When to use it - Post-meeting or post-purchase thank-you notes to individual clients - VIP customer appreciation touches where the higher per-piece investment is justified - High-value relationship moments: anniversaries, milestones, referral acknowledgments - Real estate agents following up with buyers, sellers, or past clients Notecards are not typically used for high-volume campaigns because the per-piece cost is higher than postcards. They are most effective for curated, targeted sends where the premium feel translates to a stronger relationship. ## Tips & best practices - Keep the message short and personal. Two to four handwritten-style sentences typically outperform a wall of text. - Use a warm, conversational tone - recipients expect this format to feel personal. - Add a QR code linking to a personalized landing page or calendar booking link. - `%FIRST_NAME%` at minimum. A Notecard that opens with the recipient's name performs significantly better than one that begins with "Hello." - Use First Class postage - delivery timing is more predictable, which matters for relationship-timed sends. ## Limits & gotchas - Notecards are higher cost per piece than postcards. See [thanks.io/pricing](https://www.thanks.io/pricing). - Including additional inserts (such as business cards or other physical items) inside a Notecard is not supported at this time. ## Related - [Golden Letters Playbook](../../02-playbooks/golden-letters.md) - [Gift Cards](./gift-cards.md) - [Postage Options](../postage-options.md) --- ## Postcards # Postcards ## What it is Postcards are thanks.io's most popular mailer type. They are full-bleed, printed cards available in three sizes: **4×6**, **6×9**, and **6×11** inches. Every postcard supports a custom front design, a handwritten-style message on the back, and optional QR codes. ## When to use it - High-volume outreach campaigns where cost per piece matters - Neighborhood farming and real estate geographic targeting - Promotional offers, limited-time discounts, and event announcements - Post-purchase thank-yous and customer retention - Drip campaigns and evergreen marketing sequences Postcards are the best starting point for most users - widest template selection, lowest per-piece cost, and they support every automation feature on the platform. ## Choosing your size **4×6** - the most cost-efficient size. Best for high-volume sends where per-piece cost is the primary factor. **6×9** - significantly more visual presence in the mailbox than 4×6. Popular for real estate agents, local service businesses, and campaigns where the design needs room to make an impact. **6×11** - the largest postcard format. Maximum print area for bold imagery, luxury branding, and event announcements. ## Design specs | Size | Full-bleed canvas | Safe zone | |---|---|---| | 4×6 | 1875 × 1275 px | Keep content 10% from each edge (~188 px left/right, ~128 px top/bottom) | | 6×9 | 1875 × 1275 px | Keep content 10% from each edge | | 6×11 | 3337 × 1777 px | Keep content 10% from each edge (~334 px left/right, ~178 px top/bottom) | The editor shows two overlays: - **Cut line** (red) - the outer edge of the printed card. Artwork should extend past this line (bleed) so there are no white borders after trimming. - **Safety line** (blue) - the inner safe zone. Keep all important content - text, logos, contact info - inside this line. See [Print Specs & Safe Zones](../../05-templates-and-design/print-specs-and-safe-zones.md) for the full reference across all mailer types. ## Design tips - **Full bleed:** extend artwork to the edge of the canvas (plus bleed margin) so there are no white borders after trimming. - **Safe zone:** keep important content (text, logos, contact info) inside the safe zone shown in the editor. - **Resolution:** use high-resolution images. The editor warns you if your image is too low-resolution. - **QR code placement:** the editor reserves space for the address block on the back. Don't place the QR code in the address area. - **Top-right message area:** if you want content above the address block on the back side, add it through the custom message background image. The handwriting engine does not place text there. ## Personalization Use replacement variables in your Message Template: - `%FIRST_NAME%` - recipient's first name - `%YOUR_COMPANY%` - your company name - `%CUSTOM1%` through `%CUSTOM10%` - custom fields from your mailing list Enable **AI Fonts** and optionally **Realism Mode** to make the handwritten-style rendering look more natural. ## Tips & best practices - Run Rate My Content before sending. A clear CTA and a personal opening line consistently drive better response. - Use 6×9 or 6×11 for campaigns where you want to make a strong first impression. - Add a QR code so you can track who responded. - For time-sensitive campaigns, select First Class postage to reduce delivery variability. ## Limits & gotchas - Design spec requirements (bleed, safe zone) vary slightly by size - check the editor overlays. ## Related - [Choosing a Mailer Type](../../01-getting-started/choosing-a-mailer-type.md) - [Send Mail Wizard Walkthrough](../card-builder-walkthrough.md) - [Postage Options](../postage-options.md) --- ## Send a PDF Letter # Send a PDF Letter ## What it is PDF letter mode lets you upload any PDF document as a windowed or windowless 8.5×11 letter. thanks.io prints it, addresses it, envelopes it, and mails it. You never touch the envelope. This is the right tool for: newsletters, CMA reports, insurance policy summaries, multi-page proposals, and any document that lives naturally as a full-page formatted file. ## When to use it - Monthly newsletter to your book of business - Automated CMA (Comparative Market Analysis) letter to a prospect - Insurance policy renewal notice or summary - Multi-page proposal or offer package - Any content that already exists as a PDF and needs to be mailed ## Cost The first physical page is included in the base per-piece price. Each additional physical page adds approximately $0.20 per piece. A physical page is one sheet of paper - a page printed front/back counts as one physical page, not two. For current pricing, see [thanks.io/pricing](https://www.thanks.io/pricing). ## Tips & best practices - Add your phone number, email, and website to every page of the PDF - not just the first page. Recipients sometimes flip to the last page first. - For newsletters, include one clear call-to-action on page 1. "Scan here to schedule a call" or include your direct phone number with a QR code. - Use personalized salutations in the PDF if your tool supports it (e.g., Canva doesn't support variable fields; use ChatGPT to pre-generate personalized copies, or use thanks.io's message template field alongside the PDF). - Test with a single piece to yourself before sending a full list. ## Limits & gotchas - PDF-only mode is available for both windowed and windowless letters. For windowed letters in PDF-only mode, ensure the address block on page 1 of your PDF falls within the window zone. - Each additional physical page costs $0.20 per piece. A sheet printed front/back is one physical page, not two. A 4-page PDF (2 sheets, front/back) = base price + $0.20 × 1 additional physical page. - Duplicate Prevention applies (36-hour window), same as all other mailer types. ## Related - [Letters Overview](./letters.md) - [Monthly Newsletter Campaign](../../02-playbooks/monthly-newsletter-campaign.md) - [AI CMA Letters Playbook](../../02-playbooks/index.md) - [Postage Options](../postage-options.md) --- ## Postage Options # Postage Options Every mail piece you send goes out with either **Standard postage** or **First Class postage**. Your choice affects delivery speed, tracking availability, and per-piece cost. ## Postage comparison | Postage class | Typical delivery | USPS tracking | Return-to-sender | Per-piece cost | |---|---|---|---|---| | Standard | Standard USPS + ~5 or more additional days | No | No | Lower | | First Class | Standard USPS First Class delivery | Yes | Yes | Slightly higher | | International | Varies by country | Varies | Varies | Higher than domestic | :::note For exact per-piece cost differences, see [thanks.io/pricing](https://www.thanks.io/pricing). First Class adds $0.05 for 4×6 and 6×9 postcards, and $0.21 for 6×11 postcards, letters, Notecards, and MagnaCards. ::: ## Standard postage Standard postage uses the USPS marketing mail stream and adds approximately 5+ days to delivery compared to First Class. There is no USPS tracking and no return-to-sender service. **Choose Standard when:** - Cost per piece is the priority and you're sending high volumes. - Precise delivery timing doesn't matter (evergreen promotions, drip campaigns). - You don't need to confirm whether individual pieces were delivered. ## First Class postage First Class uses the USPS First Class mail stream. It is faster, includes USPS delivery tracking, and returns undeliverable pieces to your return address. **Choose First Class when:** - Timing matters - event invitations, time-sensitive offers, birthday mail. - You want to confirm delivery status per piece. - List hygiene matters - you want undeliverable pieces returned so you can clean your records. :::tip Running a birthday or holiday campaign? Use First Class. Delivery timing is more predictable and you avoid the risk of a birthday card arriving a week late. ::: ## International delivery All mailer types support international delivery. International sends automatically use the equivalent of First Class postage - Standard is not available for international recipients. See [International Delivery](./international-delivery.md) for country-specific details. ## Limits & gotchas - Postage class is set account-wide in **Account Settings** and applies to all orders and campaigns. - Return-to-sender on First Class notifies you of undeliverable pieces - it does not guarantee a piece is delivered. ## Related - [Send Mail Wizard Walkthrough](./card-builder-walkthrough.md) - [International Delivery](./international-delivery.md) - [Plan Comparison](../13-plans-and-billing/plan-comparison.md) --- ## Postal Protect® Postal Protect® is a proprietary coating applied by our print partner that is designed to safeguard your mail pieces from damage during post office processing. Specifically, it helps prevent smudges that can appear on finished cards after they pass through USPS sorting facilities. While smudging during mail handling is outside of our direct control, our print partner has invested significant effort into resolving the issue. Their work has included: - Researching different paper types, printing equipment, ink, and coating options. - Collaborating directly with USPS sorting facility managers to identify and reduce the root cause. The result is the Postal Protect® coating, which is automatically applied to your mail pieces. ## Example The image below shows the coating in action - comparing a treated piece to an untreated one after USPS handling: ![Postal Protect example showing a treated card alongside an untreated card after USPS sorting](/img/postal-protect-coating-example.png) ## Related - [Postage Options](./postage-options.md) - [Send Mail Wizard Walkthrough](./card-builder-walkthrough.md) --- ## Single Send Overview # Single Send Overview ## What it is A **single send** is a one-time mail order placed through the Send Mail Wizard or the API. You choose a design, write a message, add recipients, and submit. Once the order processes, printing and mailing happen automatically. Single sends are distinct from campaigns. A campaign runs automatically over time based on a trigger. A single send is a deliberate, one-off action you take at a specific moment. ## When to use it - You want to send a batch of mail right now with full control over every piece. - You're following up with a specific group of contacts after an event or announcement. - You want to send to a one-time list you won't reuse - no need to set up a campaign. - You're testing a new design or message before committing to an automated flow. Use a campaign instead if you want mail to go out automatically as contacts are added, on recurring dates, or at a paced daily volume. ## How to do it ### Option 1 - Send Mail Wizard 1. Click **New Send** from the dashboard or navigate to **Send Mail**. 2. Select your mailer type, Image Template, and Message Template. 3. Add recipients using one of these methods: - **Manually** - enter individual addresses one at a time. - **Existing mailing list** - pick a saved list from your account. - **CSV upload (bulk)** - click **Upload CSV**, map your columns to the required fields (name, address, city, state, postal code), and add optional columns for replacement variables like `%FIRST_NAME%` or `%CUSTOM1%`. Preview the parsed recipients and confirm there are no errors before continuing. 4. Click **Place Order**. See the [Send Mail Wizard Walkthrough](./card-builder-walkthrough.md) for a detailed guide. ### Option 2 - API Developers can trigger single sends via the REST API. API access See [API Overview](../08-api/overview.md). ## Tips & best practices - Preview the proof before confirming every order. Orders enter the print queue quickly and can only be cancelled within one hour of placing the order. - Use replacement variables (`%FIRST_NAME%`, `%YOUR_COMPANY%`) to personalize each piece even in a bulk batch. - Run Rate My Content on new Message Templates before a large send. - If you're sending the same design repeatedly, save it as an Image Template and Message Template. ## Re-sending a past order If you want to send a new order based on a previous one, use **Re-Submit** from the Order Details page. 1. Find the order on the dashboard and click **Details**. 2. Open the **Re-Submit** dropdown and choose one of these options: - **Keep Same Addresses** - Starts a new order with all original recipients and opens the **Review** step. - **Only Failed Addresses** - Starts a new order with only failed recipients and opens the **Review** step. This appears only when the order has failures. - **Choose New Addresses** - Starts a new order with the same design and message but no recipients, and opens the **Select Recipients** step. 3. Review the order and place it when ready. ### Preview and send now (from a mailing list) Contacts in a mailing list also have a **Preview and Send Now** option. This lets you trigger a one-off send to an individual contact outside of the campaign schedule. The wizard opens with their data pre-loaded. ## Does the wizard save my progress? The Send Mail Wizard does not save in-progress orders. If you close the browser or navigate away before clicking **Place Order**, your work is lost. Complete the wizard in one session. If you are not ready to send, you can save your designs and message for reuse by creating an [Image Template](../05-templates-and-design/image-templates.md) and a [Message Template](../05-templates-and-design/message-templates.md) before starting the wizard. ## Delivery times Once you place an order, mail enters the print queue and typically ships within 1-3 business days. | Postage | Typical delivery after order | |---|---| | Standard | 7-10 business days | | First Class | 3-5 business days | Delivery timelines depend on USPS routing and destination. For time-sensitive sends, use First Class. See [Postage Options](./postage-options.md) for details. ## Limits & gotchas - Duplicate Prevention applies a 36-hour window. If the same recipient appears in a new order within 36 hours, the duplicate piece is skipped. Note: Duplicate Prevention cannot be disabled for Gift Cards. - CSV uploads must include a valid physical address for each recipient. - The wizard does not save progress - complete it in one sitting or save your templates first. ## Related - [Send Mail Wizard Walkthrough](./card-builder-walkthrough.md) - [Postage Options](./postage-options.md) - [Plan Comparison](../13-plans-and-billing/plan-comparison.md) --- ## Add-to-List Webhooks Every thanks.io mailing list has a built-in webhook URL. When your CRM fires that URL, the contact is automatically added to the list - no Zapier or third-party tools needed. CRMs with pre-formatted webhook support include **HighLevel**, **kvCORE/Bold Trail**, **Hubspot**, **Salesforce**, and **Sure Send**. ## Finding Your Webhook URL 1. In your thanks.io dashboard, go to **Mailing Lists** and open the list you want to add contacts to. 2. In the left column, scroll down to the **Recipient Add Webhook** section. ![The Recipient Add Webhook box showing the webhook URL and copy buttons for Generic, HighLevel, kvCORE/Bold Trail, and Sure Send](/img/mailing-list-webhook-box.png) 3. Click the copy button for your CRM: - **Copy Generic Code** - for any CRM not listed below - **Copy HighLevel Code** - pre-formatted with HighLevel merge fields - **Copy kvCORE/Bold Trail Code** - pre-formatted for kvCORE and Bold Trail - **Copy Sure Send Code** - pre-formatted for Sure Send 4. Paste the URL into your CRM's webhook settings. > Each mailing list has its own unique webhook URL. Copy it from the specific list you want contacts added to. ## How the Webhook URL Works The URL uses simple key-value pairs after the `?` to tell thanks.io where to put each piece of contact data: ```text key=value ``` Multiple fields are joined with `&`: ```text name=value&company=value&address=value ``` Your CRM replaces the bracketed placeholders (such as `[NAME]`) with the actual contact data when it fires the webhook. Different CRMs use different placeholder formats - for example `~VALUE~` or `{VALUE}`. Refer to your CRM's documentation for the exact syntax it expects. All the keys in the grey Webhook URL box are already correct for thanks.io - just copy them as-is. ### Available keys | Key | Description | | --- | --- | | `name` | Full name | | `firstname` | First name | | `lastname` | Last name | | `company` | Company name | | `address` | Street address | | `address2` | Address line 2 | | `city` | City | | `state` | State / Province | | `postal_code` | ZIP / Postal code | | `country` | Country | | `email` | Email address | | `phone` | Phone number | | `dob` | Date of birth | | `custom1` - `custom10` | Custom fields | :::tip[Avoid duplicate fields] `name`, `firstname`, and `lastname` all represent the same data. Use one set or the other - not both. Sending duplicate information can cause issues. ::: ## CRM-specific guides - [HighLevel](/integrations/highlevel) - step-by-step setup including workflow configuration - [Bold Trail / kvCORE](/integrations/bold-trail-kvcore) - setup details for kvCORE and Bold Trail --- ## Address Collection Landing Pages # Address Collection Landing Pages An address collection landing page is a simple hosted form that lets people enter their own mailing address. Anyone who submits the form is automatically added to the mailing list the page is attached to. Common uses include open house sign-in sheets, newsletter sign-ups, event registrations, and any other situation where you want to invite people to opt in to receive mail. ## How to create a landing page 1. Go to **Mailing Lists** and open the list you want to collect addresses into. 2. Scroll down to the **Address Collection Landing Page** card on the left side of the list page. 3. Fill in the form fields: - **Page Title** - the title of the web page shown in the browser tab. - **Header** - the primary call to action displayed on the form. - **Subheader** - secondary text shown below the header. - **Background Image URL** - paste a URL (starting with `http://`) to use a custom background image, or click **Upload** to upload one directly. - **Redirect URL** - optional. After someone submits the form, redirect them to this URL. 4. Toggle on any optional fields to include them on the form: - **Ask For Birthday** - **Ask For Phone Number** - **Ask For E-mail** - **Text on Submissions** - receive a text notification when someone submits the form. 5. Click **Publish**. 6. Copy the link that appears and share it wherever you like - on your website, in an email, or in a print piece. ## Tips & best practices - Give the page a clear, friendly header that tells visitors what they are signing up for. - Use the Redirect URL to send people to a thank-you page after they submit. - Enable **Ask For Birthday** if you plan to run a birthday campaign against this list. - The page URL can be embedded in an iframe on your own website. - You can use the landing page as the destination for a QR code on a mail piece. After publishing, copy the URL and paste it manually as the QR code target URL when building your message template. Anyone who scans the code will be taken to the form and added to the list on submission. ## Related - [Mailing Lists Overview](./overview.md) - [CSV Upload & Format](./csv-upload-and-format.md) --- ## CSV Upload & Format # CSV Upload & Format ## What it is CSV upload lets you populate a mailing list from a spreadsheet file. You map the columns in your file to the fields thanks.io expects, review a preview, and confirm the import. ## How to upload a CSV 1. Go to **Mailing Lists** and open the list you want to populate (or create a new one). 2. Click **Upload CSV**. 3. Select your `.csv` file and click **Upload**. 4. The column mapping screen appears - match each column in your file to the corresponding thanks.io field. If a mapping looks wrong, use the dropdown to select the correct field. If required fields are not mapped, a warning badge appears - fix the mapping before proceeding. Click **Save & Preview**. 5. Review the preview rows to confirm the data looks correct. 6. Click **Confirm**. After import, thanks.io validates addresses. Invalid addresses are flagged in the **Invalid Address filter**. ## Column reference The column mapping step lets you match any CSV header to the correct field - your column names don't need to match the field names below. ### Required field The mapper blocks submission until the **Address** field is mapped. | Field | Description | |---|---| | `address` | Street address, or the full address (street, city, state, zip) in a single column | If your address column contains only the street (not a full address), also map these: | Field | Description | |---|---| | `city` | City | | `province` | State or province abbreviation (e.g., `CA`, `NY`) | | `postal_code` | ZIP or postal code | ### Name fields | Field | Description | |---|---| | `name` | Full name in a single column | | `firstname` | First name | | `lastname` | Last name | ### Optional fields | Field | Description | |---|---| | `address2` | Apartment, suite, unit number | | `company` | Company or organization name (also used for spouse name) | | `country` | Country | | `email` | Email address | | `phone` | Phone number | | `dob` | Date of birth - required for Birthday campaigns. Format: `MM/DD` or `MM/DD/YYYY` | | `anniversary` | Anniversary date (e.g., house anniversary) | | `custom1` - `custom10` | Custom fields; accessible via `%CUSTOM1%`-`%CUSTOM10%` in Message Templates and `~CUSTOM1~`-`~CUSTOM10~` in Image Templates | ### Absentee (Subject) fields Use these when your list targets absentee property owners - the mail goes to the owner's mailing address but references a separate property address. | Field | Description | |---|---| | `absentee_address` | Absentee property street address (or full address) | | `absentee_city` | Absentee property city | | `absentee_state` | Absentee property state / province | | `absentee_postal_code` | Absentee property ZIP / postal code | **Note:** Absentee fields cannot be combined with Custom 1 or Custom 2. ## Reverse-append email and phone (optional) At the bottom of the upload dialog, you will see a **Reverse append email and phone number** toggle. - **Yes (on):** After the upload, thanks.io checks each imported address against an external data service to find a matching email address and phone number. The results are added to the recipient's record automatically. This costs **$0.20 per successful lookup** (some records require two lookups at $0.40). You will be prompted to confirm before the charge runs. - **No (off):** No lookup is performed. The email and phone fields remain blank unless you included them in your CSV columns. ## Blank name fields If the `firstname` or `lastname` columns are blank in your CSV and you do not enable reverse-append, the recipient's name is left blank. When that recipient receives a mailer, any message variables that reference their name - such as `%FIRST_NAME%` - will render as empty text. To avoid blank personalization: - Fill in name data in your CSV before uploading, or - Use a fallback phrase directly in your message template, such as "Hello neighbor" instead of "Hello %FIRST_NAME%", for sends where names may be missing. ## Tips & best practices - Check sample rows carefully - a misaligned column (e.g., city and state swapped) will import silently and produce bad mail pieces. - If the Address field is not mapped, the **Save & Preview** button is blocked. Map a column to Address to proceed. - After confirming the import, revisit the **Invalid Address filter** within a few minutes. - Include `email` and `phone` when available - they are used for QR Append on Scan lookups. - Use `custom1`-`custom4` to carry CRM data (e.g., lead score, agent name) that you can reference in templates. - Download a template to start from a correctly formatted file: - [CSV Template](https://d2md0c8rpvzmz5.cloudfront.net/assets/recipient_upload_example.csv) - [CSV Template (with Absentee)](https://d2md0c8rpvzmz5.cloudfront.net/assets/recipient_w_absentee_upload_example.csv) ## Limits & gotchas - Only `.csv` files are supported. Excel `.xlsx` must be exported to CSV first. - The preview shows a sample of rows, not the full file. - Invalid addresses don't block the import - they are flagged for review in the **Invalid Address filter** afterward. - The `dob` field is required for Birthday campaigns. ## Related - [Replacement Variables](../07-ai-and-personalization/replacement-variables.md) --- ## Duplicate Prevention # Duplicate Prevention Duplicate Prevention is an automatic safety mechanism that skips a mail piece if the same recipient address appears in a new order within **36 hours** of a prior send. This protects against accidentally mailing the same person twice in rapid succession. You can disable Duplicate Prevention for your account in **Mail Preferences** (gear icon ⚙ in the top navigation bar), under the **Duplicate Prevention** section. ## How it works When you place an order or a campaign fires a send, thanks.io checks whether each recipient address was already sent to in the past 36 hours. If it was, the duplicate piece is skipped for that order. The 36-hour window is per-recipient address, not per-campaign or per-list. ## The one exception: Gift Cards Duplicate Prevention **cannot be disabled for Gift Cards**. Regardless of your account setting, Gift Cards always observe the 36-hour window. All other mailer types - postcards, letters, Notecards, MagnaCards - respect your account setting. ## When this affects you - If you upload the same list to two campaigns that fire close together, some recipients may be skipped on the second send. - If you manually add a recipient to a list while a campaign is already running for that same address, the recipient may be skipped. - If you test with your own address repeatedly, you'll hit the 36-hour window and the send will be skipped. ## Tips & best practices - Wait at least 36 hours between test sends to the same address. - If you're intentionally sending a second piece to the same list quickly (e.g., a follow-up the next day), be aware those recipients will be skipped - use separate timing or disable Duplicate Prevention in settings. - Use separate lists for campaigns that should mail to the same recipients on different days. ## Limits & gotchas - Duplicate Prevention applies on all tiers. - The window is 36 hours - not 24 hours. - Skipped pieces are not queued for later - they are dropped from that order entirely. ## Related - [CSV Upload & Format](./csv-upload-and-format.md) - [Mailing Lists Overview](./overview.md) --- ## Exporting Lists # Exporting Lists Exporting a mailing list downloads all recipients as a CSV file. Use exports to back up your lists, cross-reference with your CRM, or prepare data for analysis. ## How to export 1. Go to **Mailing Lists** and open the list you want to export. 2. Click the **Export CSV** button. 3. The download starts automatically. ## What's included in the export The CSV export includes the standard recipient fields: - First name, last name - Address, city, state, ZIP - Company (if present) - Email and phone (if present) - Birthday (if present) - `custom1`-`custom10` (if populated) Engagement data (e.g., QR scan history) is exported separately from the QR & Tracking section. ## Related - [Mailing Lists Overview](./overview.md) - [Suppression Lists](./suppression-lists.md) --- ## Moving Contacts Between Lists # Moving Contacts Between Lists You can transfer one or more recipients from one mailing list to another directly inside the mailing list detail view. This is useful for segmenting contacts after a campaign, promoting warm leads to a new list, or reorganizing your lists over time. ## How to move contacts 1. Go to **Mailing Lists** and open the list that contains the contacts you want to move. 2. Check the box next to each recipient you want to transfer. To select all visible recipients at once, check the box in the column header row. 3. Once at least one contact is selected, a bulk-action toolbar appears at the top of the list. Open the **Move to list...** dropdown and choose the destination list. 4. Click **Move**. The selected recipients are removed from the current list and added to the destination list. ## Notes - **Moving is not copying.** Contacts are removed from the source list when moved. If you need the contacts to remain in both lists, export the list first and re-upload them to the destination. - The destination list must already exist. Create it under **Mailing Lists → Add List** before moving contacts if needed. - If a contact already exists in the destination list, duplicate-prevention rules apply. See [Duplicate Prevention](./duplicate-prevention.md). ## Related - [Mailing Lists Overview](./overview.md) - [CSV Upload and Format](./csv-upload-and-format.md) - [Duplicate Prevention](./duplicate-prevention.md) - [Exporting Lists](./exporting-lists.md) --- ## Mailing Lists Overview # Mailing Lists Overview ## What it is A mailing list is a collection of recipient records - names, addresses, and optional contact details - that you use to drive mail orders. Every send on thanks.io targets one or more mailing lists, whether you are placing a one-off batch or running an automated campaign. Lists are the connective tissue of the platform. Campaigns attach to lists. QR scan automations move people between lists. Analytics track engagement per list. A well-organized set of lists gives you precise control over who gets what mail and when. ## Creating a list 1. Go to **Mailing Lists** in the left navigation. 2. Click **Add List**. 3. In the dialog that appears, choose **Manually Enter Addresses**. 4. Enter a descriptive name (e.g., "Q3 New Leads" or "Just Listed Farm - Oak Park"). 5. Click **Save**. ## Adding recipients - **CSV upload** - upload a spreadsheet of addresses. See [CSV Upload & Format](./csv-upload-and-format.md). - **Manual add** - open the list, click **+ Add**, fill in the name and address. - **API** - add recipients programmatically using the thanks.io REST API. See [docs.thanks.io](https://docs.thanks.io) for the full endpoint reference. - **Zapier** - use the thanks.io Zapier integration to add recipients from any connected app (e.g., CRM, form builder, or spreadsheet) without writing code. - **Campaign automation** - campaigns can move recipients between lists automatically on send or scan events. ## Searching and filtering Use the search bar to find recipients by name or address. Use the **Invalid Only** filter to surface addresses that failed verification and need attention. ## Tips & best practices - Name lists by purpose and date so they stay organized (e.g., "Birthday Campaign 2026"). - Keep separate lists for different campaign types - don't mix drip recipients with birthday recipients. - Use the Invalid Address filter regularly before sending. - Use **Move Recipient on Send** or **Move Recipient on Scan** to build engagement-based segments automatically. ## Plan-based limits - List management is available on all tiers, including Free. ## Related - [CSV Upload & Format](./csv-upload-and-format.md) - [Address Verification](./address-verification.md) - [Segmenting & Filtering](./segmenting-and-filtering.md) --- ## Radius Search - Purchase a Mailing List # Radius Search - Purchase a Mailing List ## Mass Marketing Made Easy thanks.io's built-in **Radius Search** lets you purchase a targeted mailing list directly from your dashboard - no third-party data vendor required. It is also accessible via the [Zapier integration](/integrations/zapier) and the [API](/api). Various demographic filters are available so you can target exactly the right recipients. Each record is typically **$0.05**, though some lookups cost more depending on the options selected. --- ## How to access it 1. In the left navigation, click **Mailing Lists**. 2. Find and click **Radius Search**. --- ## Radius Search settings When the Radius Search popup opens, configure the following fields: | Field | Description | |---|---| | **Search Full Address** | Start typing to select the address you want to search from. | | **Number of Records** | How many recipients to purchase. Each record is $0.05; some lookups require two queries ($0.10). | | **Record Type** | The demographic filter to apply (see full list below). | | **Include Condos?** | Set to Yes or No. | | **Append Email & Phone for $0.20 ea.** | Skip-traces each match to append alternate contact info. Brings total to $0.25/record (some require $0.40). | --- ## Record types | Type | Description | |---|---| | **Nearest Neighbors** | Residents closest to the search address | | **Apartment Complex** | Nearest neighbors in a nearby apartment complex. Use *Include Search Address In Mailing List* to get a list of units at the complex itself. | | **Absentee Owner** | Owners of adjacent properties who do not occupy the residence | | **Likely To Move** | Nearest neighbors with life events suggesting they may need to move | | **Likely To Refi** | Nearest neighbors with LTV < 50% plus other qualifying criteria | | **Home Equity 50%+** | Nearest neighbors who own more than half their home | | **Home Free & Clear** | Nearest neighbors whose property is completely paid off | | **Possibly Underwater** | Nearest neighbors who owe more on their home than it is worth | | **Kids in Household** | Nearest neighbors with kids in the household | | **New Homeowner** | Nearest neighbors who recently purchased their home. Covers purchases made within the past 12 months. | | **High Net Worth** | Nearest neighbors with income over $200k or net worth over $1 million | | **Property Has Pool** | Nearest neighbors with an in-ground pool | | **Renters** | Nearest neighbors who are currently renting | | **Potential First Time Home Buyer** | Nearest neighbors who are young renters | | **Retiring** | Nearest neighbors between ages 55-64 | | **Retired** | Nearest neighbors age 65+ | | **Only Businesses** | Nearest commercial properties, either leased or owned | | **New Business** | Nearest new commercial properties, either leased or owned | --- ## Purchasing Once you click **Buy Mailing List**, thanks.io deducts the cost from your credit balance and creates the list immediately. You can [export your mailing list](/mailing-lists/exporting-lists) from thanks.io at any time. --- ## Targeting businesses and commercial property owners Yes - the Radius Search supports commercial targeting out of the box. Use either of these record types to reach business and commercial property owners in any area: | Record Type | Best for | |---|---| | **Only Businesses** | Surround mail campaigns targeting all commercial properties (leased or owned) near a given address | | **New Business** | Targeting newly established commercial properties near a given address | This makes it straightforward to run surround mail or area-targeted campaigns aimed at business owners and commercial property owners - without needing a separate list vendor. Simply enter your target address, choose **Only Businesses** or **New Business** as the Record Type, and purchase the list like any other Radius Search. ![alt text](../../static/img/radius-search-image.png) --- ## Skip Tracing a Mailing List Skip tracing lets you enrich an existing mailing list with additional contact data - phone numbers, email addresses, names, and correct mailing addresses - using a data lookup service built into thanks.io. This is useful when you have a list of property addresses (e.g., absentee owners) and want to also contact those owners by phone or email, or when you want to verify and correct mailing address data before sending. > **Cost:** $0.20 per successful lookup. Some matches require 2 lookups for best accuracy, bringing the cost to $0.40 per record. --- ## How to skip trace a list 1. In your thanks.io dashboard, go to **Mailing Lists** in the left-hand menu. 2. Open the mailing list you want to skip trace. 3. Scroll to the bottom of the list and click **Append Entire List**. 4. Confirm the action. thanks.io will run a data lookup for each record in the list and append any matched contact data. Once complete, matched records will have the new data added to their contact fields. Records with no match will remain unchanged. --- ## Related - [CSV Upload & Format](./csv-upload-and-format.md) - [Sourcing Custom Mailing Lists (Datazapp)](./sourcing-custom-lists.md) - [Data Services](../10-account-and-billing/data-services.md) --- ## Sourcing Custom Mailing Lists (Datazapp) If you need a more specific or granular mailing list than what the built-in [Radius Search](./radius-search.md) offers, you can use [Datazapp.com](https://datazapp.com) to create highly targeted lists, then upload the CSV to thanks.io. --- ## Step 1: Build a list on Datazapp [Datazapp.com](https://datazapp.com) is a third-party data service. No subscription is required - you pay per record. **Typical pricing:** - B2B lists with email and phone: ~$0.02/record - Homeowner data: ~$0.025-$0.04/record **Available list categories** include B2B prospect data, consumer lists, political data, and real estate lists (recent home buyers, absentee owners, etc.). **To run a search:** 1. Choose a data type (e.g., homeowner list). 2. Select the data fields you want - mailing address, phone, email. You can opt to have phone numbers scrubbed against the Do Not Call list. 3. Specify a geography by zip code, city, or metro area. 4. Use advanced filters to narrow further: AI-powered likelihood of selling, empty nester status, home equity, age, income, home value, and more. Once your search is complete, Datazapp shows the record count and total cost. Purchase and download the list as a CSV. --- ## Step 2: Upload the CSV to thanks.io 1. In your thanks.io dashboard, go to **Mailing Lists**. 2. Click **Add List** and upload the CSV. 3. Map the columns to the correct thanks.io fields. See [CSV Upload & Format](./csv-upload-and-format.md) for details. 4. Double-check the address field mapping - especially for **absentee owner lists**, which often include both a mailing address and a property address. Map the *mailing* address (not the property address) so mail reaches the owner. 5. Confirm the import. --- ## Need help uploading? If you run into issues or prefer not to handle the upload yourself, email your list to [support@thanks.io](mailto:support@thanks.io) or use the in-app chat. The thanks.io team can import it for you. --- ## Suppression Lists # Suppression Lists Any mailing list can be turned into a Suppression List. Once enabled, every address on that list is automatically blocked from receiving mail across all future orders - campaigns and one-time sends - including from sub-accounts. ## When to use it - A recipient has asked to be removed from your mailings - You have a do-not-contact list from your CRM - You want to honor opt-out requests at the account level so they're respected across every future campaign - Compliance with internal policies that require permanent exclusion for certain addresses ## How to set up a suppression list 1. Go to **Mailing Lists** and open the list you want to use as a suppression list (or create a new list first). 2. Scroll down to the **Suppression List** section on the list's detail page. 3. Toggle **Is Suppression List** to **YES**. 4. Click **Update**. The list is now a suppression list. Any address already on it - and any address added to it in the future - will be blocked from receiving mail. ## Adding addresses to a suppression list Add addresses to the list the same way you would any mailing list - via CSV upload, the **+ Add** button on the list's Recipients panel, or integrations. There is no separate suppression-specific import flow. Address fields must match exactly for suppression to take effect. ## How suppression works When a send is processed, thanks.io checks every recipient against all suppression lists on the account. Any match is automatically skipped - the order completes for all other recipients, and suppressed addresses are counted as excluded in the order summary. Suppression applies account-wide, including across all sub-accounts. ## Tips & best practices - Add opt-out requests to a suppression list immediately upon receipt. - Export your suppression list periodically as a backup. ## Limits & gotchas - Suppression applies account-wide - it cannot be scoped to a single campaign. - A suppressed address cannot receive any mail from your account until it is manually removed from the suppression list. - Address fields must match exactly - partial matches are not suppressed. ## Related - [Mailing Lists Overview](./overview.md) - [Address Verification](./address-verification.md) --- ## VisitorView Website Retargeting VisitorView is a small script you add to your website. When a visitor loads your page, the script runs automatically and attempts to identify them. If successful, it adds their name and mailing address to a thanks.io mailing list - no sign-up form or action required from the visitor. Each successful capture costs **$0.20** and is charged to your account. Captures that fail to identify the visitor are not charged. ## How it works When the script detects a visitor, it runs a skip-trace against multiple data sources using the visitor's location. At minimum it returns the visitor's mailing address. If a name, email address, or phone number is found, those are returned as well. The captured contact is added directly to whatever mailing list you connected the script to. From there, you can use a campaign to automatically send them a piece of mail. ## Setting it up ### 1. Create or open a mailing list 1. In your dashboard, go to **Mailing Lists**. 2. To use an existing list, open it. To create a new one, click **Add List**, choose **Manually Enter Addresses**, give the list a name, and click **Save**. ### 2. Configure the Retargeting Code section On the list detail page, scroll down in the left column to **Retargeting Code**. Configure the options: - **Max addresses added per month** - sets a monthly cap on how many captures this script will make. Each capture is $0.20. Set this to a limit you are comfortable with. Select **Off** to disable the script entirely. - **Site/Page Block List** - enter any URLs or paths you do NOT want the script to run on. Useful if your website platform injects a global header or footer and you want to exclude certain pages (such as admin or login pages). - **Site/Page Permit List** - enter the URLs you want the script to run on ONLY. Use this when you want to limit captures to a specific landing page and connect it to a specific mailing list. ### 3. Get and install the embed code 1. Click **Get Embed Code**. A code snippet will appear below the button. 2. Click **Copy Code to Clipboard**. 3. Paste the code into your website just before the closing `` tag. In most website builders and CRMs, this area is called the **website footer** or **custom code** section. The script runs automatically every time the page loads. In cases where the visitor cannot be identified automatically, the browser may prompt the visitor to share their location. ## Cost and billing All VisitorView captures are charged at $0.20 per successful lookup. Every charge is recorded in your [billing history](https://dashboard.thanks.io/profile/account/billing). Use the **Max addresses added per month** setting to stay within your budget. ## Related - [Data Services & Per-Use Pricing](../10-account-and-billing/data-services.md) - [VisitorView variables for dynamic mail](../07-ai-and-personalization/dynamic-images.md#visitorview-variables) - [Mailing Lists Overview](./overview.md) - [Add-to-List Webhooks](./add-to-list-webhooks.md) --- ## Branding Builder {/* AI-INSTRUCTIONS intent: Help users configure Branding Builder so their contact info and visual identity auto-populate across all mailers. audience: end users source-of-truth: docs/product-context/docs/features/ai-mailer-generator.md, docs/product-context/docs/product-overview.md preserve: Branding Builder, Message Template, replacement variables, %YOUR_FULL_NAME%, %YOUR_FIRST_NAME%, %YOUR_PHONE%, %YOUR_COMPANY%, %YOUR_EMAIL%, Scan Me do-not-claim: that advanced handwriting color options are available on Free update-policy: new Branding Builder fields added, tier gating changes */} # Branding Builder ## What it is Branding Builder is where you store your company identity. The information you configure here automatically populates into every Message Template via `%YOUR_*%` replacement variables - so you never need to retype your phone number, company name, or email in every template. What you configure: - Name and company - Phone number, email, website, and disclaimer - Headshot - Accent color - Square icon and rectangle logo - Optional real-estate branding visibility controls ## How to set it up Go to **Creatives → Branding Builder** in the sidebar. Enter your name, company, phone, email, website, and disclaimer. Under **Assets**, upload your headshot, square icon, and/or rectangle logo. Choose the brand color used for highlights and accents on your mailers. If your account industry is set to **Real Estate**, you can enable **Hide Realtor Logos** to remove default Realtor logo/compliance elements from generated branding outputs. Click **Generate Preview** to see how everything looks on a postcard back and letter. Click **Save Settings**. {/* TODO: Add screenshot here */} ## Available variables | Variable | What it inserts | |---|---| | `%YOUR_FULL_NAME%` | Your full name | | `%YOUR_FIRST_NAME%` | Your first name | | `%YOUR_PHONE%` | Your phone number | | `%YOUR_COMPANY%` | Your company name | | `%YOUR_EMAIL%` | Your email address | ## Tips & best practices - Complete Branding Builder before creating any Message Templates. Variables that reference empty fields render as blank text. - Use `%YOUR_PHONE%` and `%YOUR_COMPANY%` as a consistent sign-off at the end of every message. - Use **Generate Preview** to check how your branding looks before saving. ## Related - [Replacement Variables](../07-ai-and-personalization/replacement-variables.md) - [Message Templates](./message-templates.md) --- ## Image Templates # Image Templates ## What it is An Image Template is the visual design - the **front** of your mailer. It is a full-bleed image that prints on the front side of a postcard, letter, Notecard, MagnaCard, or other mailer type. You pair an Image Template with a Message Template to create a complete mailer. :::note Image Templates cover the **front image only**. The back of a postcard and the interior of a Notecard are configured in a Message Template, not here. ::: Four ways to create an Image Template: 1. **Upload a file** - upload a design you made in another tool (Canva, Photoshop, etc.) 2. **Design in Canva** - design directly in Canva and sync back to your library 3. **Dynamic Builder** - build a personalized postcard template with layered graphics and recipient data tags *(postcards only)* 4. **ThanksAI Studio** - let AI generate a design from a text prompt and optional website URL ## How to create an Image Template ### Upload a file 1. Go to **Image Templates** in the dashboard. 2. Click **Add Template** and choose the upload option for your mailer type (e.g., **Upload 4×6 / 6×9**), or scroll to the mailer type section and click the **Upload** button there. 3. Select your image file (high-resolution PNG or PDF recommended). 4. Add a descriptive name and save. ### Design in Canva 1. Go to **Image Templates** in the dashboard. 2. Scroll to the mailer type section you want to design for. 3. Click the **...** (more options) button in that section, then choose **Design in Canva**. 4. Authorize Canva if prompted. 5. Design your template in Canva. When finished, use the thanks.io app in Canva to sync it back to your Image Template library. ### Dynamic Builder *(postcards only)* The Dynamic Builder creates a personalized postcard front by layering graphic elements - text, logo, QR code, and an optional overlay - on top of a background image. Each field can be tagged with recipient data so the design updates per-recipient when mail is sent. 1. Go to **Image Templates** in the dashboard. 2. Click **Dynamic Builder** in the **4x6 & 6x9 Postcards** section header, or click **Add Template** → **Dynamic Builder**. 3. Enter a **Template Name**. 4. **Choose a Layout Template** - pick a preset that determines where the graphic elements are positioned on the postcard. 5. Set your **Background Image** - upload an image, paste a URL, or click **Use Map View** / **Use Street View** to pull in a property map automatically. 6. Fill in the text fields: **Header** (taggable, under 90 characters) and **Sub-header** (taggable, under 250 characters). 7. Set the **QR Code / Redirect URL** (taggable), or click **Use Message Side QR Code** to pull it from the paired Message Template. 8. Set your **Logo Image URL** (taggable), or click **Use Logo** / **Use Symbol** to pull from your Branding Builder settings. 9. Optionally add an **Overlay Graphic** - a transparent PNG layered on top of everything (1875×1275 px). 10. Click **Generate Preview** to see the result, then click **Save Dynamic Image Template**. :::tip All text and URL fields in the Dynamic Builder support data tags (e.g., `~FIRST_NAME~`, `~ADDRESS~`), so each recipient gets a personalized postcard front. ::: :::note Image URL fields in Dynamic Builder (**Background Image**, **Logo Image URL**, and **Overlay Graphic**) support `~CUSTOM1~` through `~CUSTOM10~`. During preview, token-based image sources render with placeholders. At send time, each token resolves per recipient; if the custom field value is missing or not a valid PNG/JPG URL, that recipient is skipped and the order is flagged with an error. ::: ### Generate via ThanksAI Studio See [ThanksAI Studio](../07-ai-and-personalization/creative-generation.md) for the full walkthrough. After generating a design, click **Save as Image Template** and it is added to your library. ## Design tips - Design to the correct dimensions for your mailer type. Each mailer has a specific canvas size and safe zone - keep important content inside the safe zone. - Leave a clear area where the QR code will be overlaid if your campaign uses one. - Name templates descriptively (e.g., "Just Listed - Modern Blue 2026") so they stay findable as the library grows. ## Limits & gotchas - Uploading and using Image Templates is available on all tiers. - Canva integration is available on all tiers. - The Dynamic Builder is available for 4x6 and 6x9 postcards only. ## Related - [ThanksAI Studio](../07-ai-and-personalization/creative-generation.md) - [Message Templates](./message-templates.md) - [Branding Builder](./branding-builder.mdx) --- ## Message Templates # Message Templates ## What it is A Message Template is a reusable template for the message content of your mailer. Depending on the mail type, this content appears in a different location: - **Postcard** - the back side - **Letter** - the cover letter text - **Notecard** - the interior It contains the handwritten-style text body, replacement variables, QR code configuration, font and style settings. Every time you send a mailer or trigger a campaign, you attach a Message Template. The template renders per recipient, filling in replacement variables with real data. The editor supports three composition modes: **Manual Edit**, **AI Builder**, and **Real Estate CMA**. It also includes clearer, mail-type-specific guidance while you write, one-click recommendation apply in **Rate My Content**, and faster save/preview behavior. ## How to create a Message Template 1. Go to **Message & QR Templates** in the dashboard. 2. Click **Add Template**. 3. Choose your editing mode: **Manual Edit**, **AI Builder**, or **Real Estate CMA**. 4. Draft your message. Use replacement variables (e.g., `%FIRST_NAME%`) where you want per-recipient personalization. 5. Configure the **QR Code URL** if needed: enter your destination URL in the QR Code URL field. 6. Adjust font settings: choose a handwriting style, toggle **AI Fonts** and **Realism Mode**. 7. Click **Rate My Content** to score the message, then apply recommendations in one click when suggested. 8. Click **Save Message Template**. :::note Postcard layout When viewing a postcard message template, the red line is the cut line. Keep all content you want visible on the card inside the blue line. ::: ## What a Message Template contains | Field | Description | |---|---| | Editor mode | Manual Edit, AI Builder, or Real Estate CMA mode for how you compose the message | | Message body | The handwritten-style text | | Replacement variables | `%FIRST_NAME%`, `%YOUR_COMPANY%`, `%CUSTOM1%`, etc. | | QR code config | On/off, destination URL | | QR code CC emails | Additional email addresses to notify on QR scans | | Background/stationery | Custom message background image | | Handwriting style | Choose from available fonts | | AI Fonts | Randomized character spacing for unique per-piece look | | Realism Mode | Adds crossouts and imperfections | | Additional pages | Extra pages (letters only) | | Gift card brand + amount | The gift card to include (gift card mailer type only) | | Gift card gating URL/YouTube | URL or YouTube video the recipient must view to unlock the gift card | | Share link | A URL the recipient can share with others | ## Tips & best practices - Keep your message concise. The fewer obstacles between the reader and your call to action, the better. - Run **Rate My Content** before using a template for a large send. Target 8/10 or above. - Use `%FIRST_NAME%` at the start of the message for instant personalization. - If you include a QR code, tell recipients exactly what they will get when they scan it. This helps establish trust. - Use the [Branding Builder](branding-builder.mdx) to create stationery that doubles as a business card for your mailer. - Business plan users can disable the thanks.io logo from their mailers. - The default "SCAN ME" graphic is part of the system background. Uploading a custom message background removes it, so you can design your own. - Save multiple template versions (seasonal variants, A/B versions) so you can switch without rebuilding. - Templates are reusable - attach the same template to multiple campaigns. Changes take effect on the next send. ## Limits & gotchas - If a template will not save, check the inline validation guidance for missing required fields (for example, a blank message body). ## Canva templates for custom message backgrounds You can design a custom message background using Canva. Use the official thanks.io Canva templates sized for each mail type: - [Postcard 4x6 & 6x9](https://dashboard.thanks.io/canva-templates/postcard) - [Postcard 6x11](https://dashboard.thanks.io/canva-templates/postcard6x11) - [Windowless Letter](https://dashboard.thanks.io/canva-templates/windowlessletter) - [Windowed Letter](https://dashboard.thanks.io/canva-templates/windowedletter) - [Magnacards](https://dashboard.thanks.io/canva-templates/magnacard) - [Folded Notecard & Gift Cards](https://docs.thanks.io/creatives/templates/notecards) ## Related - [Replacement Variables](../07-ai-and-personalization/replacement-variables.md) - [Rate My Content](../07-ai-and-personalization/rate-my-content.md) - [AI Fonts & Realism Mode](../07-ai-and-personalization/ai-fonts-and-realism-mode.md) --- ## Print Specs & Safe Zones # Print Specs & Safe Zones Every Image Template has a specific canvas size. Use these dimensions when creating designs in Canva, Photoshop, or any other design tool. ## Canvas sizes | Mailer type | Canvas size (px) | |---|---| | Postcard 4×6 | 1875 × 1275 | | Postcard 6×9 | 1875 × 1275 | | Postcard 6×11 | 3337 × 1777 | | Letter (windowed or windowless) | 2550 × 3300 | | Notecard | 1800 × 1313 | | MagnaCard | 2588 × 1688 | | Gift Card | 1800 × 1313 | ## Safe zone Keep all important content - text, logos, phone numbers, contact information - **at least 10% away from each edge** of the canvas. This is the safe zone. Content that falls outside the safe zone may be trimmed during printing or sit uncomfortably close to the edge. **Example safe zone margins:** | Mailer type | Min margin (left/right) | Min margin (top/bottom) | |---|---|---| | Postcard 4×6 / 6×9 (1875 × 1275 px) | ~188 px | ~128 px | | Postcard 6×11 (3337 × 1777 px) | ~334 px | ~178 px | | Notecard / Gift Card (1800 × 1313 px) | ~180 px | ~131 px | | MagnaCard (2588 × 1688 px) | ~259 px | ~169 px | | Letter (2550 × 3300 px) | ~255 px | ~330 px | ## Bleed Your artwork should extend **all the way to the edge** of the canvas - and ideally slightly beyond the cut line - so there are no white gaps after trimming. This is called bleed. Use background colors and images that extend to the very edge of the canvas. ## Cut line vs safety line When viewing the message back in the editor, two overlay lines are displayed: - **Cut line (red)** - the edge of the printed card after trimming. Artwork should extend past this line. Do not put important content here. - **Safety line (blue)** - the inner boundary of the safe zone. Keep all text and critical design elements inside this line. The front image editor in the dashboard also shows these guides when you zoom in on the uploaded design. ## Canva templates thanks.io provides official Canva templates sized to these exact dimensions for each mailer type. Start from one of these templates to get the canvas size, bleed, and safe zone set up correctly from the start. - [Postcard 4×6 & 6×9](https://dashboard.thanks.io/canva-templates/postcard) - [Postcard 6×11](https://dashboard.thanks.io/canva-templates/postcard6x11) - [Windowless Letter](https://dashboard.thanks.io/canva-templates/windowlessletter) - [Windowed Letter](https://dashboard.thanks.io/canva-templates/windowedletter) - [MagnaCards](https://dashboard.thanks.io/canva-templates/magnacard) - [Folded Notecard & Gift Cards](https://docs.thanks.io/creatives/templates/notecards) ## Related - [Image Templates](./image-templates.md) - [Message Templates](./message-templates.md) --- ## Analytics Dashboard # Analytics Dashboard ## Key metrics - **Total sends** - how many mailers have been sent - **Total scans** - how many QR code scans have been recorded - **Scan-through rate** - percentage of sent mailers that resulted in at least one QR scan ## How to use it 1. In the sidebar, click **Analytics**. 2. Review aggregate totals at the top. 3. Use filter controls to narrow results by Image Template, Message Template, or Mailing List. ### Enable Mailer Report Emails Click the **gear icon** (⚙️) in the top right to open **Account Settings**. Scroll to the **Notifications** section and enable **Daily Mailer Report**. ## Order statuses Every order has a status that reflects where it is in the process. Here is what each status means: | Status | Meaning | |---|---| | Reviewing | The order is within the 1-hour cancellation window after you placed it | | Printing | Mail pieces are being submitted to the printer network | | Printed | All mail pieces have been sent to the printer network | | Fulfilled | All processing for the order is complete | | Shipped | Mail pieces have been shipped | | Delivered | At least one mail piece in the order has been delivered | | Cancelled | The order was cancelled by you during the Reviewing window | | Error | All items in the order could not be printed | ## Tips & best practices - Compare scan-through rates across Image Templates to identify which designs resonate most. - Filter by Mailing List to understand which audience segments are most engaged. - Export scan data to CSV for deeper analysis. See [QR Analytics & Export](../14-qr-and-tracking/analytics-and-export.md). ## Related - [QR Analytics & Export](../14-qr-and-tracking/analytics-and-export.md) - [Global Scan List](../14-qr-and-tracking/global-scan-list.md) - [Exporting Reports](./exporting-reports.md) --- ## Audit Log # Audit Log The Audit Log is a chronological record of every action on your account: API calls, dashboard sends, Zapier triggers, webhook events, and logins. ## Access the Audit Log **Dashboard:** Click the **gear icon** (⚙️) in the top right to open **Account Settings**, then click the **Audit Log** tab. ## What's recorded | Event type | Includes | |---|---| | API requests | Endpoint, method, response status, validation errors | | Dashboard actions | Sends, template saves, list uploads | | Webhook deliveries | Event type, target URL, response code, retry attempts | | Zapier/Make/n8n triggers | Action taken, response status | | Logins | Timestamp, IP, user agent | ## When to use it - **Debug a failed API call** - find the exact 422 validation errors returned. - **Verify a webhook fired** - confirm the event was sent and see the response code from your endpoint. - **Audit user activity** - review who did what and when for compliance or security review. - **Diagnose a campaign** - confirm sends were triggered and orders were created. ## Related - [Webhooks](https://docs.thanks.io) - [API Error Codes](https://docs.thanks.io) --- ## Data and Privacy # Data and Privacy ## Your data on thanks.io thanks.io stores the following data on your behalf: - **Account data** - your name, email, and billing information. - **Recipient data** - names, addresses, and custom fields for your mailing lists. - **Order data** - a history of all mailers sent, proofs, and delivery tracking. - **API and activity logs** - request logs, webhook events, and login history (Audit Log). ## Recipient data Recipient data you upload is used solely to fulfill your mail orders. It is never sold or shared with third parties for marketing. - You can export your recipient data at any time from **Mailing Lists**. - You can delete recipients individually or delete entire lists. - When you delete a mailing list, all associated recipient records are removed. ## Suppression Lists If a recipient asks to be removed from your mailings, add them to a Suppression List - they will never receive mail from your account again, regardless of campaigns or future imports. See [Suppression Lists](../04-mailing-lists/suppression-lists.md). ## Account deletion To close your account and request data deletion, contact at www.thanks.io. Outstanding orders will be fulfilled before account closure. ## Privacy policy The full thanks.io Privacy Policy is at [thanks.io/privacy](https://www.thanks.io/privacy). ## Related - [Suppression Lists](../04-mailing-lists/suppression-lists.md) - [Profile and Security](./profile-and-security.md) --- ## Exporting Reports # Exporting Reports thanks.io lets you export order history, delivery stats, QR scan reports, and mailing list recipient data as CSV files. ## Available exports | Export | Where to find it | Contents | |---|---|---| | Order history | **Orders → Export** | All orders with status, mailer type, recipient, send date | | QR scan report | **QR Codes → Global Scan List → Export** | Scan events with recipient, timestamp, and page | | Mailing list recipients | **Mailing Lists → [List] → Export** | All recipients in a list as CSV | ## How to export 1. Navigate to the section with the data you want. 2. Apply any date range or filter you need. 3. Click **Export** or **Download CSV**. 4. The file downloads to your browser. ## Downloading order history The order history download is available at the upper right of the Orders page. There are two download types: ### Summary download Best for accounting and high-level reporting. Each row represents one order and includes: - Order ID and Subaccount ID - Type, Size, Message - Method (how it was sent) - Status - QR URL - Total number of recipients - Total cost - Total number of QR scans - Individual delivery statuses - Created date ### Details download Best for troubleshooting or deeper analysis. Each row represents one individual recipient and includes: - Recipient info (Name, Address, City, State, Zip, Country, Email, Phone, Custom1/2) - Number of QR code scans for that recipient - Message - Order ID - Type, Size - Method - Subaccount ID ### Filters When downloading order history you can filter by: **Method** - how the order was placed: | Method | Description | |---|---| | API | Orders sent via the API | | Campaigns | Orders sent automatically by a Campaign | | Send Mail Wizard | Orders placed using the Send Now button in the dashboard | | Email | Orders triggered by emailing send@thanks.io | | Zapier | Orders triggered via a Zapier integration | **Status** - current state of the order: | Status | Description | |---|---| | Reviewing | Within the 1-hour cancellation window after placing | | Processing | Submitted to the printer, awaiting confirmation | | Fulfilled | All processing complete | | Printed | Printer has confirmed printing | | Shipped | Printer has confirmed shipment | | Cancelled | Cancelled during the Reviewing window; funds returned to balance | | Failed | Failed due to technical errors | **Date** - choose a date range. You can download up to 30 days of order history at a time. ## Viewing order details After placing an order, click the **Details** button on the dashboard to open its order details page. ### Download a print proof In the upper left of order details, you can download a PDF proof of the mailer that was printed. ### Order tracking The **Delivery Summary** section shows all known USPS tracking information for the order. Possible delivery statuses include: - **Processing** - Order is queued for printing - **Printed** - Order has been printed and mailed - **In Transit** - Mail piece is being processed at the origin USPS facility - **In Local Area** - Mail piece is being processed at the destination USPS facility - **Out for Delivery / Delivered** - Mail piece has been cleared for delivery; should arrive within 1-2 business days - **Re-routed** - USPS re-routed the piece due to a change of address, address error, or barcode relabeling - **Returned** - USPS is returning the piece due to address or barcode errors - **Total Failed** - The piece failed and was not printed; see the order items for the specific reason ### Individual piece status The **Order Items** section lists each recipient in the order with their individual delivery status. You can click **View** in the Back Message column to see the PDF proof for that specific recipient. > Do not scan the QR code when viewing an individual proof - it will register a real scan that cannot be deleted. ### Re-Submit options From the Order Details page, you can use the **Re-Submit** dropdown to create a new order from an existing one: - **Keep Same Addresses** - creates a new order with all original recipients and opens the **Review** step. - **Only Failed Addresses** - creates a new order with only failed recipients and opens the **Review** step. This option appears only when failures exist. - **Choose New Addresses** - creates a new order with the same design and message but an empty recipient list, and opens the **Select Recipients** step. ### Errors An error means a mailer was stopped before it could be sent. Common reasons include: - **Duplicate protection** - A mailer was already sent to this address in the last 36 hours - **No-stat address** - USPS classifies this property as vacant and unlikely to receive mail - **Incorrect address** - A component of the address (street, city, state, or zip) is invalid If you think an error is not valid, check the address shown in the order items against USPS's address tool at [tools.usps.com](https://tools.usps.com/zip-code-lookup.htm?byaddress). > Duplicate and no-stat protections can be adjusted in [Order Error Settings](./order-error-settings.md). You will be responsible for any accidental mailings that result from disabling them. ### Filtering and downloading order items At the top of the Order Items section you can filter to show only errors or only QR scan events, which makes it easier to focus on specific issues or export a targeted list. ## Tips - Use the Summary download for accounting and the Details download when you need to see who scanned. - Use the QR scan export to identify high-engagement contacts for follow-up campaigns. ## Related - [Analytics Dashboard](./analytics-dashboard.md) - [QR Scan Analytics](../14-qr-and-tracking/analytics-and-export.md) --- ## Account Notifications # Account Notifications ## Where to find it Click the **gear icon** (⚙️) in the top right to open **Account Settings**. The **Notifications** section is on that page. ## Notification types | Notification | Description | |---|---| | Order confirmation | Email when an order is placed | | QR scan alert | Instant email or SMS when a recipient scans your mailer | | Mailer Report Email | Periodic summary of send and scan activity | | Delivery confirmation | Email when mail is delivered (where tracking data is available) | ## How to configure 1. Click the **gear icon** (⚙️) in the top right to open **Account Settings**. 2. In the **Notifications** section, toggle on the types you want: - **Email on QR Scan** - email whenever a QR code is scanned - **Text on QR Scan** - SMS whenever a QR code is scanned - **Daily Mailer Report** - daily performance summary for your mailings 3. To receive SMS notifications, enter your phone number in the **Contact Information** section above. 4. Click **Save Changes**. ## Related - [QR Scan Notifications](../14-qr-and-tracking/notifications.md) - [Analytics Dashboard](./analytics-dashboard.md) --- ## Order Error Settings thanks.io includes built-in safeguards that stop orders from being sent to duplicate recipients or addresses the USPS classifies as vacant. These can be adjusted in your **Mail Preferences**. ## How to find these settings 1. Click the **gear icon** (⚙️) in the top right. 2. Click **Mail Preferences**. 3. Scroll down past the Print Protect and Standard Mail Mode sections to find the three protection settings below. ## The settings ### Enable Dedupe Failsafe *(Under the Duplicate Prevention section)* When this is on, thanks.io will not send to the same recipient more than once within a 36-hour window. This protects against accidentally sending duplicate mailers when a recipient appears in multiple lists or a campaign triggers more than once. > This setting does not apply to gift cards. ### Check for Vacant Addresses on Orders *(Under the Flag Vacant Addresses section)* When this is on, thanks.io checks orders against USPS data and blocks mail going to addresses marked as "no-stat" - properties where no mail has been delivered in the past 90 days. These are typically vacant homes, new construction, or abandoned addresses. Disable this only if you are intentionally targeting areas with high new construction, where addresses may not yet have postal history. ### Auto-flag Invalid Addresses on Mailing Lists *(Under the Flag Invalid Addresses section)* When this is on, addresses that are returned or flagged as invalid are automatically marked undeliverable and excluded from future orders. This prevents you from re-sending to a bad address. ## Important warning If you turn off these protections and mail is sent to a bad address or a duplicate recipient, that mail costs money and will likely be returned or undeliverable. **thanks.io cannot offer refunds for mailings that result from disabled safeguards.** ## Related - [Download Order History & Stats](./exporting-reports.md) --- ## Profile and Security # Profile and Security ## Update name or email 1. Click the **gear icon** (⚙️) in the top right to open **Account Settings**. 2. Under **Contact Information**, update your email address. 3. Click **Save Changes**. > Changing your email requires verification - a confirmation link is sent to the new address. ## Change your password 1. Click the **gear icon** (⚙️) in the top right to open **Account Settings**. 2. Scroll to the **Password** section, enter your new password, and click **Update Password**. If you've forgotten your password, use the **Forgot Password** link on the login page. ## Enable Two-Factor Authentication (2FA) 1. Click the **gear icon** (⚙️) in the top right to open **Account Settings**. 2. Scroll to the **Two-Factor Authentication** section and toggle it on. 3. On your next login, you'll be prompted for a one-time code sent to your email (valid for 10 minutes). ## Adding team members thanks.io does not support multiple logins for a single account. There is no way to add a second user with their own email and password who can access the same account. If you need to manage separate brands, clients, or return addresses, [subaccounts](../15-subaccounts/overview.md) let you do that from the same login using the account switcher. ## Return address Your return name and address are set in **Mail Preferences**. 1. Click the **gear icon** (⚙️) in the top right. 2. Select **Mail Preferences**. 3. In **Return Address**, set **Show Return Address** to choose whether a return address is printed. 4. If **Show Return Address** is off, the form is hidden and the page shows **No return address shown.** 5. If **Show Return Address** is on and you choose a custom return address, enter Name, Address Line 1, City, State, and Zip Code. 6. Click **Save Changes**. If **Show Return Address** is on, a complete custom address is required before you can save. If you switch from hidden or default mode back to custom, the custom address fields start blank so you can enter your own details. The return address you set here applies to all orders from this account. To use different return addresses automatically, use [subaccounts](../15-subaccounts/creating-subaccounts.md) - each subaccount can have its own return address. ## Tips & best practices - Enable 2FA if your account has API access or subaccounts - a compromised account could affect multiple clients. - Use a strong, unique password. - If you see an unrecognized login in your login history, change your password immediately and contact support. ## Limits & gotchas - 2FA OTP codes expire after 10 minutes. - 2FA is email-based - ensure your account email is accessible and not a shared inbox. ## Related - [API Tokens](https://docs.thanks.io) - [Data and Privacy](./data-and-privacy.md) --- ## AI Fonts & Realism Mode # AI Fonts & Realism Mode ## What it is **AI Fonts** randomize the character placement and spacing in your handwritten-style message so every printed piece looks slightly different from the next. No two mailpieces are pixel-identical, which makes the text feel more like a personal note and less like a mass-produced template. **Realism Mode** goes further - it adds crossouts, subtle slant variations, and small imperfections to the handwritten-style rendering, imitating the natural variation of a human hand. Both are configured in the Message Template editor. ## How to enable them 1. Open a Message Template. 2. In the font settings section, toggle **AI Fonts** on. 3. To add imperfections, also toggle **Realism Mode** on. 4. To use white font (for dark background designs), select **White** in the font color options. 5. Preview the message, then click **Save**. ## Tips & best practices - Combine AI Fonts and Realism Mode for the most authentic look. - Use white font on dark Image Templates where dark ink would be unreadable. - AI Fonts introduces intentional variation - do not expect pixel-identical previews across recipients. That is the intended behavior. - Preview after enabling AI Fonts to confirm legibility, especially on shorter handwriting styles. - Realism Mode may add crossouts - disable it if the crossouts look confusing on your message. ## Limits & gotchas - AI Fonts variation is per-piece - each order generates unique rendering. ## Related - [Message Templates](../05-templates-and-design/message-templates.md) - [Rate My Content](./rate-my-content.md) --- ## Tips for Writing AI Newsletter Prompts Getting good output from thanks.io's AI newsletter feature comes down to how you write your prompt. A vague prompt produces generic content. A specific, well-structured prompt produces messages that feel personal and relevant to each recipient. The video below walks through practical tips for writing prompts that get better results - including how to give the AI enough context, how to set the right tone, and how to use replacement variables to personalize the message for each person on your list. ## Quick tips - **Be specific about tone and length** - tell the AI the voice you want ("friendly and professional") and a target word count ("under 120 words"). - **Include the purpose** - mention what the newsletter is for ("a monthly check-in for insurance clients" or "a seasonal update for past real estate clients"). - **Use replacement variables** - add `%FIRST_NAME%` and other [replacement variables](/ai-and-personalization/replacement-variables) in your prompt so the AI can address each recipient personally. - **Use Rate My Content** - after the AI generates your message, run it through [Rate My Content](/ai-and-personalization/rate-my-content) to score and refine it before sending. - **Test a few variations** - try two or three different prompt approaches on a small batch first to see which tone resonates best with your audience. --- ## ThanksAI Studio # ThanksAI Studio ## What it is ThanksAI Studio auto-builds mailer creatives with AI. Give it a prompt and it generates a print-ready front image for your postcard, notecard, letter cover, or other mailer type. No design software or graphic designer required. The generated image is saved as an Image Template and works with all standard campaign and single-send flows. A per-recipient QR code can still be placed on the AI-generated design - thanks.io composites it on top at print time, so every piece gets its own unique scannable code. ## How to use it 1. Go to **ThanksAI Studio** in the dashboard. 2. Click **New Generation**. 3. Enter your **prompt** - describe the mailer, its purpose, style, and any specific elements (e.g., "Real estate postcard for a Just Listed home. Modern design, warm tones, QR code in the bottom right."). 4. Optionally enter a **website URL** - thanks.io extracts brand colors, logo, and context automatically. 5. Select the **mailer type** (postcard, letter, Notecard, MagnaCard, etc.). 6. Click **Generate**. The status changes to *generating*. 7. When the status reaches *completed*, view the generated design. 8. To refine: type a message in the chat (e.g., "Make it more festive" or "Move the QR to the bottom left"). The design regenerates. 9. When satisfied, click **Save as Image Template**. ## Tips & best practices - Include brand colors, your CTA, and the intended audience in your prompt - the more specific, the better the first result. - For real estate, paste the listing URL directly - thanks.io pulls property details and agent branding automatically. - Use conversational refinements for small adjustments ("make the text larger", "use a darker background"). - If QR code placement is wrong, instruct the AI directly: "move the QR to the bottom-right corner." ## Limits & gotchas - Do not navigate away while the status is *generating*. - ThanksAI Studio generates the front image (postcard front, notecard front, letter cover). Message text is configured separately in a Message Template. - Per-recipient QR codes are composited onto the generated image at print time - you do not need to manually place them in the design. ## Related - [Image Templates](../05-templates-and-design/image-templates.md) - [Message Templates](../05-templates-and-design/message-templates.md) --- ## Dynamic Images (Street View) # Dynamic Images (Street View) ## What it is Dynamic images personalize the visual design of each mailer with images unique to that recipient or property. Instead of the same static design going to everyone, each piece can show a photo of the recipient's house, the subject property you're marketing, or product images from their purchase history. Three options: - **Google Street View** - automatically includes a photo of the recipient's property on the mailer - **Target Property** - for Neighbor Blast and Absentee Owner Mode: shows the *target* property, not the recipient's property - **Hyper-Personalization** - include recipient-specific images (product photos, specific house, any image URL) via your CRM or API ## Enabling Street View on an Image Template 1. In the nav bar, go to **Image Templates**. 2. Click **Dynamic Builder**. 3. Set the Background Image to `~STREET_VIEW~`. 4. Add a header and subheader - for example: - Header: *"Just Listed on Your Street"* - Subheader: *"See what's happening in your neighborhood."* 5. Save the Image Template. ## Subject Property: when to use it Use **Subject Property** when: - You're running a Neighbor Blast campaign for a Just Listed / Just Sold property - neighbors see the listing, not their own house - You're targeting absentee owners - the mailer shows the investment property you want them to sell Do NOT use Subject Property on a standard Days After Added campaign unless the target property is intentionally different from the recipient's address. ### Showing a different address in Google Street View or Map View By default, the Street View or Map View image uses the recipient's own mailing address. If you want the Google image to show a *different* address (for example, an absentee owner's investment property), map the **Absentee Address** field in the recipient record to the address you want shown. You can set this field on CSV upload, via Zapier, or through the API. ## Hyper-Personalization Hyper-Personalization is configured per-send via the API or via CRM integrations. Pass an image URL for each recipient as a custom field and reference it in the Image Template design. See [API documentation](https://docs.thanks.io) for field details. ## Dynamic Image Template variable reference Dynamic image templates use `~VARIABLE~` (tilde) syntax in the header, subheader, QR code, background image, overlay image, and other fields. Here is an example of how the variables appear in a dynamic card: ![Dynamic postcard showing personalized address in header and Street View property image](/img/dynamic-image-template-example.jpg) And the corresponding template settings: ![Dynamic Image Template settings showing tilde variables in the header and image fields](/img/dynamic-image-template-settings.png) ### Recipient variables | Variable | What it inserts | |---|---| | `~FULL_NAME~` | Recipient's full name | | `~FIRST_NAME~` | Recipient's first name | | `~LAST_NAME~` | Recipient's last name | | `~COMPANY~` | Recipient's company name | | `~ADDRESS~` | Street address line 1 | | `~ADDRESS2~` | Address line 2 | | `~CITY~` | City | | `~STATE~` | State | | `~ZIP~` | ZIP code | | `~EMAIL~` | Recipient's email address | | `~PHONE~` | Recipient's phone number | | `~CUSTOM1~`-`~CUSTOM10~` | Custom fields from the recipient record | | `~ABSENTEE_STREET~` | The absentee/target property address (Neighbor Blast and Absentee Owner Mode) | | `~MESSAGE_QR~` | Uses the same QR code URL set on the paired Message Template | ### Custom field image URLs in Dynamic Builder In Dynamic Builder image URL fields, you can use recipient custom field tokens as image sources. Supported fields: - **Background Image** - **Logo Image URL** - **Overlay Graphic** Supported tokens: - `~CUSTOM1~` through `~CUSTOM10~` At send time, each token resolves to that recipient's custom field value. If the value is a valid image URL (PNG or JPG), it is rendered in the final generated image. What this enables: - Recipient-specific background images - Recipient-specific logos or brand images - Recipient-specific overlay graphics - Flexible templates that source image assets from recipient data instead of hardcoded URLs How it works: - The Dynamic Builder editor accepts custom field tokens in image URL fields. - Preview rendering shows a placeholder image when a custom field token is used as an image source. - At send time, the system resolves each recipient's custom field value into the final image URL. - If the custom field is missing or not a valid image URL, that recipient is skipped and the order is flagged with an error. ### VisitorView variables These variables are populated when a recipient is captured via the thanks.io website tracking script. They carry data about the web page the visitor came from. | Variable | What it inserts | |---|---| | `~VV_TITLE~` | Title of the page that captured the recipient | | `~VV_IMAGE~` | Meta/OG image from the page that captured the recipient | | `~VV_LAST_URL~` | URL of the page that captured the recipient | ## Tips & best practices - For real estate, Street View on the recipient's property makes the mailer feel unmistakably personal - recipients recognize their own house immediately. - Street View quality varies by address. Rural or newer developments may have lower-resolution imagery. Preview with a sample address before a large campaign. - Hyper-Personalization is most powerful combined with CRM triggers (e.g., send a product-image postcard the day after a cart abandonment). - VV_ variables are only populated for recipients captured by the VisitorView tracking script. They will be blank for recipients added via CSV or manually. ## Limits & gotchas - Street View uses Google Street View imagery - coverage and recency depend on Google's data. - Dynamic images add processing time per piece. ## Related - [Neighbor Blast Campaign](../09-campaigns/neighbor-blast.md) - [Image Templates](../05-templates-and-design/image-templates.md) - [Replacement Variables](./replacement-variables.md) --- ## Rate My Content # Rate My Content ## What it is Rate My Content is an AI scoring feature in the Message Template editor. It works across **Manual Edit**, **AI Builder**, and **Real Estate CMA** modes, and scores your message 1-10 across four dimensions: - **Personalization** - does the message feel tailored to the recipient? - **Call to Action** - is the next step clear and compelling? - **Readability** - is the message easy to scan and understand? - **Tone** - is the tone appropriate for the intended audience? When any dimension scores 8 or below, Rate My Content surfaces specific critiques and a one-click recommendation. You can apply the recommendation immediately, adjust it, or revise manually. ## How to use it 1. Open a Message Template and write or paste your message. 2. Click **Rate My Content**. 3. Review the scores for each dimension. 4. If any score is ≤8, read the critique. 5. Click **Apply Recommendation** (or the equivalent one-click apply action) to accept the improved version, or edit manually. 6. Run Rate My Content again after making changes to verify scores improved. 7. Click **Save** when all dimensions are at your target. ## Tips by dimension - **Low Personalization:** add `%FIRST_NAME%` and other replacement variables. - **Low Call to Action:** end with one clear, specific next step (e.g., "Scan the QR code to schedule a free call" - not "Let me know if you're interested"). - **Low Readability:** shorten sentences, remove jargon. Physical mailers are read quickly. - **Low Tone:** re-read as if you were the recipient. Adjust if it's too pushy or too casual. ## Limits & gotchas - Scores are AI-generated and reflect general best practices - they are a guide, not a guarantee. - Per-recipient AI prompts embedded in Message Templates are not scored - only the static message body is evaluated. - Always review suggested improvements for accuracy and brand voice before accepting. ## Related - [Message Templates](../05-templates-and-design/message-templates.md) - [Replacement Variables](./replacement-variables.md) - [AI Fonts & Realism Mode](./ai-fonts-and-realism-mode.md) --- ## Replacement Variables # Replacement Variables ## What it is Replacement variables are placeholders you type in your Message Template. At send time, thanks.io replaces each variable with the corresponding value for that recipient - so every piece feels personally written. Variables always appear in `%UPPER_CASE%` format surrounded by percent signs. ## Example ``` Hi %FIRST_NAME%, We just listed a home near you at %ABSENTEE_STREET% and wanted to reach out. - %YOUR_FULL_NAME% %YOUR_PHONE% ``` At send time: `%FIRST_NAME%` → "Sarah", `%ABSENTEE_STREET%` → the listing address, `%YOUR_FULL_NAME%` and `%YOUR_PHONE%` pull from Branding Builder. ## Full variable reference ### Branding variables (from Branding Builder) | Variable | What it inserts | |---|---| | `%YOUR_FULL_NAME%` | Your full name | | `%YOUR_FIRST_NAME%` | Your first name | | `%YOUR_PHONE%` | Your phone number | | `%YOUR_COMPANY%` | Your company name | | `%YOUR_EMAIL%` | Your email address | ### Recipient name | Variable | What it inserts | |---|---| | `%FIRST_NAME%` | Recipient's first name | | `%LAST_NAME%` | Recipient's last name | | `%FULL_NAME%` | Recipient's full name | | `%NAME%` | Alias for `%FULL_NAME%` | ### Recipient address | Variable | What it inserts | |---|---| | `%ADDRESS%` | Street address line 1 | | `%ADDRESS2%` | Address line 2 | | `%CITY%` | City | | `%STATE%` | State or province | | `%ZIP%` | ZIP or postal code | ### Recipient - other fields | Variable | What it inserts | |---|---| | `%COMPANY%` | Recipient's company name | | `%CUSTOM1%`-`%CUSTOM10%` | Custom fields 1-10 from the recipient record | | `%FIELD1%`-`%FIELD4%` | Aliases for `%CUSTOM1%`-`%CUSTOM4%` | ### Real estate / Absentee Owner | Variable | What it inserts | |---|---| | `%ABSENTEE_STREET%` | The target/search address (Neighbor Blast and Absentee Owner Mode) | ### Date | Variable | What it inserts | |---|---| | `%CURRENT_DAY%` | The current date when the mail piece is generated | ## Tips & best practices - Configure Branding Builder before using `%YOUR_*%` variables. Empty fields render as blank text. - Use `%FIRST_NAME%` at the start of the message for instant personalization. - Custom fields (`%CUSTOM1%`-`%CUSTOM10%`) let you carry any CRM data - lead score, product name, agent name - into your mailer. - If a variable is missing for a recipient, it renders as empty. Preview with a real recipient before a large send. ## Tilde format for QR codes and dynamic image templates The `%VARIABLE%` format is for the message body text only. Two other fields use a different format - `~VARIABLE~` (tilde instead of percent signs): - **QR code URL field** in a Message Template - for example, `https://yoursite.com/welcome?name=~FIRST_NAME~` - **Dynamic Image Template fields** - header, subheader, background image, overlay image, and QR code See [Dynamic QR URLs](../14-qr-and-tracking/dynamic-urls.md) and [Dynamic Images](./dynamic-images.md) for full details and variable lists. ## Limits & gotchas - Standard recipient and branding variables are available on all tiers. - Do not modify the `%` delimiters or change casing inside the variable name - `%first_name%` will not resolve. - `%FIELD1%`-`%FIELD4%` are interchangeable with `%CUSTOM1%`-`%CUSTOM4%`. ## Related - [Branding Builder](../05-templates-and-design/branding-builder.mdx) - [CSV Upload & Format](../04-mailing-lists/csv-upload-and-format.md) - [Message Templates](../05-templates-and-design/message-templates.md) --- ## API Test Mode API Test Mode can be enabled or disabled in your API settings. When test mode is on, any orders placed via Zapier or the API will be **automatically cancelled**. This lets you test your integration without placing real orders. To access it, click the gear icon at the top right of your dashboard and select **API Access**. From there, you can toggle API Test Mode on or off. --- ## Authorization Headers When making API calls or setting up webhooks, use the following headers to authorize your connection. Your tool or interface will accept these as a Key/Value pair. The format below shows `'Key' : 'Value'`: ``` Accept : application/json Authorization : Bearer YOUR_API_KEY ``` > **Note:** Casing matters. `Accept` is not the same as `accept`. Include a space after `Bearer` before your API key. Below is an example of what this looks like in a UI-based tool: ![Authorization headers example in a UI-based tool](/img/authorization-headers-example.png) --- ## Finding Mailing List, Image Template & Message Template IDs When using the API, you will often need to reference specific IDs for mailing lists, image templates, and message templates. ## Mailing List ID Click **Mailing Lists** on the left sidebar, then click on the list you want the ID for. ![Click on the mailing list you want an ID for](/img/find-mailing-list-click.png) The ID appears in the URL at the top of your browser window. ![Find the mailing list ID in the browser URL bar](/img/find-mailing-list-url.png) In the example above, the number `115262` is the ID. ## Image Template ID Click **Image Templates** on the left sidebar, then hover over the image you want an ID for and click the magnifying glass icon. ![Hover over the image template and click the magnifying glass icon](/img/find-image-template-magnify.png) The ID is displayed at the bottom left of the preview. ![Image template ID shown at the bottom left](/img/find-image-template-id.png) ## Message Template ID Click **Message & QR Templates** on the left sidebar. The ID for each template is listed on the right side of the screen. ![Message template IDs listed on the right side](/img/find-message-template-id.png) --- ## Generate an API Key You can generate an API key at any time by clicking the gear icon at the top right of your dashboard and selecting **API Access**. Scroll down to **Personal Access Tokens** and click the **+** icon to generate a new key. You will be prompted to give your token a name, and then the token will be shown to you. > **Important:** The token is only shown **once**. If you close the window before copying it, you will need to generate a new key. --- ## API & Developer Documentation The thanks.io REST API and full developer documentation - including authentication, API tokens, webhooks, rate limits, code examples, and endpoint references - is hosted at: **[docs.thanks.io →](https://docs.thanks.io)** --- ## What you'll find at docs.thanks.io - **Authentication** - generating API keys and API tokens, authorization headers - **Sending mail via API** - orders API, sending postcards, letters, and handwritten cards programmatically - **Campaigns API** - creating and managing campaigns via API - **Mailing lists API** - managing contact lists, adding and removing contacts - **Templates API** - retrieving template IDs, handwriting style IDs, image template and message template IDs - **Webhooks** - setting up webhook delivery, easy add-to-list webhooks, webhook error troubleshooting - **Rate limits** - API rate limiting and best practices - **Error codes** - full list of API error codes and how to resolve them - **Code examples** - sample code in multiple languages (Node.js, Python, PHP, Ruby, etc.) - **MCP server** - thanks.io MCP server setup and configuration for AI integrations - **Test mode** - using API test mode (orders auto-cancel in test mode) - **First API request** - getting started walkthrough for developers Head to **[docs.thanks.io](https://docs.thanks.io)** to get started. --- ## Birthday & Holiday Campaigns # Birthday & Holiday Campaigns ## What it is **Birthday campaigns** trigger on the birthday stored in each recipient's profile - every year, on their birthday, the campaign fires. **Holiday campaigns** trigger on a calendar date you choose (e.g., December 1 for a Christmas send) and send to everyone on the bound list on that date. ## Birthday campaign setup 1. Go to **Automated Campaigns** in the left navigation. 2. Click **Add Automation**. 3. In the modal, set **Select What To Send**, **Select An Image Template**, **Select A Message Template**, and **Select A Mailing List**. Ensure recipients have a `birthday` field populated. 4. Under **When to Send**, choose **On Recipient's Birthday** as the Sending trigger. 5. Click **Save**. 6. On the automation row, click **Preview** to review the rendered mailer. 7. Toggle the automation **ON**. ## Holiday campaign setup 1. Go to **Automated Campaigns** in the left navigation. 2. Click **Add Automation**. 3. In the modal, set **Select What To Send**, **Select An Image Template**, **Select A Message Template**, and **Select A Mailing List**. 4. Under **When to Send**, choose **On a Holiday** as the Sending trigger, then select the holiday from the **Select Holiday** dropdown. 5. Click **Save**. 6. On the automation row, click **Preview** to review the rendered mailer. 7. Toggle the automation **ON**. ## Tips & best practices - thanks.io automatically triggers birthday sends 10 days before the recipient's birthday to account for delivery time. No manual timing adjustment is needed. - Ensure the `birthday` column is in your CSV. Missing birthday data means the trigger never fires. - Use `%FIRST_NAME%` to personalize the greeting. - For Holiday campaigns, create the campaign at least 1-2 weeks before the send date. - Birthday campaigns recur annually - you don't need to re-enable them each year. ## Limits & gotchas - Duplicate Prevention applies. - Holiday campaigns send to all active recipients on the bound list on the trigger date - make sure your list is current. - If a recipient's birthday is less than 10 days away when they are added to your list, the campaign will not fire for that birthday - it is too close to the scheduled send window. The campaign will fire on the following year's birthday. ## Related - [CSV Upload & Format](../04-mailing-lists/csv-upload-and-format.md) - [Campaigns Overview](./overview.md) --- ## Chaining Automated Campaigns & Automations # Chaining Automated Campaigns & Automations ## What it is Chaining lets you connect campaigns together so a recipient automatically flows from one sequence to the next. The mechanism that drives chaining: - **Move recipient to new mailing list after sending** - when an automation sends mail to a recipient, automatically move that recipient to a different list. This can trigger a second campaign that watches the destination list. ## Building a 3-touch drip with chaining **Option A - Multiple actions in one campaign (same list):** 1. Add three automations to a Days After Added campaign at Day 3, Day 10, and Day 21. 2. The same list drives all three actions. 3. Each action uses a different Image Template + Message Template. **Option B - Chain across campaigns (different lists):** 1. Campaign A (Days After Added, Day 3) on List A. 2. Set **Move Recipient on Send** → move to List B. 3. Campaign B (Days After Added, Day 10) watches List B. 4. Set **Move Recipient on Send** on Campaign B → move to List C. 5. Campaign C watches List C. Option B is more flexible but requires more setup. Use it when you need different campaign types in the same sequence (e.g., Neighbor Blast → Days After Added follow-up). ## Related - [Days After Added](./days-after-added.md) - [Neighbor Blast](./neighbor-blast.md) --- ## Days After Added # Days After Added ## What it is Days After Added sends a mailer a fixed number of days after a recipient is added to the bound mailing list. Add someone on day zero - the campaign fires automatically on day N. It is the most common campaign type for drip sequences, welcome series, and lead nurture flows. ## How to set it up 1. Go to **Automated Campaigns** in the left navigation. 2. Click **Add Automation** (header banner) or **+ Add Automation** next to a mailing list group. 3. In the modal, set **Select What To Send**, **Select An Image Template**, **Select A Message Template**, and **Select A Mailing List**. 4. Under **When to Send**, choose **A Number of Days After a Recipient Is Added** as the Sending trigger. 5. Enter the number of **Days** (how many days after a recipient is added to the list). 6. Optionally toggle **Move recipient to new mailing list after sending** and select a destination list. 7. Click **Save**. 8. On the automation row, click **Preview** to review the rendered mailer. 9. Toggle the automation **ON** to activate it. ## Build a multi-step drip To build a drip sequence (e.g., Day 3 → Day 10 → Day 21): - Add multiple Campaign Actions at different delays, **or** - Use **Move Recipient on Send** to move the recipient to a second list that is bound to a second campaign. See [Chaining & Actions](./chaining-and-actions.md). ## Tips & best practices - Use `%FIRST_NAME%` and other replacement variables in your Message Template to personalize automatically. - For a welcome series: warm introductory message on day 3, stronger CTA on day 10-14. - Preview using a real recipient from your list to catch variable issues before going live. ## Limits & gotchas - Duplicate Prevention applies. If the same recipient received mail less than 36 hours ago, the send is skipped for that recipient. - Delay timing is based on when the recipient was added, not when the campaign was enabled. ## Related - [Chaining & Actions](./chaining-and-actions.md) - [Campaigns Overview](./overview.md) - [Duplicate Prevention](../04-mailing-lists/duplicate-prevention.md) --- ## evenFLOW Daily Limit # evenFLOW Daily Limit ## What it is evenFLOW sends a fixed number of mailers per day from a bound list. You set the daily rate (e.g., 50 pieces/day) and evenFLOW works through the list at that pace. When the list is exhausted, the campaign pauses and resumes automatically when new recipients are added. ## How to set it up 1. Go to **Automated Campaigns** in the left navigation. 2. Click **Add Automation**. 3. In the modal, set **Select What To Send**, **Select An Image Template**, **Select A Message Template**, and **Select A Mailing List**. 4. Under **When to Send**, choose **Daily Send Limit (evenFLOW)** as the Sending trigger. 5. Enter the **Number of Recipients to Send to Daily**. 6. Optionally toggle **Move recipient to new mailing list after sending** and select a destination list. 8. Click **Save**. 9. On the automation row, click **Preview** to review the rendered mailer. 10. Toggle the automation **ON**. ## Tips & best practices - Calculate your daily limit to complete the list within your target window. A list of 500 at 20/day completes in 25 days. - Combine with **Move recipient to new mailing list after sending** to build a rolling engagement filter: recipients who are mailed move to another list. ## Limits & gotchas - Duplicate Prevention applies. ## Related - [Farming with evenFLOW Playbook](../02-playbooks/farming-with-evenflow.md) - [Campaigns Overview](./overview.md) - [Chaining & Actions](./chaining-and-actions.md) --- ## Neighbor Blast # Neighbor Blast ## What it is Neighbor Blast mails to the neighbors of a target address. When you add an address to the bound list, thanks.io finds nearby neighbors within your configured radius and sends them mail automatically. All Neighbor Blast recipients land in a shared list called **All Campaign Neighbor Blasts** - available for follow-up campaigns. ## How to set it up 1. Go to **Automated Campaigns** in the left navigation. 2. Click **Add Automation**. 3. In the modal, set **Select What To Send**, **Select An Image Template**, **Select A Message Template**, and **Select A Mailing List** (this list receives the source/target addresses you want to blast around). 4. Under **When to Send**, choose **Neighbor Blast (radius around an address)** as the Sending trigger. 5. Set **Neighbor Types** and **Number of Neighbors to Send To**. 6. Enter the day delay in the **Enter Day After Added to List** field (days after an address is added before the blast fires). 7. Under **Select the Property to Display in Google Street View**, choose whether the card image shows the target property or the recipient's property. 8. Optionally toggle **Include Search Address In Mailing List** to also mail the target address itself. 9. Optionally toggle **Move recipient to new mailing list after sending** and select a destination list. 10. Click **Save**. 11. On the automation row, click **Preview** to review the rendered mailer. 12. Toggle the automation **ON**. ## Adding a source address Add the listing or target address to your bound list. The campaign fires automatically within the delay window. - From the dashboard: open your list → **Add Recipient** → enter the address - Via CSV upload - Via CRM/Zapier integration ## Tips & best practices - **Enable Target Property** for Just Listed / Just Sold and absentee owner sends. Without it, the recipient (a neighbor) sees their own address, not the listing - confusing and irrelevant. - For time-sensitive Just Listed sends, set delay to 0. - Combine with **Move Recipient on Send** to move Neighbor Blast recipients into a follow-up list for a Days After Added drip. - Check **All Campaign Neighbor Blasts** regularly - it's your complete record of everyone reached. ## Limits & gotchas - Neighbor searches draw on thanks.io's address data - coverage varies by area. - Duplicate Prevention applies. ## Related - [Neighbor Blast Playbook](../02-playbooks/neighbor-blast-just-listed.md) - [evenFLOW Daily Limit](./evenflow-daily-limit.md) - [Chaining & Actions](./chaining-and-actions.md) --- ## Automated Campaigns Overview # Automated Campaigns Overview ## What it is A campaign is an automated rule that turns list membership - or a date or radius event - into a mail order without manual effort. You configure the trigger, attach a design and message, and enable it. thanks.io handles the rest. Campaigns are built around two core objects: - **Mailing List** - the recipient pool the campaign watches - **Automation** - the actual send: Image Template + Message Template + delay + optional follow-up rules The Automated Campaigns index groups automations by their bound mailing list. Each mailing list group shows its automations as individual rows with Trigger, Schedule, Image Template, Message Template, Mail Piece, and Status. Every campaign action can be **previewed** before you enable it. ## Campaign types | Sending trigger | Best for | |---|---| | Every Month (recurring) | Monthly touches, client retention | | Every Year (recurring) | Annual check-ins, yearly promotions | | On a Holiday | Seasonal promotions, holiday greetings | | On Recipient's Birthday | Customer appreciation, birthday offers | | On Recipient's Anniversary | Client retention, renewal reminders, milestone recognition | | On a Specific Date | One-time event-based sends, planned campaigns | | A Number of Days After a Recipient Is Added | Drip nurture, welcome series, lead follow-up | | Staggered Throughout the Year (evenFLOW) | Spread sends evenly across the year | | Daily Send Limit (evenFLOW) | Sustained farming, paced high-volume outreach | | Neighbor Blast (radius around an address) | Real estate farming, local service marketing | ## How to create an automation 1. Go to **Automated Campaigns** in the left navigation. 2. Click **Add Automation** - either from the header banner or the **+ Add Automation** button next to an existing mailing list group. 3. In the **Add Automation** modal, fill in: - **Select What To Send** - mail piece type (Postcard, Letter, Notecard, etc.) - **Select An Image Template** - **Select A Message Template** - **Select A Mailing List** 4. Under **When to Send**, choose a **Sending trigger** (this sets the campaign type). Fill in any trigger-specific fields that appear (day count, date, holiday, neighbor radius, etc.). 5. Optionally toggle **Move recipient to new mailing list after sending** and select a destination list. 6. Click **Save** (or **Save and Add Another** to chain another automation). 7. On the automation row, click **Preview** to verify the rendered mailer. 8. Toggle the automation **ON** in the Status column to activate it. ## Related - [Days After Added](./days-after-added.md) - [Birthday & Holiday Campaigns](./birthday-and-holiday.md) - [Anniversary Send](./anniversary-send.md) - [Neighbor Blast](./neighbor-blast.md) - [evenFLOW Daily Limit](./evenflow-daily-limit.md) --- ## Campaign Preview & Analytics # Campaign Preview & Analytics ## Previewing a campaign Before enabling a campaign, always preview the automation: 1. Go to **Automated Campaigns** in the left navigation. 2. Expand the mailing list group that contains the automation. 3. On the automation row, click **Preview**. 4. thanks.io renders the mail piece using a recipient from the bound list (or a placeholder if the list is empty). 5. Check: design, message, replacement variables, QR code placement, and address block. 6. If anything looks wrong, click the edit (pencil) icon on the row to reopen the automation modal and adjust the templates. ## Campaign analytics Each automation row in the **Automated Campaigns** list shows: - **Trigger** - the sending trigger type (e.g., monthly, birthday, days after added) - **Schedule** - trigger-specific timing (e.g., day count, holiday name) - **Message Template** and **Image Template** - the attached designs - **Mail Piece** - postcard size or mail type - **Status** - Active or Paused For QR scan data, go to **Analytics** in the left navigation (under Reports). The Analytics page shows: - **Top Scan Rates** - breakdown by Image Template, Message Template, and Mailing List - **Recent Scans** - a live feed of recent QR scans with recipient name, address, and timestamp - **All QR Scans** - link to the full scan history across all campaigns ## Related - [Campaigns Overview](./overview.md) --- ## Address Verification # Address Verification - FAQs ### What is address verification? Address verification checks each recipient's address against postal databases to confirm it can receive mail. It runs automatically when you upload a CSV and flags any addresses that cannot be confirmed as deliverable via the Invalid Address filter on your mailing list. ### Why was my address marked as invalid? Common causes include typos, missing suite/unit numbers, non-existent street numbers, PO box formatting errors, or addresses in newly built developments not yet in the postal database. ### How do I fix an invalid address? Open your mailing list, use the Invalid Address filter to find flagged recipients, then click to edit each recipient and correct the address. Once saved, verification runs again automatically. ### Is address verification automatic? Yes - Auto Address Verification runs every time you upload a CSV or add recipients. ### Why was the address on my delivered card different from what I entered? thanks.io uses a CASS-Certified Address Verification system that automatically standardizes and cleanses U.S. addresses to optimize deliverability. International addresses are standardized to uppercase. After verification, postcards and letters are also run through **NCOA** (National Change of Address) as required by USPS. NCOA is a USPS database of change-of-address records, and running through it may result in the final printed address being different from what you originally entered. This process reduces undeliverable mail and ensures your pieces reach the right people. ### My recipient address is blocked or showing as wrong - what do I do? If an address is being blocked, it may be a **"No Stat" address** - a property labeled as inactive (vacant) by the USPS. thanks.io blocks No Stat addresses by default since mail to these addresses is almost certain to be undeliverable. **To turn off No Stat blocking:** Go to **Account Settings → Mail Preferences → Flag Vacant Addresses** and disable the "Check for Vacant Addresses on Orders" toggle. Only disable this if you are intentionally mailing to areas with high new construction, where addresses may exist before the USPS database has been updated. If you believe a specific blocked address is actually valid and active, you can also request the USPS update its status. Visit [postalpro.usps.com/ppro-tools/address-management-system](https://postalpro.usps.com/ppro-tools/address-management-system), enter the 5-digit ZIP code, and click "locate" to find the relevant AMS office to contact. ### What does "Or Current Resident" mean, and how does it affect delivery rates? When you provide a recipient name, thanks.io automatically appends **"Or Current Resident"** to the delivery address. For example, a piece addressed to *John Doe, 123 Main Street, Anytown USA* will print as *John Doe Or Current Resident, 123 Main Street, Anytown USA*. This can improve delivery rates when you are not fully certain the named person still lives at that address - USPS will deliver the piece to whoever currently resides there rather than returning it as undeliverable. The tradeoff is that the mailer feels slightly less personal since it acknowledges the recipient may have changed. ## Related - [CSV Upload & Format](../04-mailing-lists/csv-upload-and-format.md) --- ## AI & Personalization # AI & Personalization - FAQs ### What is Rate My Content? Rate My Content is an AI scoring tool in the Message Template editor. It evaluates your message across personalization, call to action, readability, and tone - returning a score of 1-10. Scores of 8 or below surface specific critiques and a one-click improved version. ### What score should I aim for? Aim for 9 or 10 across all four dimensions before sending. ### What are replacement variables? Placeholders (e.g., `%FIRST_NAME%`, `%CITY%`, `%CUSTOM1%`) that are replaced with real recipient data at send time. Branding variables (`%YOUR_COMPANY%`, `%YOUR_PHONE%`) pull from your Branding Builder. ### Can I personalize each mailer with AI? Yes. The per-recipient AI messaging feature lets you embed a ChatGPT-style prompt in your Message Template. At send time, the AI generates a unique message for each recipient using their specific data. ### What are AI Fonts? AI Fonts apply randomized character placement and spacing so every piece in a batch looks subtly unique - no two pieces are pixel-identical. ### What is Realism Mode? Realism Mode adds subtle imperfections (slight crossouts, character irregularities) to make the handwriting-style rendering look even more naturally written. ### Does thanks.io use real handwriting? No. All text is produced by a proprietary digital handwriting engine - fully automated digital printing. ### What is ThanksAI Studio? ThanksAI Studio auto-builds mailer creatives with AI. Give it a prompt and it generates a print-ready front image for postcards, notecards, letter covers, and more. No design tool required. A per-recipient QR code can still be placed on the generated design - thanks.io composites it on top at print time. ## Related - [Rate My Content](../07-ai-and-personalization/rate-my-content.md) - [Replacement Variables](../07-ai-and-personalization/replacement-variables.md) - [AI Fonts & Realism Mode](../07-ai-and-personalization/ai-fonts-and-realism-mode.md) --- ## API & Webhooks # API & Webhooks - FAQs ### Does thanks.io have an API? Yes. thanks.io provides a REST API (v2) for sending mailers, managing mailing lists and recipients, handling orders, configuring webhooks, and more. The full OpenAPI spec is at [docs.thanks.io](https://docs.thanks.io). ### How do I authenticate API requests? **Personal access token** (single-account scripts) or **OAuth 2.0** (multi-tenant applications). Both use a Bearer token in the `Authorization` header. ### Is there a sandbox? Yes. **API Testing Mode** lets you submit orders without generating real mail or charges. Enable it in **Account Settings** → **API Access** tab, under **API Settings** → **Test Mode**. Turn it off before going live. :::warning Make sure API Testing Mode is off before you want to send real mail. ::: ### What webhook events are available? Order Status Change, Order Item Status Change, Order Item Delivered, and QR Code Scans. ### Are webhooks guaranteed? Webhooks are delivered at-least-once. Make your webhook consumer idempotent (safe to process the same event more than once) and deduplicate on event ID. ### How do I test my webhooks? Use the Test button in the dashboard webhook configuration screen, or use a tool like [webhook.site](https://webhook.site) to inspect payloads. ### What is the thanks.io MCP server? The thanks.io documentation MCP server at `https://docs.thanks.io/mcp` provides LLM-friendly access to the API documentation for AI assistants and developer tools that support the Model Context Protocol. ## Related - [API Overview](../08-api/overview.md) - [Authentication](https://docs.thanks.io) - [Webhooks](https://docs.thanks.io) --- ## Billing # Billing - FAQs ### What plans does thanks.io offer? Four tiers: **Free**, **Business**, **Professional**, and **Enterprise** (custom pricing). See [thanks.io/pricing](https://www.thanks.io/pricing) for current rates and features. ### How does pricing work? Monthly plan fee + per-piece cost for each mailer you send. No minimums, no commitments. Postage is included in the per-piece price. ### Is there a free plan? Yes. The Free plan has no monthly fee - you pay only per piece. Core single-piece sending is included. ### Are there discounts for yearly billing? Yes. Annual billing includes a subscription discount shown during checkout. ### Do you offer nonprofit pricing? Yes. Contact thanks.io to apply for discounted postage rates before placing your first order. ### When am I charged? Monthly plan fee: at the start of each billing period. Per-piece charges: when your order is submitted. Data services: at the time of use. ### What are data services? Pay-per-use lookups billed separately from your plan (address append, radius search, Print Protect, etc.). Available on all plans. ### Can I get invoices? Yes. Download PDF invoices from **Settings → Billing → Invoice History**. ### How do I upgrade my subscription? Go to **Settings → Billing → Subscription** or visit [dashboard.thanks.io/profile/billing/subscription](https://dashboard.thanks.io/profile/billing/subscription) to upgrade to the Business, Annual Business, or Professional plan. ### I have questions about the Enterprise plan Contact [support@thanks.io](mailto:support@thanks.io) for Enterprise pricing and options. ### How does the $49 bonus credit work when I upgrade to the Business plan? The $49 bonus credit is a one-time credit - not a monthly recurring benefit. Unused bonus credits carry over each month until they are used up, at which point you purchase credits as needed. All credits are non-refundable but they never expire. ### Why is my price different than I expected? Two settings can affect your per-piece cost beyond the base plan rate: - **Print Protect** - a flat fee added per postcard. You can adjust or remove it in your account Settings. - **Postage class** - First Class is the default and costs a few cents more per piece. Switching to Standard postage saves money but adds roughly 5 extra days to delivery, and Standard does not include tracking or return-to-sender service. ### If I disable auto-recharge, will my campaigns keep sending? Only while you have enough credits. If a send/order would push your balance below $0, the send is blocked and you will see an "auto-recharge disabled" failure message. :::warning Disabling auto-recharge means mailers can stop once your balance goes below $0. Keep credits available or add funds manually to avoid delivery interruptions. ::: ### Can I still add funds manually if auto-recharge is disabled? Yes. Manual credit top-ups using **Add Credits** continue to work normally even when auto-recharge is disabled. ### If I re-enable auto-recharge later, do I lose my previous recharge amount? No. Your previous auto-recharge amount is retained and applied again when you re-enable auto-recharge. ### Is a return address required? No. A return address is optional. In **Account Settings → Mail Preferences**, you can turn off **Show Return Address** to send without one. If **Show Return Address** is on and you use a custom return address, all required address fields must be completed before saving. ### Can gift cards be emailed to recipients? No. Gift cards can only be sent through physical direct mail. Email delivery of gift card codes is not currently supported. ### Why are $5 gift cards only available on paid plans? Two reasons: 1. **Fraud prevention** - $5 cards on free accounts would make it easy to abuse the platform by creating multiple accounts to send gift cards to oneself. 2. **Flexible redemption billing** - On paid plans, you are only charged for the gift card portion if the recipient actually redeems it. If they do not redeem, you only pay for the printing. ### How long does a recipient have to redeem a gift card? thanks.io places no time limit on how long the QR code remains scannable. Once the recipient claims the card, the expiration policy is set by the issuing brand. Almost all major brands have no expiration date on gift card balances. ### Can I cancel or deactivate a gift card the recipient has not received? Yes, if the gift card is still unredeemed. You can now invalidate unredeemed gift cards directly from the **Order Details** page. This is useful if a gift card was sent by mistake, is no longer needed, or should be disabled before use. If the gift card has already been redeemed, it cannot be invalidated. ### Which gift card brands are available? **Popular Picks:** Amazon, Starbucks **Food & Dining:** Applebee's, Baskin Robbins, Burger King, Chart House, Chili's, Chipotle, Cold Stone Creamery, Domino's, DoorDash, Dunkin' Donuts, Grubhub, IHOP, Morton's The Steakhouse, Omaha Steaks, On The Border, Outback Steakhouse, Panera, Papa John's, P.F. Chang's, Red Robin, Sheetz, SONIC, Taco Bell, TGI Fridays, Uber Eats, Wawa **Entertainment:** AMC Theatres, Apple Gift Card, Cinemark, Fandango, GameStop, Google Play, Sony PlayStation, Regal, Microsoft Xbox **Gifts & Retail:** 1-800-Flowers.com, Athleta, AutoZone, Baby Gap, Barnes & Noble, Bass Pro Shops, Build-A-Bear Workshop, Cabela's, Callaway, Crate & Barrel, CVS Pharmacy, eBay, Fanatics, Foot Locker, Go Play Golf, Guitar Center, Kohl's, Land's End, REI, Sephora, Spa Week **Travel & Transportation:** Chevron, Delta Air Lines, Hotels.com, Lyft, Uber **Big Box & Home:** Best Buy, The Home Depot, Target, Walmart, Wayfair ## Related - [Pricing Overview](../10-account-and-billing/pricing-overview.md) - [Upgrading or Downgrading Your Plan](../10-account-and-billing/upgrading-downgrading.md) --- ## Automated Campaigns # Automated Campaigns - FAQs ### What is a campaign? A campaign is an automated rule that triggers a mailer send when certain conditions are met - a recipient being added to a list, a birthday arriving, a geographic radius search completing, etc. ### What campaign types are available? - **Days After Added** - sends N days after a recipient is added to a list - **Birthday** - sends on the recipient's birthday - **Anniversary** - sends on a recurring anniversary date (e.g., policy start date, purchase date, or any custom date field) - **Holiday** - sends on a calendar date - **Neighbor Blast** - sends to addresses within a radius of a target property - **evenFLOW Daily Limit** - sends a fixed number of pieces per day from a list ### What is evenFLOW? evenFLOW paces sending at a set number of pieces per day. You can enable a loop so it restarts from the beginning when the list is exhausted, or pause when the list runs out. ### What is Neighbor Blast? Neighbor Blast sends to addresses within a configurable radius of a subject property - widely used in real estate for Just Listed, Just Sold, and farming campaigns. ### Can I pause a campaign? Yes. Toggle the campaign on or off from the campaign management screen at any time. > **Note:** If a campaign is disabled during a period when a mailer would have been sent, those sends are not placed retroactively when you turn it back on. Re-enabling a campaign only triggers future scheduled sends. ### Can I chain campaigns together? Yes. Use **Move recipient on send** to automatically move a recipient to a new list after a campaign fires. If that new list is attached to another campaign, the recipient enters the next campaign automatically. ### Can I send a T65 campaign? Yes. You can set up a T65 mailer as a campaign using the standard campaign sending options. All types of insurance mailers are supported. ### Can I edit an order after it has been placed? No. Once an order is placed, it cannot be edited. To make changes, cancel the order and re-create it. You are never charged for anything that is not sent. You can cancel any order in one click from your dashboard within the 1-hour cancellation window. ### What is JustListedJustSold.com? JustListedJustSold.com (JLJS) is an automated real estate mailer service offered by thanks.io. It lets you quickly send professionally designed postcards for Just Listed, Just Sold, Open House, Under Contract, Coming Soon, and seller farming campaigns. The service automatically customizes each card with the property details and your information, including a QR code on the back. You receive a text notification whenever the QR code is scanned. Pricing is transparent and shown before checkout. Visit [justlistedjustsold.com](http://justlistedjustsold.com) to get started. ## Related - [Campaigns Overview](../09-campaigns/overview.md) - [evenFLOW Daily Limit](../09-campaigns/evenflow-daily-limit.md) - [Neighbor Blast](../09-campaigns/neighbor-blast.md) --- ## CSV Upload # CSV Upload - FAQs ### What format does thanks.io require? UTF-8 encoded with a header row. Each subsequent row is one recipient. ### What columns are required? A deliverable physical address is required (at minimum: street address and country). Name, city, state/province, and postal code are strongly recommended. Email, phone, and custom fields are optional. ### How do I map custom fields? The upload column-mapping screen lets you map CSV columns to `custom1`-`custom10`. Once mapped, those values are available as `%CUSTOM1%`-`%CUSTOM10%` in Message Templates. ### Can I preview before uploading? Yes. thanks.io shows a preview with sample rows and column mappings before you confirm the import. ### What happens to duplicate rows? Duplicate rows are imported. Duplicate Prevention then governs whether each recipient receives mail within the 36-hour window. De-duplicate your CSV before uploading for cleaner lists. ### Does CSV upload update existing recipients? No. Uploading adds new recipients. To update an existing recipient's address or custom fields, edit the recipient directly in the dashboard. ### How do I handle international addresses? Include a `country` column with the 2-letter country code (e.g., `CA`, `GB`). Follow the postal conventions of the destination country. ### How do I add a spouse, second name, or business name to the postage address? Use the **2nd Contact** field (the CSV column header is `company`). The value you enter will appear below the recipient's name on the envelope. You can also reference it in Message Templates using `%COMPANY%`. If you want to address both people in the message body (for example, "Dear Bob & Alice"), store the combined name string in a custom field such as `custom1`, then use `%CUSTOM1%` in your template. ## Related - [CSV Upload & Format](../04-mailing-lists/csv-upload-and-format.md) --- ## Duplicates & Suppression # Duplicates & Suppression - FAQs ### What is Duplicate Prevention? Duplicate Prevention prevents the same recipient from receiving more than one piece of mail from your account within a 36-hour window, account-wide across all lists and campaign types. ### How does the 36-hour window work? When mail is sent to a recipient, thanks.io records the send timestamp. If another send is attempted for the same recipient within 36 hours, it is blocked and marked "Duplicate Prevented." The window resets after 36 hours. ### Can I disable Duplicate Prevention? Yes. Go to **Account Settings → Mail Preferences** and toggle off **Enable Dedupe Failsafe** under the Duplicate Prevention section. When off, duplicate checks are disabled account-wide. Gift cards are unaffected either way. ### What is a Suppression List? A Suppression List contains recipients who should never receive mail from your account. They are permanently skipped on all future sends, regardless of which list or campaign triggers the send. ### How is a Suppression List different from Duplicate Prevention? Duplicate Prevention is a temporary, time-based block (expires after 36 hours). A Suppression List is a permanent exclusion. Use Suppression Lists for opt-outs; Duplicate Prevention handles accidental double-sends. ## Related - [Duplicate Prevention](../04-mailing-lists/duplicate-prevention.md) - [Suppression Lists](../04-mailing-lists/suppression-lists.md) --- ## Handwriting & Fonts # Handwriting & Fonts - FAQs ### Is the handwriting real or digital? Digital. thanks.io uses a proprietary handwriting engine that renders handwritten-style script. It is a fully automated digital printing process. ### What handwriting fonts are available? A library of handwriting-style fonts ranging from casual to neat and professional. Browse and preview in the Message Template editor. Standard (non-handwriting) fonts are also available and labeled as **Normal Print**. ### Do character limits vary by handwriting style? Yes. Because each font has different glyph sizes, the number of characters that fit on a mailer depends on both the style and the specific letters used. A message with many narrow letters (like "i") will fit more text than one with many wide letters (like "m" or "a"). Check the character count indicator in the Message Template editor. ### What ink colors are available? The default ink color is black. You can change it in your account settings. Available colors are: - Blue - Black - Green - Purple - Red - White (useful for dark-background designs) ### Does my handwriting style apply to the envelope too? No. The handwriting style on the envelope is fixed and cannot be changed. Handwritten envelopes are available on notecards, gift cards, and windowless letters only. If you want the text inside your mailer to look similar to the envelope, use the AI Font **Analytic Atom** in blue - it is the closest match to the envelope handwriting style. ### What are AI Fonts? AI Fonts apply randomized character placement and spacing so each mail piece in a batch looks subtly different - no two pieces are pixel-identical. ### What is Realism Mode? Realism Mode adds subtle imperfections (slight crossouts, minor irregularities) to make the rendering look even more like a naturally handwritten note. ### Can I use custom fonts? No - thanks.io uses its own font library. Browse available fonts in the Message Template editor to find the closest match to your preferred style. ### Can the font on the address portion of a postcard or envelope be changed? No - the address fonts are fixed and cannot be customized. - **Postcards** use a typed font that meets USPS guidelines for postal permits. This is required for the mail to process correctly through their automated systems. - **Envelopes** use a handwritten-style font chosen for both legibility and a welcoming look. The blue ink adds a personal touch that has been shown to increase open rates. These choices are intentional - they balance postal compliance, readability, and aesthetics to make a strong first impression. ### Is the recipient address handwritten? It depends on the mailer type: - **Windowless letters, notecards, and gift cards** - yes, the recipient and return address are written in a handwriting-style font. - **Postcards and windowed letters** - no, the address uses a typed font for USPS processing compatibility. ## Related - [AI Fonts & Realism Mode](../07-ai-and-personalization/ai-fonts-and-realism-mode.md) - [Message Templates](../05-templates-and-design/message-templates.md) --- ## Healthcare & HIPAA # Healthcare & HIPAA - FAQs ### Can healthcare providers use thanks.io? Yes. Healthcare providers may use thanks.io for general marketing and advertising campaigns that do **not** involve Protected Health Information (PHI). thanks.io is not a HIPAA-compliant platform and does not execute Business Associate Agreements (BAAs). Do not upload, store, or process PHI in thanks.io. ### What types of mailings are acceptable? Healthcare providers may use thanks.io for general marketing purposes, including: - Announcing a new practice or office location - Introducing a new provider - "Now accepting new patients" campaigns - Community event invitations - Health fairs or educational seminars - Seasonal wellness tips sent to the general public - Flu shot or vaccination clinic announcements distributed broadly - Mailings to purchased marketing lists - Every Door Direct Mail (EDDM) or geographic marketing campaigns - General branding and awareness campaigns These campaigns should be directed to the general public or prospect lists and should not rely on patient medical information. ### What should not be sent through thanks.io? Because thanks.io is not HIPAA compliant, healthcare providers should not use the platform to process or mail communications that involve PHI. Examples include: - Patient lists exported from an Electronic Medical Record (EMR) or practice management system - Appointment reminders - Recall or reactivation postcards generated from patient records - Messages related to diagnoses, treatments, prescriptions, or medical conditions - Mailings targeted to patients based on medical history or healthcare services received - Any mailing that requires a HIPAA Business Associate Agreement (BAA) ### Why are patient lists different from general marketing lists? Patient information maintained by a healthcare provider may be considered PHI under HIPAA. Uploading that information to a third-party service that is not HIPAA compliant may create compliance issues, even if the postcard itself does not disclose medical details. For this reason, healthcare providers should only use thanks.io for marketing campaigns that do not require the use or disclosure of PHI. ### Does thanks.io sign Business Associate Agreements (BAAs)? No. thanks.io does not execute Business Associate Agreements and should not be used to process or store PHI. ## Our policy **Healthcare Providers:** thanks.io is not a HIPAA-compliant service and does not execute Business Associate Agreements (BAAs). Do not upload or process PHI through the platform. The service may be used for general marketing campaigns directed to the public or prospect lists that do not contain PHI. Mailings based on patient records, diagnoses, treatments, appointments, or other protected health information should be handled through a HIPAA-compliant provider. --- ## Integrations # Integrations - FAQs ### What integrations does thanks.io support? Native: HubSpot, Canva, HighLevel, Bold Trail/kvCORE, SureSend, Email, and more. Automation platforms: Zapier, Make, n8n. See [docs.thanks.io](https://docs.thanks.io) for the full list. ### Is Canva free? Yes. The Canva integration is available on all plans, including Free. ### How do I connect HubSpot? Go to **Integrations** → HubSpot card → **Connect**. See [the HubSpot guide](../12-integrations/hubspot.md). ### Does thanks.io work with Zapier? Yes. See [Zapier Integration](../12-integrations/zapier.md). ### Can I use thanks.io with Shopify? Yes. Connect via Zapier or Make to trigger sends from Shopify order events. See [Shopify Integration](../12-integrations/shopify.md). ### What is the n8n node? thanks.io is available as a community n8n node (`n8n-nodes-thanks-io`) and via n8n Cloud. See [n8n Integration](../12-integrations/n8n.md). ## Related - [Integrations Overview](../12-integrations/overview.md) --- ## Postage & Shipping # Postage & Shipping - FAQs ### What is the difference between Standard and First Class postage? Standard postage is the lower-cost option and sufficient for most campaigns. First Class postage costs a few cents more per piece, delivers roughly 5 days faster on average, and includes return-to-sender service if the address is undeliverable. Standard postage does not include return-to-sender or individual piece tracking. ### How long does delivery take? Standard postage typically arrives in 7-14 business days from the print date. First Class typically arrives in 3-10 business days. Delivery times are estimates - actual transit varies by destination, USPS conditions, and season. ### Does thanks.io support international delivery? Yes. thanks.io supports international delivery for all mailer types. Delivery times for international mail vary by country. ### How much does postage cost? Postage is included in the per-piece price. See [thanks.io/pricing](https://www.thanks.io/pricing) for current per-piece rates by plan and mailer type. ### What happens if a mail piece is undeliverable? With First Class postage, undeliverable pieces are returned to your return address. With Standard postage, undeliverable pieces are discarded by USPS and not returned. ### Can I get tracking on my mail? Individual mail-piece tracking is not available for Standard postage. For engagement tracking, use QR codes - every scan is logged in real time regardless of postage class. ### When do orders process and ship? When an order for postcards, letters, or notecards is submitted, you have a 1-hour window to cancel before it is processed. After that window, the order cannot be cancelled. Orders placed before 11am Central time are processed that same day. Orders placed after 11am Central time are processed the next business day. Orders placed after 11am on Friday, or on weekends, are not printed until Monday morning. Average processing time during regular business hours is 24 hours. After USPS picks up, First Class mail typically arrives at the recipient's address within 5-7 days. ### What state do mail pieces ship from? All printing and mailing is handled at thanks.io's U.S. facility in Texas. ### Where is thanks.io based? Where do mailers print from? thanks.io's operations are based in Alaska (handling paperwork, finances, and returns). The company is officially registered in New Hampshire. All printing is done at a U.S. facility in Texas. ### Does thanks.io work in Canada? Yes. Canadian addresses are supported at the international mailing rate - see [thanks.io/pricing](https://www.thanks.io/pricing) for current rates. The following services are **not** available for Canadian accounts: purchasing lead mailing lists, website retargeting (VisitorView), and gift cards. ### What countries are not available for international mailing? The following countries are currently not supported per USPS restrictions (last updated March 2022): Algeria, Argentina, Australia, Azerbaijan, Bahrain, Bangladesh, Burkina Faso, Burundi, Cape Verde, Chile, Cuba, Curacao, Egypt, Eritrea, Ethiopia, Faroe Island, Ghana, Grenada, Guinea Bissau, India, Iraq, Kazakhstan, Kenya, Kuwait, Laos, Libya, Maldives, Mongolia, Morocco, Namibia, Nigeria, Oman, Pakistan, Peru, Philippines, Qatar, Samoa, Saudi Arabia, Solomon Islands, Sri Lanka, St. Marten, Suriname, Syria, Tunisia, United Arab Emirates, Yemen, Zambia Contact [support@thanks.io](mailto:support@thanks.io) if you have questions about a specific country. ### Can I use an international return address? No. Pre-sorted commercial mailings require a valid U.S. return address per USPS requirements. If your company is based outside the U.S., use a valid U.S. return address in **Account Settings → Mail Preferences** when **Show Return Address** is enabled. ### Why don't you offer EDDM (Every Door Direct Mail)? thanks.io sends via First Class Mail only. EDDM works differently and is not the right fit for everyone: - **EDDM advantage:** You do not need a mailing list - mail goes to every address in a chosen neighborhood, with lower postage rates. - **EDDM drawbacks:** No personalization (no recipient name on the piece), you must mail to the entire neighborhood with no way to limit quantity, and the broad approach wastes budget on people outside your target market. thanks.io is better suited for businesses targeting a specific audience, controlling send timing and quantity, and personalizing each piece. ### My card was delivered with smudges - what happened? Smudging can happen when USPS ultra high-speed sorting equipment runs mail pieces through belts that rub against the front (non-address) side of the card. This is a USPS handling issue outside of thanks.io's control, though the printer works closely with USPS to minimize it. Tips to reduce visible smudging: - Use lighter background colors on your design. Lighter backgrounds make smudging far less noticeable - black backgrounds show smudges most, white backgrounds show them least. - The area most affected on 4x6 postcards is the center-left portion of the card front. ### Why does my order status say "error"? Review the error details shown in your dashboard - they will indicate the specific issue. The most common causes are: - **Address Incomplete or Missing** - the street, city, state, or ZIP is missing or incorrectly formatted - **Address Undeliverable** - the address failed verification (see [Address Verification FAQs](address-verification.md)) - Same recipient receiving a mailer to the same address on the same day (duplicate/spam protection) - CSV formatting errors (especially when address fields contain commas without proper quoting) - Integration not set up correctly - if entering an address on a single line, format it as: Street, City, State, ZIP with commas separating each part ### Do you use recycled paper? Yes. thanks.io letters and postcards use recycled paper with between 10% and 100% post-consumer waste (PCW) material. ## Related - [Postage Options](../03-sending-mail/postage-options.md) - [International Delivery](../03-sending-mail/international-delivery.md) --- ## Privacy & Compliance # Privacy & Compliance - FAQs ### How does thanks.io handle recipient data? Recipient data is stored securely and used to produce and deliver your mailers. thanks.io does not sell recipient data. See the [thanks.io Privacy Policy](https://www.thanks.io/privacy) for full details. ### Can I delete recipient data? Yes. Delete individual recipients from your mailing lists in the dashboard, or delete entire mailing lists. For bulk deletion, contact support. ### Can I opt out recipients? Yes. Add them to a **Suppression List** - suppressed recipients are permanently skipped on all future sends. ### Does thanks.io comply with GDPR? thanks.io does not make a blanket GDPR compliance claim. Review the [Privacy Policy](https://www.thanks.io/privacy) and consult your legal counsel for obligations as a data controller when mailing EU residents. ### Can healthcare providers use thanks.io? Yes, for general marketing campaigns that do not involve Protected Health Information (PHI). For full guidance on HIPAA, PHI restrictions, acceptable mailing types, and BAA policy, see [Healthcare & HIPAA - FAQs](./healthcare-and-hipaa.md). ### How do I delete my account? Contact at www.thanks.io. Account deletion is permanent - export any data you need first. ### What are your support hours? Support is available Monday through Friday, 9am - 7pm Eastern time. Support is closed on weekends and holidays. You can reach the team by email at [support@thanks.io](mailto:support@thanks.io) or via the help widget in the dashboard. ### Do you offer live demos or calls? thanks.io does not offer 1-on-1 demo calls - the platform is designed to be self-serve and you can get started in minutes. Several resources are available to help: - **Getting started videos:** [help.thanks.io/basics](https://help.thanks.io/basics) - Welcome Video and The Basics walkthrough - **"Paper Click" Marketers community** on Skool ([skool.com/paperclickmarketers](https://www.skool.com/paperclickmarketers)) - community with daily office hours - **Partnership sessions** ([calendly.com/thanks-io/partnerships](https://calendly.com/thanks-io/partnerships)) - for coaches, trainers, SaaS/API owners, and marketing agencies - **Automation Strategy Sessions** ([calendly.com/thanks-io/strategysession](https://calendly.com/thanks-io/strategysession)) - for help planning automated mail campaigns ## Related - [Suppression Lists](../04-mailing-lists/suppression-lists.md) - [Global Scan List](../14-qr-and-tracking/global-scan-list.md) - [Healthcare & HIPAA - FAQs](./healthcare-and-hipaa.md) --- ## QR Codes # QR Codes - FAQs ### How do I add a QR code to my mailer? QR codes can be configured in three ways: - **Message Template** - Open the Message Template editor, enable the QR code option, and set your destination URL or choose the thanks.io default landing page. - **Send Mail Wizard** - QR code options are available when building your order in the wizard. - **API** - Pass your QR destination URL as part of the API request when sending programmatically. ### What happens when someone scans my QR code? The recipient is taken to your specified URL or the thanks.io default landing page, which greets them by name and displays your branding. ### Can I track who scanned? Yes. Every scan is recorded with the recipient's details, the order, and the mailing list. View scans in the Analytics dashboard, the Global Scan List, and receive real-time email, text, or webhook notifications. ### Can I use a custom URL? Yes. You can set any publicly accessible URL as the QR destination. Dynamic per-recipient URLs are also supported - the QR code encodes recipient-specific parameters so your landing page knows exactly who scanned. ### What is the Global Scan List? The Global Scan List (also called **All QR Scans**) automatically adds every scanning recipient. Use it as a source for follow-up campaigns. ### Can I move a recipient to a different list on scan? Yes. **Move recipient to a list on scan** automatically moves a scanning recipient to a list you specify, which can trigger a follow-up campaign automatically. ### How do I remove the QR code from my mailers? When you use the Branding Builder, a QR code is automatically included on your mailers. To remove it, update or remove the background image that was added by the Branding Builder. You can do this on the [Image Templates](https://dashboard.thanks.io/image_templates#system-background-images) page. ## Related - [Enabling QR Codes](../14-qr-and-tracking/enabling-qr-codes.md) - [Global Scan List](../14-qr-and-tracking/global-scan-list.md) - [Notifications](../14-qr-and-tracking/notifications.md) --- ## Subaccounts # Subaccounts - FAQs ### What is a subaccount? A scoped tenant under your parent thanks.io account with its own isolated mailing lists, templates, campaigns, orders, and webhooks. ### How do I create a subaccount? Go to the Sub Accounts section in the dashboard and click **Add Sub Account**. See [Creating Subaccounts](../15-subaccounts/creating-subaccounts.md). ### Do subaccounts have their own templates? Yes. Each subaccount has its own Image Templates, Message Templates, lists, and campaigns. Content does not carry over from the parent automatically. ### How does billing work? All subaccount usage is billed to the parent account. No separate billing per subaccount. ### Can each subaccount have its own webhooks? Yes. Webhooks are subaccount-scoped - each subaccount can have its own endpoints and event subscriptions. ### How do I switch between accounts? A picker on the left-hand side of the interface lets you switch between your main account and any subaccounts. Select the account you want from the list and the dashboard reloads in that context. ### Why are some settings or features greyed out? Certain items and features are only available when you are logged into the main (parent) account. If a setting appears greyed out or unavailable, switch back to your main account using the account picker on the left-hand side of the interface and try again. ## Related - [Subaccounts Overview](../15-subaccounts/overview.md) --- ## Templates & Design # Templates & Design - FAQs ### What is the difference between an Image Template and a Message Template? An **Image Template** holds the visual design - front and back artwork. A **Message Template** holds the written content - the handwriting-style message body, QR code configuration, and replacement variables. Both are required; you pair them at send time or inside a campaign. ### How do Message Template editor modes work? Message Templates offer three editing modes: - **Manual Edit** for direct control of your copy. - **AI Builder** for chat-based drafting and iteration. - **Real Estate CMA** for CMA-focused real estate messaging. ### How do I create an Image Template? Upload artwork directly in the dashboard, design in Canva and sync, or use a pre-built inspiration in the template library. ### Can I sync designs from Canva? Yes. The Canva integration is available on all plans, including Free. ### What file formats are accepted? JPEG and PNG are most common. Letters also accept PDF. Check the dashboard upload interface for current accepted formats. ### What are the correct dimensions? | Mailer type | Inches (w × h) | Pixels (w × h) | |---|---|---| | Postcard (4×6) | 6.25 × 4.25 in | 1875 × 1275 px | | Postcard (6×11) | 11.25 × 6.25 in | 3337 × 1777 px | | Letter / Windowless Letter | 8.5 × 11 in | 2550 × 3300 px | | Notecard / Gift Card | 5.625 × 4.3125 in | 1800 × 1313 px | | MagnaCard | 10.25 × 6.75 in | 2588 × 1688 px | These are the full canvas sizes at 300 DPI including bleed. Keep important content (text, logos, QR codes) inside the safe zone away from the edges. ### What is the Branding Builder? Stores your company-wide branding (logo, name, phone, email, "Scan Me" background). Values are accessible as replacement variables (`%YOUR_COMPANY%`, `%YOUR_PHONE%`) in any Message Template. ### Can I use Street View on my mailers? Yes. Street View is part of the Dynamic Images feature, which lets you embed automatically generated visuals into your mailer's Image Template. Street View pulls a Google Street View photo of each recipient's property so every piece in a run is uniquely personalized. ### Which background image gets used on my mailer? When an order is created, the system picks the background image using this priority order (highest wins): 1. **Manually set via API or Send Mail Wizard** - overrides everything else 2. **Attached to the Message Template** - the background set directly on the template 3. **Subaccount default** - the default background configured on the subaccount 4. **Account default** - the account-wide default background ### Do you offer a preview of your product offerings? Yes. You can view a [PDF portfolio](https://d2md0c8rpvzmz5.cloudfront.net/assets/print-portfolio.pdf) featuring live samples of each mailer type. ### Do you have holiday and Christmas card templates? Yes. thanks.io includes pre-loaded holiday templates in the Image Templates library. Go to **Image Templates** in your dashboard and browse the available designs. The inspiration gallery is also available directly in the dashboard - browse holiday and Christmas designs there, or upload your own artwork via **Image Templates → Upload**. ### Do you have example or inspiration creatives? Yes. The inspiration gallery is built into the dashboard and includes designs for postcards and notecards across many categories: Birthday, Christmas, Father's Day, Hanukkah, Holiday, HouseAversary, Mother's Day, Thanksgiving, Thank You, and more. ### Am I able to share Image and Message Templates? Yes. Use the Template Share Link to share a template with another user. When they click the link, a copy of the template is added to their account. ### Can I customize the front of an envelope? No. Envelopes are not customizable with images or graphics. Both windowed and non-windowed envelopes come as-is. The non-windowed style features a fixed handwritten-style font for a personal touch, but the design cannot be changed. See [Handwriting & Fonts FAQs](handwriting-and-fonts.md) for details about the envelope address style. ### Why are windowless letters more expensive than windowed letters? Windowless letters include two features that add a personal touch and have been shown to increase open rates: 1. **Handwritten-style address** - the recipient and return address are written in a handwriting-style font in blue ink. 2. **Real postage stamp** - a genuine postage stamp is used instead of metered postage, giving the envelope a more personal feel. ### Can I send a letter with a PDF file only (no cover letter)? Yes. You can send a letter using just an uploaded PDF without a handwritten cover page: - **In the Message Template editor** - select the "PDF File Only" option. - **In the Send Mail wizard** - choose "Upload PDF File." - **Via API** - use the `pdf_only_url` parameter in your API request. See the [API docs](../08-api/overview.md) for details. ### How many additional pages can be included with letters? | Letter type | Max pages | Included in base price | |---|---|---| | Letter with handwritten cover | Up to 10 additional PDF sheets (double-sided) | Cover included | | PDF-only letter (no cover) | Up to 12 total PDF sheets (double-sided) | First 2 sheets included | Each additional physical page beyond what is included in the base price costs $0.20. ### Can I use merge fields in a PDF I upload? No. Merge fields like `%FIRSTNAME%` or `%CUSTOM1%` only work in Message Templates, not in uploaded PDFs. If personalization is important, build your message in the Message Template editor rather than uploading a PDF. ### The colors on my mailer look wrong - what happened? This is usually a CMYK vs. RGB issue. Computer screens use RGB color (a wider range), while physical printing uses CMYK (a narrower range). If you design in RGB mode (the default in most apps including Canva), colors may look noticeably different when printed. Fix: Design in CMYK mode when possible. In Canva, you can [create a CMYK color palette](https://www.canva.com/help/article/cmyk-for-print) for more accurate print results. In Photoshop, work in CMYK color mode from the start. ## Related - [Image Templates](../05-templates-and-design/image-templates.md) - [Message Templates](../05-templates-and-design/message-templates.md) - [Branding Builder](../05-templates-and-design/branding-builder.mdx) --- ## Glossary # Glossary Definitions for terms you'll encounter across the thanks.io dashboard and docs. --- ### Absentee Owner Mode A design option for [Neighbor Blast](06-campaigns/neighbor-blast.md) and radius automated campaigns. When enabled, the mailer shows the **target property address** rather than the recipient's own address. Useful for Just Listed / Just Sold automated campaigns where you want neighbors to see the specific property you are marketing. --- ### Address Collection Landing Page A thanks.io-hosted web form, attached to a mailing list, where people can submit their own name and address to be added to that list. Useful for open house sign-ins, newsletter sign-ups, event registrations, and any other opt-in scenario. The URL can be shared anywhere - in an email, on a website, or as the destination for a QR code on a mail piece. --- ### AI Fonts A rendering mode that applies randomized character placement and letter spacing to every piece so each mailer looks slightly different - mimicking natural handwriting variation. --- ### Audit Log A chronological record of every API call, dashboard action, Zapier trigger, webhook event, and login on your account. --- ### Branding Builder A dashboard tool where you set your account-wide visuals: company logo, brand colors, contact information (name, phone, email, company), handwriting color, and the "Scan Me" background used on your default QR landing page. These values auto-populate into Message Templates via replacement variables. --- ### Send Mail Wizard The dashboard tool for composing and sending a single-piece mailer. Walk through choosing a mailer type, selecting Image and Message Templates, adding recipients, reviewing a proof, and placing the order. --- ### ThanksAI Studio AI that auto-builds mailer creatives from a prompt. Give it a description and it generates a print-ready front image for postcards, notecards, letter covers, and more. The result saves as a reusable Image Template. Per-recipient QR codes are composited on top at print time, so every piece gets its own unique scannable code. --- ### Days After Added An automation type that automatically sends a mailer a set number of days after a recipient is added to a mailing list. Ideal for drip sequences, onboarding series, and follow-up cadences. --- ### Duplicate Prevention A built-in safeguard that prevents the same recipient from receiving more than one piece of mail from the same account within any 36-hour window. Applies to all mailer types except gift cards. --- ### evenFLOW An automation type that sends at a fixed daily rate from a mailing list (e.g., 50 pieces/day). Optional loop mode restarts from the beginning when the list is exhausted. --- ### Global Scan List An automatically maintained mailing list (`All QR Scans`) that captures every recipient who has scanned a QR code on one of your mailers. Use it as a source for follow-up automated campaigns. --- ### Handwritten-style The visual style of text rendered by the thanks.io handwriting engine. thanks.io does **not** use real pens or human handwriters - all text is produced by a proprietary digital rendering engine. --- ### Image Template The front image of a mailer - a full-bleed design that prints on the front of a postcard, letter, Notecard, MagnaCard, or other mailer type. The back of a postcard and the interior of a Notecard are set in a Message Template, not here. Image Templates can be uploaded as files, synced from Canva, or generated via ThanksAI Studio. Used in both single sends and automated campaigns. --- ### Invalid Address Filter A mailing list feature that flags and isolates recipients whose addresses fail address verification. You can view, fix, or remove invalid addresses before sending. --- ### Just Listed / Just Sold Real estate automated campaign templates that reference the subject property in the mailer design, typically paired with a Google Street View of the property and an Absentee Owner Mode send to surrounding neighbors. --- ### MagnaCard A 6×9-inch magnetic postcard that adheres to refrigerators and metal surfaces. The front is a full-color design; the back functions like a standard postcard. Available on all plans. --- ### Message Template A reusable message body for a mailer. Includes the handwritten-style text, QR code configuration, replacement variables, AI Fonts, and Realism Mode settings. Message Templates support a ChatGPT-style prompt for per-recipient AI generation at send time. --- ### Neighbor Blast An automation type that searches a configurable radius around a given address and sends mail to all neighboring properties. Popular with real estate agents for farming neighborhoods. --- ### Notecard A 5.5x8.5-inch folded greeting card with a real postage stamp. One of thanks.io's premium mailer formats - ideal for personal thank-you notes and high-value customer touches. --- ### Print Protect An optional anti-smudge coating added to a mailer before printing. A pay-per-use add-on. Useful for high-stakes automated campaigns where presentation is critical. --- ### Rate My Content An AI scoring system in the Message Template editor. Evaluates your copy 1-10 across four dimensions: **Personalization**, **Call to Action**, **Readability**, and **Tone**. Scores below 8 surface specific critiques and a one-click improved version. --- ### Realism Mode An optional enhancement to AI Fonts that adds deliberate imperfections - small crossouts, subtle spacing variations, slight slant changes - to make handwritten-style text look even more authentic. --- ### Replacement Variables Placeholders in a Message Template that are replaced with real data at send time. Always in `%UPPER_CASE%` format: `%FIRST_NAME%`, `%YOUR_COMPANY%`, `%CUSTOM1%`. --- ### Standard vs. First Class Postage Two postage options for every mailer: - **Standard postage** - lower cost; ~5+ additional delivery days; no individual tracking; no return-to-sender. - **First Class postage** - higher cost; faster delivery; return-to-sender enabled. --- ### Suppression List A permanent exclusion list - recipients on a Suppression List are never mailed, regardless of automated campaigns or individual sends. Used to honor opt-outs and remove bad addresses permanently. --- ### VisitorView A data service that identifies website visitors and appends their physical mailing address, enabling follow-up mail to people who visited your site but didn't convert. Pay-per-use; see [thanks.io/pricing](https://www.thanks.io/pricing). --- ### Windowed vs. Windowless Letter - **Windowed letter** - recipient's address is visible through a window in the envelope. Standard format. - **Windowless letter** - full-bleed design with no address window; more premium appearance; higher cost. --- ## Bold Trail / kvCORE Integration # Bold Trail / kvCORE Integration :::tip[Business plan users] On the Business plan? We can set this up for you. Before reaching out, have your BoldTrail campaign built, know which mail pieces you want to send, and have your timing planned out. ::: There are two ways to connect BoldTrail (formerly kvCORE) to thanks.io: **direct webhooks** (no third-party tools required) and **Zapier** (easier to configure, more reliable). ## Method 1: Direct Webhook ### Step 1: Get the webhook URL from thanks.io 1. Go to **Mailing Lists** in the left nav and open the list you want BoldTrail contacts added to (or create a new one). 2. Scroll down to the **Recipient Add Webhook** section. 3. Click **Copy kvCORE/Bold Trail Code** to copy the webhook URL to your clipboard. ### Step 2: Configure the webhook in BoldTrail 1. In BoldTrail, go to **Marketing → Smart Campaigns**. 2. Create a new campaign or open an existing one. 3. Click **Add Action** and select **Webhook**. 4. Split the copied URL into two parts - everything before the `?` goes in the main URL field; everything after the `?` is the query string. 5. Add each query parameter as a separate field and map BoldTrail merge tags: | thanks.io parameter | BoldTrail merge tag | |---|---| | `firstname` | `{first_name}` | | `lastname` | `{last_name}` | | `address` | `{lead_address}` | | `city` | `{lead_city}` | | `state` | `{lead_state}` | | `zip` | `{lead_zip}` | | `email` | `{email}` | 6. Set your timing and save the campaign. ### Step 3: Test the integration 1. Pick a contact with a complete mailing address. 2. Add them to the Smart Campaign. 3. Allow up to 15 minutes for webhook processing, then check **Orders** in thanks.io to confirm the recipient was added to the list. ## Method 2: Zapier (recommended) Zapier is easier to set up and more reliable for most users. ### Part 1: Create a Zapier action in BoldTrail 1. In your Smart Campaign, click **Add Action** and select **Zapier**. 2. Give the action a descriptive name. 3. Copy the generated **Zap ID** - you'll need it in Zapier. 4. Save the action. ### Part 2: Set up the Zap in Zapier 1. In Zapier, create a new Zap. 2. **Trigger:** App = **kvCORE** (or BoldTrail) → Event = **Campaign Action** → paste your Zap ID. 3. **Action:** App = **Thanks.io** → choose an action: - **Add Recipient** - adds the contact to a mailing list - **Send Postcard / Letter / Notecard** - sends a mail piece immediately 4. Map BoldTrail contact fields to the thanks.io fields (name, address, city, state, zip). 5. Turn on the Zap. ## Bonus: Reverse integration (QR scan → BoldTrail) You can also trigger BoldTrail updates when a recipient scans a QR code on a thanks.io mailer. Configure this via a thanks.io campaign webhook pointed at a BoldTrail contact-update webhook. ## Tips & best practices - Enable **API Testing Mode** in thanks.io while testing so no real mail ships. - Ensure contacts have a complete mailing address before they enter the campaign - incomplete addresses cause sends to fail silently. - Test with a single contact before enabling large automations. ## Related - [Webhook-Based CRM Integration](./webhook-based-crm.md) - [Zapier Integration](./zapier.md) - [Neighbor Blast](../09-campaigns/neighbor-blast.md) --- ## Canva Integration # Canva Integration ## What it is Design the front of your mailer in Canva and publish it directly to thanks.io as an Image Template. No manual re-uploading required. ## How to access The Canva integration is built directly into the Image Templates page - there is no separate connection step. 1. In your thanks.io dashboard, go to **Creatives → Image Templates** in the left nav. 2. Find the mailer type section you want to design for (e.g., *4x6 & 6x9 Postcards*). 3. In the section header, click the **...** (more options) button. 4. Select **Design in Canva**. ## How to use a Canva template 1. Click **Design in Canva** to open the thanks.io Canva template for that mailer type. 2. If this is your first time using the Canva integration, you will be prompted to authorize the connection. Follow the on-screen steps to allow Canva to connect with your thanks.io account. 3. Design or customize your mailer using the pre-sized Canva template. 4. When your design is finished, click **Return to thanks.io**. This automatically imports your design as a new Image Template in that category. ## Edit an existing Canva template You can update any image template that was originally created in Canva without leaving thanks.io. 1. Go to **Creatives → Image Templates**. 2. Find the template you want to update. Templates created in Canva display a Canva badge icon. 3. Hover over the template and click the **Canva** icon (or open the template actions and click **Edit In Canva**). 4. Make your changes in Canva. 5. When finished, click **Return to thanks.io** to sync the updated design back to the Image Template. ## Tips - Always start from a thanks.io Canva template - it has the correct dimensions, bleed, and safe zones for each mailer type. - Keep important content inside the safe zone; edges may be trimmed in printing. - The Canva design creates a static image. Personalization (replacement variables, Street View) is handled in the Message Template in thanks.io, not in Canva. ## Related - [Image Templates](../05-templates-and-design/image-templates.md) - [Integrations Overview](./overview.md) --- ## Email Integration # Email Integration ## What it is The Email Integration lets you trigger a thanks.io mail send by sending a specially formatted email to a dedicated thanks.io address. No API or code required - any system that can send email can trigger a send. ## How to use it 1. Compose an email to [send@thanks.io](mailto:send@thanks.io) from the email address you used to sign up. If you need to send from a different address, contact support to have it added to your account. 2. Put the recipient's name, street, city, state, and zip in the **Subject** line, separated by commas. For example: `John Smith, 123 Main St, Springfield, IL, 62701` 3. Enter your postcard handwritten message content in the **body**. Delete any email signatures you have set up. ## Sending options ### Default card Set a card design as your default by hovering over it in [Image Templates](https://dashboard.thanks.io/image_templates) and clicking the **star icon**. A green confirmation message will appear. All sends via email will use this design unless you specify a card ID. ### Send a specific card To send a specific design, hover over it in [Image Templates](https://dashboard.thanks.io/image_templates) and click the **magnifying glass icon** to reveal its Card ID Email. It looks like `send+12345@thanks.io`. Use this address in the **To:** field instead of the generic `send@thanks.io`. You can save these card-specific addresses to your email address book for easy reuse. ## Tips & best practices - Send a test email first and confirm the order appears before automating in your CRM. - Enable **API Testing Mode** while testing so no real mail ships. ## Limits & gotchas - Formatting errors cause sends to fail silently or be rejected. - Email processing is near-real-time, not instantaneous. ## Related - [Webhook-Based CRM Integration](./webhook-based-crm.md) - [API - Sending Mail](https://docs.thanks.io) --- ## Follow Up Boss Integration The easiest way to connect Follow Up Boss with thanks.io is through Zapier. If you are familiar with Zapier, visit the link below to browse the available connections you can build and automate: [zapier.com/apps/follow-up-boss/integrations/thanksio](https://zapier.com/apps/follow-up-boss/integrations/thanksio) If you are new to Zapier or need a refresher, visit the thanks.io Zapier resources page: [help.thanks.io/zapier-resources](https://help.thanks.io/zapier-resources) --- ## HighLevel Integration # How to Connect GoHighLevel to Thanks.io to Automatically Send Mail > These instructions also work for any white-labeled HighLevel CRM. See the [white-label list](#white-label-highlevel-users) at the bottom of this article. Integrating Thanks.io with HighLevel lets you automatically send postcards, letters, or greeting cards when key events happen - like new leads, pipeline stage changes, or appointment bookings. ## What You'll Need - A [Thanks.io](https://thanks.io/) account - A [HighLevel](https://www.gohighlevel.com/) account - Either: - The built-in Thanks.io Mailing List Webhook (recommended - no extra tools needed) - Or [Zapier](https://zapier.com/) / [Make](https://www.make.com/) for more advanced routing --- ## Option 1: Direct Integration via Mailing List Webhook (Recommended) This is the easiest way to trigger postcards or letters from HighLevel workflows - no third-party tools or code needed. ### Step 1: Get Your Webhook URL from Thanks.io 1. In your Thanks.io dashboard, go to **Mailing Lists**. 2. Click into the list you'd like to use. 3. Scroll down to the **Recipient Add Webhook** section at the bottom of the left panel. 4. Click **Copy HighLevel Code** - this copies your webhook URL with HighLevel's contact merge fields already filled in: ``` https://dashboard.thanks.io/api/webhooks/ml/{YOUR_LIST_ID}/{token}/add-recipient ?firstname={{contact.first_name}} &lastname={{contact.last_name}} &company={{contact.company_name}} &address={{contact.address1}} &city={{contact.city}} &state={{contact.state}} &postal_code={{contact.postal_code}} &country={{contact.country}} &email={{contact.email}} &phone={{contact.phone}} &dob={{contact.date_of_birth}} ``` > Each mailing list has its own unique webhook URL. Be sure to copy it from the specific list you want contacts added to. ### Step 2: Add the Webhook in HighLevel 1. In HighLevel, go to **Workflows** and create or open the workflow where you want to trigger mail. 2. Add a **Webhook** action step. 3. Paste in the Thanks.io webhook URL you copied - HighLevel's contact fields are already mapped automatically. ### Step 3: Activate and Test 1. Save and activate your workflow. 2. Run a test with a real contact - the contact will be automatically added to your Thanks.io mailing list. 3. Once added, mail sends based on your **Campaigns** automation settings in Thanks.io. > **Important:** After linking, go to the **Campaigns** page in Thanks.io to configure when mail sends - immediately, on a delay, or on a specific date after someone is added to the list. --- ## Option 2: Use Zapier or Make If you want more advanced routing logic or want to connect multiple apps at once, use [Zapier](https://zapier.com/) or [Make](https://www.make.com/) to build automations between HighLevel and Thanks.io. See [Zapier Integration](./zapier.md) and [Make Integration](./make.md) for step-by-step setup. --- ## White-Label HighLevel Users These instructions work for any white-labeled HighLevel CRM. Some white labels our users have successfully integrated: - Go Guru Pro (GoGuru Pro) - Pro Edge CRM If your white label isn't listed here, the steps above will still work. --- ## Related - [Mailing Lists](../03-contacts/mailing-lists.md) - [Automated Campaigns](../02-campaigns/campaigns.md) - [Zapier Integration](./zapier.md) - [Make Integration](./make.md) --- ## HubSpot Integration The thanks.io integration for HubSpot lets you send postcards, letters, notecards, and gift cards directly from any contact or company record in your HubSpot CRM. ## Getting started [Click here to install the thanks.io app for HubSpot.](https://app.hubspot.com/oauth/authorize?client_id=e4d5f870-75aa-4ad8-8ade-f65a1b105c74&redirect_uri=https://dashboard.thanks.io/hubspot/auth&scope=crm.objects.contacts.write%20crm.objects.companies.read%20crm.objects.contacts.read) Once installed, follow the steps below to add the send wizard to your contact view and start sending mail. --- ## Add thanks.io to your HubSpot Contact view These steps only need to be completed once by an account admin. 1. Navigate to one of your contacts in HubSpot (CRM > Contacts). ![HubSpot contacts list](/img/hubspot-01-contacts-list.png) 2. On the contact's middle tab, click **Customize record**. ![Contact record with Customize record option](/img/hubspot-02-contact-overview-tab.png) 3. Click the view you want to edit - in most cases, this is the **Default View**. ![Click the Default View to edit](/img/hubspot-03-click-default-view.png) 4. Click **Add Cards** on the middle column. ![Click Add Cards on the middle column](/img/hubspot-04-click-add-cards.png) 5. Under the **Apps** section, select **thanks.io Step-by-Step send wizard**. ![Select thanks.io Step-by-Step send wizard under Apps](/img/hubspot-05-select-wizard.png) 6. Click **X** to close the right panel. You can reorder the cards if needed. Click **Save** in the upper right. ![Close the panel and click Save](/img/hubspot-06-close-save.png) 7. The thanks.io Step-by-Step send wizard will now appear in the middle column Overview section of the contact page. --- ## Send direct mail from a contact 1. Open a contact or company record in HubSpot. ![Open a contact or company record in HubSpot](/img/hubspot-01-contacts-list.png) 2. On the contact's column tab, click **Overview**. ![Click Overview on the contact's column tab](/img/hubspot-02-contact-overview-tab.png) 3. Scroll down to the **thanks.io Step-by-Step send wizard**. If you don't see it, an admin will need to complete the setup steps above. ![thanks.io Step-by-Step send wizard on the contact page](/img/hubspot-07-send-wizard.png) 4. Select the **Mail Type** you want to send. 5. Select the **Image Template** - this is the front of the mailer for postcards, notecards, and gift cards, or the background image for cover letters. If you have no image templates, you can add them at [dashboard.thanks.io/image_templates](https://dashboard.thanks.io/image_templates). 6. Add a **message** for the mailer. For postcards, this is the back of the postcard. For notecards and gift cards, this is the inside of the mailer. For letters, this is the cover letter. You can select a message template or enter a custom message. Note: gift cards require a message template. New message templates can be added at [dashboard.thanks.io/message_templates](https://dashboard.thanks.io/message_templates). 7. Review the creative preview for your mailer. If everything looks correct, click **Send**. --- ## iList Integration For step-by-step instructions on integrating iList with thanks.io, visit: [go.thanks.io/ilist/](https://go.thanks.io/ilist/) --- ## InsuredMine CRM Integration ## Native integration InsuredMine offers a built-in integration with thanks.io. You can set it up directly from your InsuredMine account: [insuredmine.com/integrations/thanks-io/](https://www.insuredmine.com/integrations/thanks-io/) ## Advanced configuration with Zapier For use cases not covered by the native integration, you can use Zapier to connect InsuredMine with thanks.io. Make sure to use contact-based triggers when setting up your Zaps: [insuredmine.com/knowledge-base/zapier-integration/](https://www.insuredmine.com/knowledge-base/zapier-integration/) :::note Physical mailing addresses are not included on certain types of triggers in InsuredMine, such as deal card triggers. Use contact-based triggers to ensure address data is available. ::: --- ## Make Integration # Make Integration ## What it is Make (formerly Integromat) is a visual automation platform where you build flowchart-style "scenarios." The thanks.io Make module lets you add a mail send action to any scenario. ## How to use it 1. In Make, open **Scenarios** and create or edit a scenario. 2. Add a thanks.io module and choose an action (e.g., **Send Postcard**). 3. Click **Create a connection** and enter your thanks.io API token (from **Settings → API Tokens**). 4. Configure the module: select mailer type, Image Template, Message Template, and map recipient fields. 5. Connect to your trigger module (e.g., HubSpot **Watch Contacts**). 6. Click **Run once** to test, then enable the scenario. ## Tips & best practices - Use Make's **Router** to branch the scenario - skip international addresses, for example. - Use **Tools → Set Variable** to clean up address data before passing it to thanks.io. - Enable **API Testing Mode** in thanks.io while building your scenario so no real mail ships. - Add an error handler on the thanks.io module to catch failed sends and route to a notification. ## Related - [Zapier Integration](./zapier.md) - [n8n Integration](./n8n.md) --- ## Monday.com Integration You can connect Monday.com with thanks.io using a Mailing List Sync. When contacts in your Monday.com board are updated, they are automatically added to a thanks.io mailing list. You can then use thanks.io Campaigns to automatically send mail to that list. ## Setup 1. In the thanks.io dashboard, click **Integrations**. ![Click Integrations in the thanks.io dashboard](/img/monday-com-01-click-integrations.png) 2. Click **Connect** on the Monday.com tile. ![Click Connect on the Monday.com tile](/img/monday-com-02-click-connect.png) 3. Click **Install**. ![Click Install](/img/monday-com-03-click-install.png) 4. Once installed, thanks.io will appear in your Monday.com apps. ![thanks.io visible on Monday.com apps page](/img/monday-com-04-installed-apps.png) 5. Open your main menu from the bottom-left corner of your Monday.com dashboard and select **Integrations**. ![Open main menu and select Integrations](/img/monday-com-05-open-integrations-menu.png) 6. Choose **Mailing List Sync**. ![Choose Mailing List Sync](/img/monday-com-06-choose-mailing-list-sync.png) 7. Select which Monday.com board you want to send contacts from. ![Select a Monday.com board](/img/monday-com-07-select-board.png) 8. Choose what type of update to a contact in Monday.com should trigger that contact to be synced to a thanks.io mailing list. You can use a general column or status update, or set a specific status value as the trigger. ![Choose the update type that triggers the sync](/img/monday-com-08-choose-update-type.png) 9. Set the specific values for the sync trigger by clicking each white link to select a value. When configuring **Recipient**, match your Monday.com fields to the available fields in thanks.io. Be sure to set at least a name and a complete mailing address. The custom fields (Custom 1 and Custom 2) are mail merge fields available for dynamic image templates or message templates. ![Map Monday.com fields to thanks.io recipient fields](/img/monday-com-09-map-recipient-fields.png) 10. Click **Add to board** at the bottom right. ![Click Add to board](/img/monday-com-10-add-to-board.png) 11. Your integration configuration will appear in the integrations interface. You can turn the integration on or off as needed. Test it by setting it to **On**, then update a contact in your board to match the trigger conditions. The sync should happen almost instantly. ![Integration toggle showing on/off state](/img/monday-com-11-integration-toggle.png) ## Integrations log To view the history of your integrations, click **Integrations** in the upper right of any Monday.com board. ![Click Integrations in the upper right of a Monday.com board](/img/monday-com-12-log-click-integrations.png) From there, click **Integrations Activity** to see what has been running - or not running. This is useful for troubleshooting your automations and syncs. ![Click Integrations Activity](/img/monday-com-13-log-click-activity.png) ![Integrations activity log showing sync history](/img/monday-com-14-log-activity-view.png) --- ## n8n Integration # n8n Integration ## What it is thanks.io has an n8n node available as a **verified** community package (`n8n-nodes-thanks-io`) - built and maintained by thanks.io and verified by n8n. The node lets you add thanks.io mail sends as an action step in any n8n workflow, connecting to over 1,000 other apps and services. ## Available actions | Action | Description | |---|---| | **Send Postcard** | Send a postcard mailer | | **Send Notecard** | Send a folded notecard mailer | | **Send Windowed Letter** | Send a letter in a windowed envelope | | **Send Windowless Letter** | Send a letter in a windowless envelope | | **Send Magnacard** | Send a magnet-style mailer | | **Send Giftcard** | Send a giftcard mailer | ## How to use it ### n8n Cloud (verified node) Because the thanks.io node is a verified community node, an instance owner must enable it once before anyone on the instance can use it. 1. As an instance owner, go to **Settings → Community nodes** and install `n8n-nodes-thanks-io`. ([Learn more about verified node setup](https://docs.n8n.io/integrations/community-nodes/installation/verified-install/)) 2. Open the workflow editor, click **+** in the top right, and search for **thanks.io** in the Nodes panel. 3. Drag the **thanks.io** node into your workflow canvas. 4. Click the node and select **Create New Credential**, then enter your thanks.io API token. 5. Configure the node: choose an action (e.g. Send Postcard), select your Image Template and Message Template, and map recipient fields. 6. Connect to your trigger, then click **Execute Node** to test and activate. ### Self-hosted n8n 1. In your n8n directory: `npm install n8n-nodes-thanks-io` 2. Restart n8n, then follow the Cloud steps above. ## Tips & best practices - Inspect the **Execution** view after a test run to verify field mapping before going live. - Enable **API Testing Mode** in thanks.io while building. - For bulk sends, pass data through a **Split In Batches** node before the thanks.io node to avoid rate limits. ## Resources - [thanks.io on n8n](https://n8n.io/integrations/thanksio/) - [thanks.io on GitHub](https://github.com/thanks-io/) - [Using verified nodes in n8n](https://docs.n8n.io/integrations/community-nodes/installation/verified-install/) ## Related - [Zapier Integration](./zapier.md) - [Make Integration](./make.md) --- ## Integrations Overview # Integrations Overview ## What it is thanks.io connects to the tools you already use through four integration categories: native integrations, automation platforms, e-commerce platforms, and a REST API with webhooks. ## Integration categories ### Native integrations Pre-built, first-party connections configured inside the thanks.io dashboard or inside the partner platform: | Integration | What it does | |---|---| | [HubSpot](./hubspot.md) | Send mail directly from HubSpot contact and company records | | [Canva](./canva.md) | Design in Canva and add to Image Templates directly from the Image Templates page (all plans) | | [SureSend](./suresend.md) | Embed the send UI inside the SureSend CRM | | [HighLevel](./highlevel.md) | Trigger sends via webhooks from HighLevel workflows | | [Bold Trail / kvCORE](./bold-trail-kvcore.md) | Webhook-based sends for real estate CRMs | | [Email Integration](./email-integration.md) | Trigger sends by sending a specially formatted email - no API required | ### CRM integrations Connections for specific CRM platforms: | Integration | Notes | |---|---| | [Monday.com](./monday-com.md) | Sync board contacts to a mailing list and trigger campaigns | | [InsuredMine](./insuredmine.md) | Native integration for insurance CRM users | | [iList](./ilist.md) | Real estate list integration | | [Follow Up Boss](./follow-up-boss.md) | Connect via Zapier | ### Automation platforms Connect thanks.io to thousands of other apps through middleware: | Platform | Notes | |---|---| | [Zapier](./zapier.md) | 8,000+ app connections, template library included | | [Make](./make.md) | Visual scenario builder (formerly Integromat) | | [n8n](./n8n.md) | Self-hosted or cloud; community node `n8n-nodes-thanks-io` | ### REST API + Webhooks Build fully custom integrations using the REST API v2. See [API Overview](../08-api/overview.md). ## Tips & best practices - Start with a native integration or automation platform before building a custom API integration. - Use API Testing Mode (available in Account Settings) to test sends without printing or shipping real mail. - When connecting via Zapier or Make, test with a single recipient before enabling large automations. ## Related - [API Overview](../08-api/overview.md) - [Webhooks](https://docs.thanks.io) --- ## Shopify (and E-commerce) Integration # Shopify (and E-commerce) Integration ## What it is thanks.io connects to Shopify, WooCommerce, BigCommerce, and Magento through Zapier or Make. When a customer event fires (new order, first purchase, win-back trigger), Zapier or Make triggers a thanks.io mail send automatically. ## Common use cases - Send a handwritten-style thank-you postcard after every first purchase - Win back customers who haven't bought in 60-90 days with a special offer - Send a gift card to high-value customers as a VIP reward - Follow up on reviews or referrals with a physical mailer ## How to use it via Zapier 1. Go to [zapier.com](https://zapier.com) and search for **thanks.io Shopify** to browse pre-built templates. 2. Choose a template or build from scratch with a Shopify **New Order** (or similar) trigger. 3. Add a **Filter** step to narrow the trigger (first purchases only, orders over a certain value, etc.). 4. Add a thanks.io **Send** action step; authorize thanks.io in Zapier. 5. Map Shopify shipping address fields to the thanks.io recipient fields. 6. Select your Image Template and Message Template. 7. Test and activate. For Make, use the Shopify **Watch Orders** trigger module and connect a thanks.io HTTP request action. See [Make Integration](./make.md). ## Tips & best practices - For win-back campaigns, use a **Delay** step to send the mail 60-90 days after the customer's last order. - Add a QR code linking to a personalized discount URL. Use the Global Scan List to see who redeems it. ## Limits & gotchas - Map from the Shopify shipping address (not billing address) for best deliverability. - WooCommerce, BigCommerce, and Magento follow the same pattern using their respective Zapier or Make triggers. ## Related - [Zapier Integration](./zapier.md) - [Make Integration](./make.md) - [Gift Cards](../03-sending-mail/mailer-types/gift-cards.md) --- ## SureSend Integration # SureSend Integration ## What it is Connecting thanks.io with Sure Send allows you to automatically add contacts to your thanks.io mailer automations directly from your CRM workflow. ## How to connect ### Step 1: Enable the "Direct Mail" Widget 1. Go to [https://suresend.ai/settings/widgets](https://suresend.ai/settings/widgets) 2. Locate the **Direct Mail** widget 3. Enable it ### Step 2: Authorize Your Accounts 1. Open any **Person Detail** page in Sure Send (any contact will work) 2. Click on the **Direct Mail** tab 3. Enter your thanks.io credentials and click **Sign In** 4. Click **Connect to Sure Send** 5. Approve the authorization request Once completed, refresh the page. Your Sure Send account will now be connected to thanks.io. ### Step 3: Add a Webhook (Optional) You can configure Sure Send to automatically add contacts to a thanks.io mailing list. **In thanks.io:** 1. Navigate to the Mailing List you want to use 2. Scroll to the **Recipient Add Webhook** section 3. Click **Copy Sure Send Code** **In Sure Send:** 1. Go to [https://suresend.ai/settings/webhooks](https://suresend.ai/settings/webhooks) 2. Create a new webhook using the copied URL ## Tips - Set up your Image Templates and Message Templates in the thanks.io dashboard first - the widget lets you choose from existing templates. - Test with a single internal send before rolling out to your team. - Use replacement variables (`%FIRST_NAME%`, `%YOUR_COMPANY%`) in your Message Templates for personalized sends. ## Related - [Integrations Overview](./overview.md) --- ## Webhook-Based CRM Integration # Webhook-Based CRM Integration ## What it is Any CRM that can send an outbound HTTP POST - Salesforce, Pipedrive, ActiveCampaign, Keap, Monday.com, and others - can trigger a thanks.io mail send. This guide covers the general pattern. For platform-specific steps, see [HighLevel](./highlevel.md) or [Bold Trail / kvCORE](./bold-trail-kvcore.md). ## General setup steps 1. **Get your API token** - go to **Settings → API Tokens** and create a Personal Access Token. 2. **Note your template IDs** - open your Image Templates and Message Templates and note the IDs. 3. **Create the webhook in your CRM** - fire on the event you want to trigger mail (deal stage change, tag added, contact created, etc.). 4. **Configure the HTTP request:** - **Method:** `POST` - **URL:** `https://api.thanks.io/api/v2/send/{mailer-type}` (replace `{mailer-type}` with `postcard`, `letter`, `windowlessletter`, `notecard`, `magnacard`, or `giftcard`) - **Headers:** `Authorization: Bearer YOUR_API_TOKEN` and `Content-Type: application/json` - **Body:** JSON with recipient and template fields (see [docs.thanks.io](https://docs.thanks.io) for the full schema) 5. **Map CRM fields** to the thanks.io recipient schema (name, street, city, state, ZIP). 6. **Enable API Testing Mode** in Account Settings and test with a single record. 7. **Check the Audit Log** at **Settings → Audit Log** to confirm the request was received. 8. **Disable Testing Mode and go live.** ## Tips & best practices - Always test with API Testing Mode before going live. - Use the Audit Log to diagnose failed API calls - it shows requests received, responses returned, and validation errors. - Validate address fields in your CRM before sending; missing addresses cause `422` errors. - Implement exponential backoff for `429` (rate limit) responses. ## Related - [API - Sending Mail](https://docs.thanks.io) - [API Authentication](https://docs.thanks.io) - [API Error Codes](https://docs.thanks.io) --- ## Zapier Integration # Zapier Integration ## What it is The Zapier integration connects thanks.io to 8,000+ apps with no coding required. Set up a "Zap" with a trigger (something that happens in another app) and an action (send mail via thanks.io). Popular connections: HubSpot, Salesforce, Google Sheets, Typeform. ## How to use it 1. In your thanks.io dashboard, click **Integrations** in the left nav. 2. Find the **Zapier** card and click **Browse Templates**, or go to [zapier.com](https://zapier.com) and search for **thanks.io**. 3. Choose a pre-built Zap template or click **Make a Zap** to build from scratch. 4. Select your trigger app and event (e.g., HubSpot **New Contact**). 5. Add a thanks.io **Action** step and authorize thanks.io in Zapier. 6. Map your trigger data to thanks.io recipient fields (name, address, city, state, ZIP). 7. Select your Image Template and Message Template. 8. Click **Test & Review**, then turn on the Zap. ## Tips & best practices - Use a **Filter** step before the thanks.io action to skip contacts with incomplete addresses or who are already in your Suppression List. - Enable **API Testing Mode** in Account Settings while testing so no real mail ships. - Add a **Delay** step for sends you want to happen a few days after the trigger. - Use Zapier's **Formatter** step to clean up address data before passing it to thanks.io. ## Limits & gotchas - Zapier's free plan limits the number of Zap runs per month. High-volume use cases may require a paid Zapier plan. - Each Zap run sends to a single recipient - for bulk sends, use the thanks.io mailing list API. ## Get Notified on QR Scan You can leverage Zapier to notify you when someone scans a postcard using thanks.io's **QR Code Scan** trigger in Zapier. ![Zapier QR Code Scan trigger setup](/img/zapier-qr-scan-trigger.png) We will provide you with all of the data that pertains to the mailers as we know it, so you can update your CRM or system. > **Tip:** Save emails and phone numbers in your thanks.io mailing lists to make it easy to use client lookup functions/searches in your Zaps. ![QR scan data fields available in Zapier](/img/zapier-qr-scan-data-fields.png) ### Example Zap: Create a Follow-up Task from a QR Scan The most common and important notification type is to perform a follow-up. When you are sending mail that you want people to scan, when they do take that action you'll want to contact them to follow up and ensure they got what they wanted from your QR code. Creating a task in your CRM or system to do just that is easy with this automation. ![Example Zap creating a follow-up task on QR scan](/img/zapier-qr-scan-followup-task.png) Follow the links below to create your own version now. - [Create a QR Scan Zap now](https://zapier.com/webintent/create-zap?create=true&entry-point-location=explore&template__0__action=qr_code_scan&template__0__selected_api=ThanksIOCLIAPI%401.13.0&template__0__type_of=read&utm_source=thanksio&utm_medium=product&utm_campaign=zapier-gbl-zcr-display-team_explore_zt_integration_triggers&entry-point-method=make_a_zap_supported_trigger) - [Zapier Template: Update a Contact in kvCORE on thanks.io QR Scan](https://zapier.com/shared/73df63c70931fc65db3227a2d7e4c85629b0e053) ## Related - [Make Integration](./make.md) --- ## Credits, Balance & Auto-Recharge # Credits, Balance & Auto-Recharge ## What are credits? Credits are your account balance in thanks.io. They are used to pay for every order you place - postcards, letters, notecards, and other mail pieces all deduct from your credit balance. Your current credit balance is shown in the top right corner of every page in the thanks.io dashboard. When you purchase a Business Plan subscription, your first month's fee is credited back to your account as thanks.io credits. ## Adding credits manually 1. Go to **Account → Billing** and click the **Payment Method** tab. 2. Under **Add Credits**, select an amount from the dropdown or type in a custom amount (minimum $10, maximum $5,000). 3. Click **Add Credits Now**. Your card on file is charged immediately and the credits are added to your balance right away. ## Auto-Recharge Auto-Recharge keeps your account funded automatically so your campaigns never pause unexpectedly. When your credit balance drops to $0, thanks.io automatically charges your card the amount you have set and adds it to your balance. You can disable Auto-Recharge from Billing settings. :::info Auto-Recharge disable is available for paid subscription plan users only. ::: :::warning[Heads up before you disable Auto-Recharge] Disabling auto-recharge means mailers can stop once your balance goes below $0. Keep credits available or add funds manually to avoid delivery interruptions. ::: **To set or update your Auto-Recharge amount:** 1. Go to **Account → Billing** and click the **Payment Method** tab. 2. Under **Auto-Recharge Setting**, choose an amount from the dropdown. 3. Click **Save Changes**. To disable Auto-Recharge entirely, use the disable toggle in Billing settings and save your changes. Set an amount that reflects what you expect to spend per month on direct mail. **Example:** You have $52.75 in credits and an auto-recharge of $100. You send 108 postcards at $0.49 each ($52.92 total). You are $0.17 short, so your card is charged $100.17 - leaving you with a $100 credit balance after the order. ### What happens when Auto-Recharge is disabled? - Sends continue only while your balance is sufficient. - If a send/order would push your account below $0, the send is blocked. - You see an "auto-recharge disabled" failure message. - You can either add credits manually with **Add Credits Now** or re-enable Auto-Recharge. When you re-enable Auto-Recharge later, your previously selected recharge amount is retained. ## Unrecognized charge? A charge on your card may be from a recent automated campaign, a gift card purchase, or a direct mail order. Review your transaction history under **Account → Billing → Billing History**. If you still don't recognize the charge, contact [support@thanks.io](mailto:support@thanks.io). ## Transferring credits from a previous account Credits are non-transferable between accounts. If you have an old thanks.io account with a remaining balance, that balance cannot be moved to a new account automatically. To request a transfer, [contact support](../16-troubleshooting/contact-support.md) with both account email addresses. The support team will review and, where possible, arrange a manual credit adjustment. ## Related - [Managing Payment Methods](./managing-payment-methods.md) - [Pricing Overview](./pricing-overview.md) - [Upgrading or Downgrading Your Plan](./upgrading-downgrading.md) --- ## Data Services # Data Services Data services are pay-per-use features charged separately from your mailer per-piece costs. You only pay for what you use - no monthly quotas or minimums. > Current per-use rates at [thanks.io/pricing](https://www.thanks.io/pricing). ## Address Append (email → physical address) Converts a known email address into a physical mailing address. Useful for e-commerce operators, insurance agents, real estate professionals, and anyone who has a database of contacts with email addresses but no physical street address on file. Match rate is typically 60-80%. Charged per successful lookup. See [thanks.io/pricing](https://www.thanks.io/pricing) for current rates. ## Email/Phone Append (physical → email or phone) Converts a physical mailing address into an email address or phone number. Also powers the **Append on Scan** automation - when a recipient scans your QR code, their email or phone is automatically appended to their recipient record. Charged per successful lookup. ## Radius Address Search (Neighbor Blast) Finds all deliverable addresses within a radius of a given property. Used by real estate agents for Just Listed / Just Sold campaigns and local businesses targeting nearby households. Charged per address returned. ## VisitorView (website visitor → physical address) Identifies visitors to your website and appends their physical mailing address, enabling automated follow-up mail. See [VisitorView Website Retargeting](../04-mailing-lists/visitorview-website-retargeting.md) for setup instructions. ## Print Protect An optional anti-smudge coating applied to mailers before printing. Charged per piece. Useful for high-stakes or premium campaigns where print presentation is critical. ## Related - [Per-Piece Rates](./per-piece-rates.md) - [Pricing Overview](./pricing-overview.md) --- ## Managing Payment Methods # Managing Payment Methods Update the credit card on file and download invoices from the Billing section of your account. ## Add or update a payment method 1. Go to **Account → Billing**. 2. Click the **Payment Method** tab. 3. Enter your new card details and click **Update**. :::warning[Saving a new card replaces the existing one] There is no option to remove a payment method without replacing it. The new card takes effect immediately and is used for all future charges. ::: ## Download invoices 1. Go to **Account → Billing** and click the **Billing History** tab. 2. Find the invoice and click **Download** to save it as a PDF. ## Transaction history thanks.io tracks every credit and charge to your account. To view your full transaction history: 1. Go to **Account → Billing** and click the **Billing History** tab, or navigate directly to [dashboard.thanks.io/profile/billing/history](https://dashboard.thanks.io/profile/billing/history). 2. All past purchases, credit additions, and any refunds or credits applied to your account are listed here. ### Download a billing statement To download a monthly billing statement: 1. On the Billing History page, scroll down to the **Billing Statements** section. 2. Find the month you need and click to download. To have your company details appear on the statement, fill in the **Company Information** form on the right side of the page. :::tip[Tips & best practices] - Keep your payment method up to date to avoid failed charges that could pause your account. - All subaccount charges roll up to the parent account's payment method. - Contact support if you believe a charge is incorrect. ::: ## Related - [Pricing Overview](./pricing-overview.md) - [Upgrading or Downgrading Your Plan](./upgrading-downgrading.md) --- ## Nonprofit Pricing # Nonprofit Pricing thanks.io offers discounted postage rates for qualifying nonprofit organizations. Nonprofit rates can significantly reduce the cost of donor acknowledgment letters, fundraising appeals, and stewardship mailings. > Current nonprofit rates at [thanks.io/pricing](https://www.thanks.io/pricing). ## Who qualifies Registered 501(c)(3) organizations (US) or equivalent nonprofit designations in other countries. Contact support to confirm eligibility for non-US organizations. ## How to apply 1. Email [support@thanks.io](mailto:support@thanks.io) to find out more and see if you're eligible. 2. Have your **USPS Nonprofit Authorization Number** ready - that's the number you receive once approved for nonprofit mailing rates. > Domestic mail only. Nonprofit postage. Not for multi-page letters. ## What is a Nonprofit Authorization Number? - It's the special number the USPS assigns to eligible nonprofits that lets them mail at lower postage rates, called [Nonprofit USPS Marketing Mail rates](https://pe.usps.com/businessmail101?ViewName=NonprofitApplication). - Fill out **USPS Form 3624** (no fee) and include proof of eligibility (such as an IRS determination letter). Applications are typically reviewed within 5-10 business days when submitted online. - Once approved, you receive a nationwide authorization number usable at any USPS location that accepts presorted mail. ## Tips - Nonprofit rates apply to the postage component; the plan subscription fee is not discounted. - Contact support early - verification may take a few business days. ## Related - [Per-Piece Rates](./per-piece-rates.md) - [Pricing Overview](./pricing-overview.md) --- ## Per-Piece Rates # Per-Piece Rates Every mailer you send incurs a per-piece charge that covers design, printing, and postage - all bundled into a single rate. No separate postage invoices. Per-piece rates vary based on three factors: 1. **Mailer type** - postcards, letters, Notecards, MagnaCards, and gift cards are each priced differently. 2. **Postage class** - Standard is cheaper; First Class is faster and costs more per piece. 3. **Your plan tier** - higher tiers (Business, Professional) unlock lower per-piece rates. > Current rates are always at [thanks.io/pricing](https://www.thanks.io/pricing) - do not rely on cached numbers. ## Mailer types | Type | Notes | |---|---| | 4×6 postcard | Smallest and lowest cost | | 6×9 postcard | Mid-size, popular for real estate | | 6×11 postcard | Large format | | Windowed letter | Address shows through envelope window | | Windowless letter | Address printed on envelope; full-face design | | Notecard | 5.5x8.5 folded, premium feel, real stamp | | MagnaCard | 6×9 magnetic, highest per-piece cost | | Gift card | Branded gift card with QR redemption | ## Standard vs. First Class - **Standard** - lower cost; delivery ~5+ additional days vs. First Class; no tracking; no return-to-sender. - **First Class** - higher cost; faster; USPS tracking; return-to-sender enabled. See [Postage Options](../03-sending-mail/postage-options.md) for guidance on when to use each. ## Multi-page letters Both windowed and windowless letters support multi-page sends. The first physical page is included in the base per-piece price. Each additional physical page adds $0.20 per piece. A sheet printed front/back counts as one physical page, not two. ## Related - [Pricing Overview](./pricing-overview.md) - [Upgrading Your Plan](./upgrading-downgrading.md) --- ## Plan Comparison # Plan Comparison ## What it is thanks.io offers four plans. Each plan determines your monthly cost, per-piece pricing, and which features you can access. All plans include postage, handwritten-style rendering, no minimums, and no long-term commitments. ## Plans at a glance | Feature | Free | Business | Professional | Enterprise | |---|---|---|---|---| | Monthly cost | $0 | $49/mo | $199/mo | Contact sales | | Per-piece pricing | Standard rates | Discounted | Lowest | Custom | | API access | - | ✓ | ✓ | ✓ | | Webhooks | - | ✓ | ✓ | ✓ | | QR codes & tracking | - | ✓ | ✓ | ✓ | | Campaigns (all types) | - | ✓ | ✓ | ✓ | | Address Verification | - | ✓ | ✓ | ✓ | | Suppression Lists | - | ✓ | ✓ | ✓ | | Sub-accounts | - | ✓ | ✓ | ✓ | | AI generation & AI Fonts | ✓ (basic) | ✓ | ✓ | ✓ | | Per-recipient AI messaging | - | ✓ | ✓ | ✓ | | Dedicated account manager | - | - | ✓ | ✓ | | Design & messaging services | - | - | ✓ | ✓ | | Slack support | - | - | ✓ | ✓ | :::warning Per-piece prices are not listed here - they change. Always check [thanks.io/pricing](https://www.thanks.io/pricing) for current rates before budgeting a campaign. ::: ## What every plan includes (including Free) - Send all five mailer types (postcards, letters, Notecards, gift cards, MagnaCards) - Handwritten-style rendering and AI Fonts - Standard or First Class postage - International delivery - Canva integration - Pay-per-use data services (address append, radius search) - Chat and email support - No minimums, no commitments ## Which plan is right for you? **Free** - Try thanks.io with no monthly fee. You can send one-off pieces immediately. Campaigns, QR tracking, and most personalization features are not included. **Business** - The right choice for most growing teams. You get discounted per-piece rates, full campaign access (drip, birthday, holiday, Neighbor Blast, evenFLOW), QR tracking, webhooks, sub-accounts, suppression lists, address verification, and per-recipient AI messaging. **Professional** - For high-output senders who want the lowest per-piece rates and white-glove support. Everything in Business, plus a dedicated account manager, design and messaging services, and Slack access to the thanks.io team. **Enterprise** - Custom enterprise tier. Contact the thanks.io sales team for pricing and SLA details. ## Tips & best practices - Start on Free to verify the workflow before committing to a paid plan. - Upgrade to Business as soon as you need campaigns or QR tracking - the discounted per-piece rates often offset the monthly fee at moderate send volumes. - Yearly plans include a subscription discount on paid tiers. ## Limits & gotchas - There are no unlimited-send tiers. Every piece has a per-piece cost regardless of plan. - Nonprofit postage rates are available on all plans; contact thanks.io to verify eligibility. ## Related - [What is thanks.io?](./what-is-thanks-io.md) - [Sign Up and Send Your First Mailer](./sign-up-and-first-send.md) - [Dashboard Tour](./dashboard-tour.md) --- ## Pricing Overview # Pricing Overview thanks.io uses a two-part pricing model: a **monthly plan fee** plus a **per-piece charge** for every mailer you send. The per-piece charge covers design, print, and postage - no hidden fees. > All pricing is subject to change. Always verify current rates at [thanks.io/pricing](https://www.thanks.io/pricing). | Tier | Monthly fee | Key features | |---|---|---| | **Free** | $0/month | Core sending, API access, no minimums, no commitments | | **Business** | See [pricing page](https://www.thanks.io/pricing) | Automation, QR tracking, webhooks, campaigns, subaccounts | | **Professional** | See [pricing page](https://www.thanks.io/pricing) | Everything in Business + dedicated account manager, Slack support, design services | | **Enterprise** | Contact sales | Custom pricing for enterprise and high-volume senders | ## What every tier includes (even Free) - No minimums and no commitments - Canva integration - Pay-per-use data services - Chat/email/1-on-1 support - Postage included in per-piece pricing ## What requires Business or above - Webhooks - All campaign types (evenFLOW, Days After Added, Birthday/Holiday, Neighbor Blast) - QR code tracking and scan notifications - Subaccounts - Suppression Lists, Address Verification, CSV export - Zapier, Make, and automation platform integrations ## Related - [Per-Piece Rates](./per-piece-rates.md) - [Upgrading or Downgrading Your Plan](./upgrading-downgrading.md) - [Managing Payment Methods](./managing-payment-methods.md) --- ## Upgrading or Downgrading Your Plan # Upgrading or Downgrading Your Plan ## How to change your plan 1. Go to **Account → Billing → Change Plan**. 2. Choose the plan you want to move to. 3. Confirm the change. On upgrade, you immediately gain access to the new tier's features. On downgrade, features that aren't included in the lower tier are deactivated at the next billing cycle. ## What to expect on downgrade If you downgrade from Business to Free: - Campaigns, QR tracking, webhooks, subaccounts, and other Business-only features are deactivated - API access remains active - the API is available on all plans - Existing mailing lists, templates, and orders remain accessible ## Tips - Upgrade at any time - changes take effect immediately. - If you want to downgrade mid-cycle, wait until near the end of your billing period to maximize value from your current plan. - Contact support for Enterprise pricing. ## Related - [Pricing Overview](./pricing-overview.md) - [Yearly Discounts](./yearly-discounts.md) --- ## Yearly Discounts # Yearly Discounts thanks.io offers annual billing at a discount compared to month-to-month. When you switch, you are charged for the full year upfront at the discounted rate. > The exact discount is on [thanks.io/pricing](https://www.thanks.io/pricing). ## How to switch to annual billing 1. Click the **gear icon** (⚙️) in the top right to open **Account Settings**, then click **Subscription Plan**. 2. Find the **Billing Cycle** selector (Monthly / Annual). 3. Switch to **Annual**. 4. Review the total amount charged upfront, then click **Confirm**. ## Tips - Combine annual billing with the highest plan tier you need - you get both the subscription discount and lower per-piece rates. - Enterprise plans have custom pricing - annual discounts for Enterprise are negotiated with sales. ## Related - [Upgrading / Downgrading](./upgrading-downgrading.md) - [Pricing Overview](./pricing-overview.md) --- ## QR Analytics & Export # QR Analytics & Export ## Where to find QR scan data QR scan data is available in two places: 1. **Analytics dashboard** - aggregate scan counts, scan rates, and breakdowns by campaign or mailing list 2. **Global Scan List (All QR Scans)** - the live list of scan recipients, filterable and exportable ## Analytics dashboard Go to **Analytics** in the left navigation to see: - Total QR scans across all campaigns - Scan rate (scans ÷ total pieces sent) - Breakdown by Image Template or mailing list - Time-based scan trends ## Exporting scan data To export QR scan data: 1. Go to **Mailing Lists** in the left navigation. 2. Open the **All QR Scans** system list. 3. Click **Export**. 4. Download the CSV with recipient details, scan event timestamps, and source URL. The export includes the source campaign or mailing list for each scan, allowing you to attribute engagement back to the specific mailer. ## Tips & best practices - Monitor scan rate as the primary engagement KPI for your campaigns. A strong scan rate (compared across templates) signals that the design and CTA are working. - Export scan data regularly and import it into your CRM to keep engagement records current. - Compare scan rates across Image Templates to identify which designs drive more engagement. ## Limits & gotchas - Scan data is PII-adjacent - treat exports carefully. ## Related - [Global Scan List](./global-scan-list.md) - [QR Scan Notifications](./notifications.md) - [Analytics Dashboard](../06-account-settings/analytics-dashboard.md) --- ## Dynamic QR URLs # Dynamic QR URLs ## What it is A dynamic QR URL contains replacement variables in the destination URL field. When thanks.io generates each mailer, it substitutes the variables with that recipient's real data - so each QR code points to a unique URL for that person. ## Example URL in the Message Template: ``` https://yoursite.com/welcome?name=~FIRST_NAME~&agent=~YOUR_FULL_NAME~ ``` For a recipient named "Sarah", the QR code points to: ``` https://yoursite.com/welcome?name=Sarah&agent=Jane%20Smith ``` ## How to set it up 1. Open a Message Template. 2. In the **QR Code** URL field, type your base URL and insert replacement variables using `~VARIABLE~` syntax. 3. Save the template. 4. Preview with a test recipient to confirm the URL resolves correctly. ## Common variable uses in QR URLs | Variable | Example use | |---|---| | `~FIRST_NAME~` | Pre-fill a form with the recipient's name | | `~ADDRESS~` | Pass address to a personalized landing page | | `~CUSTOM1~` | Carry a CRM ID, coupon code, or lead source parameter | | `~YOUR_COMPANY~` | Identify the sending agent or business | See [Replacement Variables](../07-ai-and-personalization/replacement-variables.md) for the full list. ## Tips & best practices - Test dynamic URLs with multiple recipients before a campaign launch - a missing `~CUSTOM1~` renders as an empty string in the URL, which may break your destination page. - Use `~CUSTOM1~`-`~CUSTOM10~` to carry CRM IDs or coupon codes from your data source into the QR URL. - Keep dynamic URLs simple. The more variables you include, the more edge cases to test. ## Limits & gotchas - Variables in the URL are substituted in plain text - do not pass sensitive identifiers (SSNs, tokens) as URL parameters. - The URL must be publicly accessible; private or localhost URLs will not work. ## Related - [Enabling QR Codes](./enabling-qr-codes.md) - [Replacement Variables](../07-ai-and-personalization/replacement-variables.md) --- ## Enabling QR Codes # Enabling QR Codes ## How to enable a QR code 1. Go to **Message & QR Templates** and open or create a template. 2. In the **QR Code** URL field, enter your destination URL: - **Custom URL** - any publicly accessible URL (booking page, product page, landing page) - **Default thanks.io landing page** - click **Use thanks.io Default** for the built-in recipient greeting page - **Dynamic URL** - use replacement variables in the URL field (e.g., `https://yoursite.com/welcome?name=~FIRST_NAME~`) for per-recipient links 3. Click **Save**. ## Tips & best practices - Use the thanks.io default landing page for campaigns where you don't have a specific URL - it greets the recipient by name automatically. - For high-intent campaigns, use a custom URL pointing to your booking calendar or product page. - Always test your QR URL by scanning a preview piece before launching a campaign. - Combine with **Move Recipient on Scan** to automate follow-up when someone scans. ## Setting a QR code for an entire mailing list You can set a default QR code URL at the mailing list level. Every recipient on that list will receive that URL as their QR code destination, unless a more specific URL is configured elsewhere. 1. Go to **Mailing Lists** and open the list. 2. Scroll down to the **Tracking URL** section. 3. Enter your destination URL in the **QR Code URL (optional)** field. 4. Click **Update**. ![Mailing list Tracking URL section](/img/mailing-list-tracking-url.png) :::note The **Tracking URL** section requires a Business plan. ::: ### QR code priority order When multiple QR URLs are set, thanks.io uses the highest-priority one: | Priority | Where it is set | |---|---| | 1 (highest) | Mailing List - **Tracking URL** | | 2 | Message Template - QR Code URL field | | 3 | Zapier / API | ### VisitorView retargeting lists and QR URLs For VisitorView retargeting lists, the Tracking URL section works the same way - set a URL there to override the Message Template's QR destination for everyone on that list. ## QR placement on your mailer Where the QR code appears on the finished piece depends on the mailer type: | Mailer type | Where QR appears | |---|---| | Most mail types (letters, cards, etc.) | Controlled by the **Message Template** - enter a URL and check the preview to see the position | | Postcard (front/design side) | Can be added to the design side by using a [Dynamic Template](../05-templates-and-design/overview.md) | | Gift Cards | QR codes are not available | ### Placing a QR code on the front (design side) of a card ![Dynamic Image Template with QR Code](../../static/img/enabling-qr-codes-image.png) By default, the QR code is placed on the back of most mailers. If you want the QR code to appear on the **front** of a card — for example, on a real estate "just listed" postcard linking directly to the property website - use a **Dynamic Image**. [Dynamic Images](../07-ai-and-personalization/dynamic-images.md) let you generate a QR code image on the fly from a per-recipient URL and embed it anywhere in your card design, including the front. **Steps:** 1. In your card design, add a **Dynamic Image** element in the location where you want the QR code to appear. 2. Set the Dynamic Image source to generate a QR code from the property URL (e.g., the listing page on your website). 3. To make it per-recipient, use a replacement variable such as `~CUSTOM_FIELD_1~` in the URL so each card links to the correct listing. 4. Save and preview the design - the QR code will render on the front of each printed card. :::tip[Real estate use case] For just-listed campaigns, set the Dynamic Image URL to the individual property listing page. Prospects who scan the QR code on the front of the card are taken directly to the property website, no need to flip to the back. ::: ## Limits & gotchas - QR configuration is per-template. If the same template is used across multiple campaigns, they all share the same QR destination URL. - The QR code on each piece is unique to that recipient even when the base URL is the same - thanks.io appends tracking parameters automatically. ## Related - [Dynamic QR URLs](./dynamic-urls.md) --- ## Global Scan List # Global Scan List ## What it is The Global Scan List is a mailing list called **All QR Scans** that thanks.io maintains automatically. Every time a recipient scans any QR code on any mailer in your account, they are added to this list - regardless of which campaign, mailing list, or send the mailer came from. This gives you a single, unified segment of your most engaged recipients across all campaigns. Each scan event includes context about where the scan came from (source order and source mailing list) so you know which campaign drove the engagement. ## How to use it for follow-up 1. Create a **Days After Added** campaign (or any campaign type). 2. Bind it to the **All QR Scans** list. 3. Set a 1-3 day delay. 4. Attach a follow-up Image Template and Message Template. 5. Enable the campaign. Anyone who scans any mailer now enters your follow-up automatically - no per-campaign configuration needed. ## Tips & best practices - The Global Scan List is the easiest way to build a universal follow-up - configure it once and forget it. - Check the list regularly to identify your most engaged recipients. Sort by most recent scan to find hot leads. - Use the scan context (source campaign) to personalize the follow-up message - a recipient who scanned a Just Listed card should get a different follow-up than one who scanned a gift card. ## Limits & gotchas - Recipients are added to All QR Scans in addition to any Move Recipient on Scan destination - the Global Scan List is cumulative. - If the same recipient scans multiple times, they remain on the list and each scan is logged as a separate event. ## Related - [QR Analytics & Export](./analytics-and-export.md) - [QR Scan Notifications](./notifications.md) --- ## QR Scan Notifications # QR Scan Notifications ## What it is When a recipient scans the QR code on a mailer, thanks.io can notify you instantly via: - **Email** - a notification to your account email with the recipient's name, address, and scan timestamp. To CC additional recipients on these emails, add them to the Message Template. - **SMS/Text** - a text message to your registered phone number - **Webhook** - a POST request to your configured endpoint with the full scan event payload ## How to configure notifications 1. Click the **gear icon** (⚙️) in the top right to open **Account Settings**. Email and SMS toggles are in the **Notifications** section. 2. For webhooks, click the **Webhooks** tab, enter your endpoint URL, and optionally configure a signing secret. 3. Save. ## Webhook payload The scan webhook payload includes: - Recipient name and address - Source mailing list and campaign - Scan timestamp - QR destination URL scanned - Thanks.io recipient ID (for CRM correlation) See [Webhooks](https://docs.thanks.io) for the full payload schema and verification guide. ## Tips & best practices - Enable email notifications for high-value campaigns (real estate, VIP clients) so you can follow up personally within minutes of a scan. - For high-volume campaigns, use webhooks to push scan events into your CRM automatically rather than receiving individual emails. - Webhook delivery is at-least-once - build idempotent consumers to handle duplicate delivery. - Test your webhook endpoint with a preview scan before launching a campaign. ## Limits & gotchas - SMS notifications require a registered phone number in your account settings. - Webhook payload format may evolve - subscribe to the thanks.io changelog to stay informed. ## Related - [Global Scan List](./global-scan-list.md) - [Webhooks](https://docs.thanks.io) --- ## QR Tracking Overview # QR Tracking Overview ## What it is QR tracking makes every physical mailer measurable. When you include a QR code in a Message Template, thanks.io generates a unique, trackable link for each recipient. When someone scans, thanks.io: - Fires an instant notification to you (email, text, or webhook) - Optionally moves the scanning recipient to a new mailing list (triggering a follow-up campaign automatically) - configured on the mailing list page under **When Someone Scans a QR Code…** - Optionally appends missing email or phone data to the recipient's record - configured in **Account Settings → Mail Preferences → Append on Scan** - Logs the scan in your analytics dashboard - Adds the recipient to the **Global Scan List** for easy cross-campaign follow-up ## How QR tracking works 1. You configure a QR code in a Message Template - either with a custom URL or the thanks.io default landing page. 2. At send time, each recipient's mailer gets a unique QR code that encodes their recipient ID and destination URL. 3. When a recipient scans, thanks.io logs the scan event, fires notifications, and runs lifecycle automations. ## What happens on a scan | Event | What happens | |---|---| | Recipient scans QR | Scan logged; notifications sent | | Move Recipient on Scan | Recipient moved to destination list | | Append on Scan | Email/phone looked up and appended ($0.20/lookup) | | Global Scan List | Recipient automatically added to "All QR Scans" | ## Tips & best practices - Enable QR on every Message Template by default - there is no reason to send mail without tracking. - Connect scans to a follow-up campaign via Move Recipient on Scan for fully automated lead nurturing. - Review the Global Scan List regularly - it is your most engaged segment across all campaigns. - Use analytics to compare scan rates across different Image Templates and Message Templates. ## Limits & gotchas - QR scan webhooks are at-least-once delivered - build idempotent webhook consumers. - Append on Scan costs $0.20 per lookup and is off by default. ## Related - [Enabling QR Codes](./enabling-qr-codes.md) - [QR Analytics & Export](./analytics-and-export.md) --- ## Creating Subaccounts # Creating Subaccounts ## How to create a subaccount 1. Log in to your **parent account**. 2. Open **Account Settings** (gear icon, top right) and click the **Sub Accounts** tab. 3. Click **Add Sub Account**. 4. Enter the subaccount name and contact details. 5. Click **Save**. The subaccount appears immediately in the subaccount switcher in the left sidebar. ## Switching into a subaccount 1. Use the subaccount switcher in the **left sidebar**. 2. Select the subaccount from the list. 3. The dashboard reloads scoped to that subaccount. All work done after switching (creating lists, sending mail, configuring webhooks) is scoped to the selected subaccount. ## Tips & best practices - Create the subaccount before starting any client work so all assets are isolated from the start. - Set up Branding Builder inside each subaccount before creating any Image Templates. - Use a consistent naming convention (e.g., "ClientName - Region") to keep the switcher easy to scan. ## Related - [Subaccounts Overview](./overview.md) - [What is Scoped to a Subaccount](./scoping.md) --- ## Subaccounts Overview # Subaccounts Overview ## What it is A subaccount is a child account that lives under your parent thanks.io account. Each subaccount has its own isolated workspace - its own mailing lists, recipients, templates, campaigns, orders, and webhooks - while billing rolls up to the parent account. Subaccounts let you manage multiple distinct brands or clients from a single thanks.io login, without mixing their data. You switch between accounts using the account switcher in the top navigation. ## When to use it - **Agencies** managing direct-mail campaigns for multiple clients - each client gets their own subaccount with separate branding, lists, and reporting - **Enterprises** with separate brand divisions or regional teams that need isolated campaign management - **High-volume senders** who need strict data separation across business units - Any scenario where you need one bill but multiple isolated workspaces ## How to create a subaccount 1. Log in to your parent account. 2. Click the **gear icon** (⚙️) in the top right to open **Account Settings**, then click the **Sub Accounts** tab. 3. Click **Add Sub Account**. 4. Enter the subaccount name and contact details. 5. Click **Save**. Once created, switch into the subaccount using the subaccount switcher in the left sidebar. All actions (sending mail, creating templates, managing lists) are scoped to that subaccount only. ## Tips & best practices - Name subaccounts clearly (e.g., "Client Name - Brand A") so the account switcher stays navigable. - Set up Branding Builder within each subaccount before creating templates - branding is scoped per subaccount. - Create webhook subscriptions inside the subaccount context so events are scoped correctly to that client. - Use the parent account as your billing and admin hub; do day-to-day work inside each subaccount. ## Limits & gotchas - Billing always rolls up to the parent. The parent account's payment method is charged for all subaccount activity. - The plan tier is shared - all subaccounts inherit the parent's plan tier and feature set. - You cannot move mailing lists or templates between subaccounts. ## Related - [Creating Subaccounts](./creating-subaccounts.md) - [What is Scoped to a Subaccount](./scoping.md) --- ## What is Scoped to a Subaccount # What is Scoped to a Subaccount ## Scoped per subaccount (isolated) The following data is created and visible only within the subaccount where it was created: | Resource | Scoped to subaccount? | |---|---| | Mailing Lists | Yes | | Recipients | Yes | | Image Templates | Yes | | Message Templates | Yes | | Campaigns | Yes | | Orders | Yes | | Webhooks | Yes | | Branding Builder settings | Yes | | Suppression Lists | Yes | ## Shared with the parent | Resource | Shared with parent? | |---|---| | Billing (payment method, invoices) | Yes - parent pays for all subaccounts | | Plan tier and feature access | Yes - all subaccounts inherit the parent's plan | ## Tips & best practices - Build all client-specific assets while inside the client's subaccount context. - If you can't find a list or template, check which account context you're in via the account switcher. - Set up Branding Builder inside each subaccount before creating templates. ## Main account–only settings Some settings and features are only accessible from the main (parent) account. If you notice an option is greyed out or unavailable while inside a subaccount, switch back to your main account using the account picker on the left-hand side of the interface. Examples of items that require main account access: - Billing and payment methods - Plan management and upgrades - Creating and deleting subaccounts - Account-level API keys ## Limits & gotchas - You cannot share or copy Mailing Lists, templates, or campaigns between subaccounts or between a subaccount and the parent. - Webhooks created in the parent account do not receive events from subaccounts - create webhooks inside each subaccount. ## Related - [Subaccounts Overview](./overview.md) --- ## Address Verification Failed # Address Verification Failed ### Symptom: Address marked as invalid even though it looks correct 1. Check for typos in the street number, street name, and city spelling. 2. Try expanding abbreviations - use "Street" instead of "St" or "Avenue" instead of "Ave." 3. Confirm the ZIP/postal code matches the city and state. 4. Add or correct the unit/suite/apartment number if applicable. --- ### Symptom: All records failing after upload 1. View a few failing recipients and confirm address fields are in the correct columns (street, city, state, postal code are separate, not concatenated). 2. Confirm the `country` field uses the correct 2-letter code (e.g., `US`, `CA`). 3. Export a few failing rows, fix the format manually, and re-upload to a test list to confirm the corrected format passes. ## Related - [CSV Upload & Format](../04-mailing-lists/csv-upload-and-format.md) --- ## API Authentication Errors # API Authentication Errors ### Symptom: 401 Unauthorized on every request 1. Confirm you're including the token as a Bearer token: `Authorization: Bearer YOUR_TOKEN`. 2. Check for leading/trailing whitespace in the token value - copy it fresh from the dashboard. 3. Confirm the token still exists in **Settings → API Tokens**. 4. If you recently rotated the token, update it everywhere it's used. --- ### Symptom: API token not working after creation 1. Confirm you copied the full token at creation - it's only shown once. If you missed it, delete it and create a new one. 2. Wait 30 seconds and retry. 3. Test with a simple `GET` request (e.g., list mailing lists) to rule out endpoint-specific issues. --- ### Symptom: OAuth token expired 1. Implement the OAuth token refresh flow - refresh before expiry using the refresh token. 2. If the refresh token itself expired, redirect the user through the OAuth authorization flow again. 3. Check the `expires_in` value and set a proactive refresh timer (e.g., 60 seconds before expiry). ## Related - [Authentication](https://docs.thanks.io) - [API Overview](../08-api/overview.md) --- ## Campaign Not Triggering # Campaign Not Triggering ### Symptom: Campaign is enabled but no mail sent 1. Confirm both an Image Template and a Message Template are assigned to the campaign action. 2. Confirm the mailing list has recipients that are not all marked invalid or suppressed. 3. For Days After Added campaigns, confirm the delay period has elapsed for the recipients in the list. 5. Review the Billing History for billing errors. --- ### Symptom: Campaign fired for some recipients but not others 1. Check each skipped recipient for an "Invalid" address status or suppression list membership. 2. Check whether skipped recipients were mailed within the last 36 hours - Duplicate Prevention will block them. 3. For Birthday/Holiday campaigns, confirm skipped recipients have valid birth dates or that the target date is set correctly. --- ### Symptom: "Duplicate Prevented" on expected campaign orders Duplicate Prevention is working as intended - the recipient received mail within the last 36 hours. To avoid this: 1. Stagger campaign timing so recipients aren't targeted by two campaigns within the same 36-hour window. 2. Check whether a recipient appears in the source list more than once. --- ### Symptom: evenFLOW campaign paused unexpectedly 1. Check whether the list still has eligible recipients. Add new recipients to resume. 2. If you want the campaign to loop after exhausting the list, enable the **loop** option in the evenFLOW settings. ## Related - [Campaigns Overview](../09-campaigns/overview.md) - [evenFLOW Daily Limit](../09-campaigns/evenflow-daily-limit.md) - [Duplicate Prevention](../04-mailing-lists/duplicate-prevention.md) --- ## Contact Support # Contact Support ## Try self-serve first Most issues are faster to resolve with: - www.thanks.io - step-by-step articles - [docs.thanks.io](https://docs.thanks.io) - API reference ## When to contact support - You've followed the troubleshooting guide and the issue persists - You see an error message you don't recognize - An order was sent incorrectly and you need to discuss a resolution - You need data deletion, a full data export, or account closure - You have a billing dispute or refund request ## How to contact | Channel | Access | |---|---| | Help center & tickets | www.thanks.io | | Email | [support@thanks.io](mailto:support@thanks.io) | | Chat | Dashboard chat icon (lower corner) | | Dedicated account manager | See account settings | | Slack | Invite link in onboarding materials | ## What to include in your request A complete request gets resolved faster: - **Account email** - the email associated with your thanks.io account - **Order ID(s)** - from the Orders section or email receipts - **List ID or campaign name** - if the issue involves a list or campaign - **Exact error message** - copy/paste, not a paraphrase - **Steps to reproduce** - numbered sequence leading to the issue - **Expected vs. actual behavior** - **Screenshots** For API issues, also include: - Endpoint called (e.g., `POST /api/v2/send/postcard`) - HTTP status code - Full response body (redact any tokens first) ## Related - [API Authentication Errors](./api-auth-errors.md) - [Webhook Delivery Problems](./webhook-delivery.md) - [CSV Upload Issues](./csv-upload-issues.md) --- ## CSV Upload Issues # CSV Upload Issues ### Symptom: "CSV upload failed" or no file accepted 1. Confirm the file is saved as `.csv`, not `.xls` or `.xlsx`. 2. Re-save with UTF-8 encoding: in Excel, **File → Save As → CSV UTF-8 (Comma delimited)**. 3. Open in a plain text editor and confirm the first row is a header row with comma-separated values. 4. Remove special characters from the filename. --- ### Symptom: Columns not mapping correctly 1. On the column-mapping screen, manually assign each column to the correct field. 2. Avoid special characters, line breaks, or leading spaces in your column headers. 3. Custom fields must be mapped explicitly to `custom1`-`custom10` - they do not auto-map. --- ### Symptom: Some recipients missing after upload 1. Check your CSV for rows missing a street address - rows without required fields are silently skipped. 2. Remove blank trailing rows. 3. After uploading, compare imported recipient count to your CSV row count (minus the header row). 4. Use the Invalid Address filter to find rows rejected due to verification failures. --- ### Symptom: Addresses showing as invalid after upload 1. Use the **Invalid Address filter** on your mailing list to view flagged recipients. 2. Edit each flagged recipient and correct the address. Verification re-runs automatically on save. 3. If a valid address keeps failing, try reformatting the ZIP code and ensure the state abbreviation matches USPS standards. --- ### Symptom: CSV preview shows scrambled or misaligned data 1. Open in a text editor and look for values with unescaped commas - wrap them in double quotes (e.g., `"Smith, John"`). 2. Confirm the delimiter is a comma (some Excel regional versions export semicolons). 3. Re-export using **CSV UTF-8 (Comma delimited)** and try again. ## Related - [CSV Upload & Format](../04-mailing-lists/csv-upload-and-format.md) --- ## QR Scans Missing or Not Tracked # QR Scans Missing or Not Tracked ### Symptom: No QR code on delivered mailer 1. Open the Message Template used for that order - QR codes are configured in the Message Template, not the Image Template. 2. Confirm the QR code option is enabled and a destination URL is set. 3. Preview the mailer in the dashboard - if no QR code appears in the preview, it won't appear on the printed piece. --- ### Symptom: Scan happened but no email/text notification received 1. Go to **Account Settings → Notifications** and confirm QR scan email notifications are enabled. 2. For text notifications, confirm **Send Notify Text on QR Scan** is on and a phone number is saved. 3. Check your spam folder. 4. Confirm the scan registered in the Global Scan List - if it's listed there but you got no notification, it's a notification configuration issue. --- ### Symptom: QR scan webhook not firing 1. Confirm you subscribed to the **QR Code Scans** event type in your webhook configuration. 2. Verify the endpoint URL is publicly accessible (not localhost or behind a VPN). 3. Use the dashboard **Send Test** to fire a test event. 4. Check your endpoint logs - if requests arrive but fail, ensure your endpoint returns a `2xx` response. ## Related - [Enabling QR Codes](../14-qr-and-tracking/enabling-qr-codes.md) - [Notifications](../14-qr-and-tracking/notifications.md) - [Global Scan List](../14-qr-and-tracking/global-scan-list.md) --- ## Send Wizard and Order Errors # Send Wizard and Order Errors ### Symptom: Send Mail Wizard is stuck and won't advance 1. Scroll up on the current step to check for validation errors. A red warning message or highlighted field usually blocks the **Continue** button. 2. Confirm you have selected both an Image Template and a Message Template. Both are required before the wizard advances to the recipient step. 3. Confirm at least one recipient is added with a valid physical address. 4. If the **Place Order** button is greyed out, check the order summary for any flagged rows - invalid addresses are shown with a warning icon. Remove or fix those rows before placing the order. 5. Try refreshing the page and starting the wizard again. The wizard does not save progress, so you will need to re-enter your choices. --- ### Symptom: Still getting an error after removing a recipient 1. After removing the problem recipient, scroll through the remaining recipient list to confirm no other rows are flagged. 2. If the error message is about a specific field (e.g., address format), click **Edit** on each remaining recipient and verify the address is complete. 3. If the error persists after cleaning up recipients, try submitting a smaller batch (e.g., send in two batches) to isolate the problem row. 4. If you cannot identify the cause, [contact support](./contact-support.md) and share the error message text. --- ### Symptom: Need to re-submit a corrected mailing after an order went out with mistakes 1. Go to the dashboard and click **Orders**. 2. Find the original order and click **Details**. 3. Open the **Re-Submit** dropdown and choose the option that matches your goal: - **Keep Same Addresses** to send again to the full original recipient set. - **Only Failed Addresses** to send only to recipients that failed in the original order (shown only when failures exist). - **Choose New Addresses** to keep the same design and message but pick a different audience. 4. Complete the flow and place the new order. :::note The original order cannot be changed once placed. Re-Submit creates a brand-new order. Standard per-piece costs apply to the new order. ::: ## Related - [Single Send Overview](../03-sending-mail/single-send-overview.md) - [CSV Upload Issues](./csv-upload-issues.md) --- ## Webhook Delivery Problems # Webhook Delivery Problems ### Symptom: Webhook not receiving events 1. Confirm the correct event types are selected (Order Status Change, Order Item Status Change, Order Item Delivered, QR Code Scans). 2. Confirm the endpoint URL is publicly accessible - webhooks cannot reach `localhost` or internal network addresses. 3. Use the **Send Test** feature to send a test event to your endpoint. 4. Confirm the webhook is registered on the correct account/subaccount - events from a subaccount only fire that subaccount's webhooks, not the parent's. --- ### Symptom: Receiving duplicate events thanks.io delivers at-least-once. Return a `2xx` response as quickly as possible, and make your consumer idempotent - store the event ID and skip processing if you've already handled it. --- ### Symptom: Payload missing expected fields 1. Review the full payload structure for each event type at [docs.thanks.io](https://docs.thanks.io/webhooks). 2. Log the raw incoming payload and compare to the documented schema. 3. Use the **Send Test** dashboard feature to capture a sample payload. --- ### Symptom: Endpoint returning 4xx/5xx and events not retrying 1. Fix the underlying error in your endpoint. Check your server logs. 2. `400 Bad Request` usually means a parser mismatch - verify your endpoint parses `application/json`. 3. `401`/`403` means your endpoint is enforcing auth - remove it for the webhook path. 4. Once your endpoint is healthy, send a test event to confirm delivery is restored. --- ### Symptom: Wrong account events being received Webhooks are scoped per account/subaccount. To receive events from both parent and subaccounts at the same endpoint, create a separate webhook subscription in each account context pointing to the same URL. --- ### Symptom: Birthday or thank-you campaign webhook not firing 1. Confirm the campaign is enabled and actively sending. Go to **Automated Campaigns** and check that the Status column shows the automation as ON. 2. Confirm the correct webhook event type is subscribed: **Order Item Status Change** (fires on each piece sent) or **Order Item Delivered** (fires on delivery). Birthday/holiday campaigns create orders just like any other campaign, so the same webhook events fire. 3. Confirm the webhook is registered on the same account or subaccount as the campaign. Subaccount webhooks do not fire on the parent account's webhook subscriptions. 4. Check your webhook endpoint with **Send Test** to confirm delivery is working end to end. 5. If the campaign has never fired at all, check [Campaign Not Triggering](./campaign-not-triggering.md) first. --- ## Related - [Webhooks](https://docs.thanks.io)